Printer Turns Off When I Try to Print [Fix]
It's either the power supply or driver issues to blame!
5 min. read
Updated on
Read our disclosure page to find out how can you help Windows Report sustain the editorial team. Read more
Key notes
- If the printer turns off when you try to print, it's likely the power supply or a firmware issue to blame.
- A quick is to directly connect the printer to the power socket.
- For a few users, updating the printer firmware did the trick, when it was not working.
If you’re trying to use your printer, but it keeps turning on and off, or it turns off unexpectedly and/or repeatedly, you need to fix it before it gets worse.
Most times, your printer appears offline with no warning whatsoever. Then you’re unable to print, copy, scan, or even fax because of low power, or the printer is off. It just won’t respond.
If it is connected to a power outlet with a low power supply problem, your printer may turn off repeatedly.
Here are some solutions you can use to troubleshoot and fix the issue.
How do I stop my printer from turning off?
Before we move to the slightly complex solutions, here are a few quick ones to try:
- Connect the printer directly to the power socket instead of the surge protector.
- Replace the printer cable in case of a wired one.
- Make sure the power cable is not damaged.
- If you use a hub, directly connect the printer to the PC.
- Remove all the non-critical peripherals connected to the PC.
If none work, move to the fixes listed next.
1. Change power settings
1.1. Via Control Panel
- Go to the setup menu.
- Check Energy settings.
- Open the setup menu.
- Click Preferences.
- Click Schedule off.
- Click Auto Power off.
- Click Auto off.
1.2 Via the dedicated software
- Open your printer’s software
- Check energy settings
- Check the Auto Power off or Schedule Off feature
- Search Windows for your printer model
- Select your printer from the list
- Double click Maintain your printer, which opens a toolbox
- Click Advanced settings and make necessary changes to the settings
- Follow the on-screen prompts to complete the process
Your printer is usually designed to reduce power consumption when it is inactive. This function is enabled by the automatic Power Off or Schedule On and Off feature, which makes your printer turn off after 2 hours of inactivity.
Then, when you’re ready to use it again, press the power button to turn it back on. So, check these settings and make sure everything is in order.
If you cannot check the power settings for your printer, or the printer still turns off when you try to print, go to the next solution.
2. Restart the printer
- Turn on your printer.
- Wait till it is idle and silent.
- While the printer is on, disconnect the power cord from the back of the printer.
- Unplug the power cable from the power socket on the wall.
- Wait about a minute or two before plugging back the power cable into the wall socket.
- Reconnect the power cord to the printer.
- Turn on the printer if it doesn’t come on automatically, then let it warm up.
- Wait till the printer is idle and silent.
Restarting your printer may fix any connectivity errors lurking and get things running if the printer turns off when you try to print.
3. Update the printer’s firmware
- Turn on the printer and ensure it is connected to your computer through your local network or USB cable.
- Go to your manufacturer’s support site and enter the model number for your printer.
- Select the operating system.
- Click Firmware (if none is listed, then there’s no currently available update for your printer).
- Click Download.
- Click to use the download and install assistant.
- Click Next
- Click Install now.
- When the printer update window opens, check the serial number displays, then select the checkbox next to it.
- Click Update.
- If the serial number displays but the not applicable status is grayed out, click Cancel.
- If the serial number doesn’t display and your printer uses a network connection, plug in a USB cable to the printer and to the computer, wait about half a minute, then click Refresh. If the serial number displays, select the checkbox next to it, then click Update.
- Once the update is complete, click Ok.
- Remove the USB cable you used to update your printer.
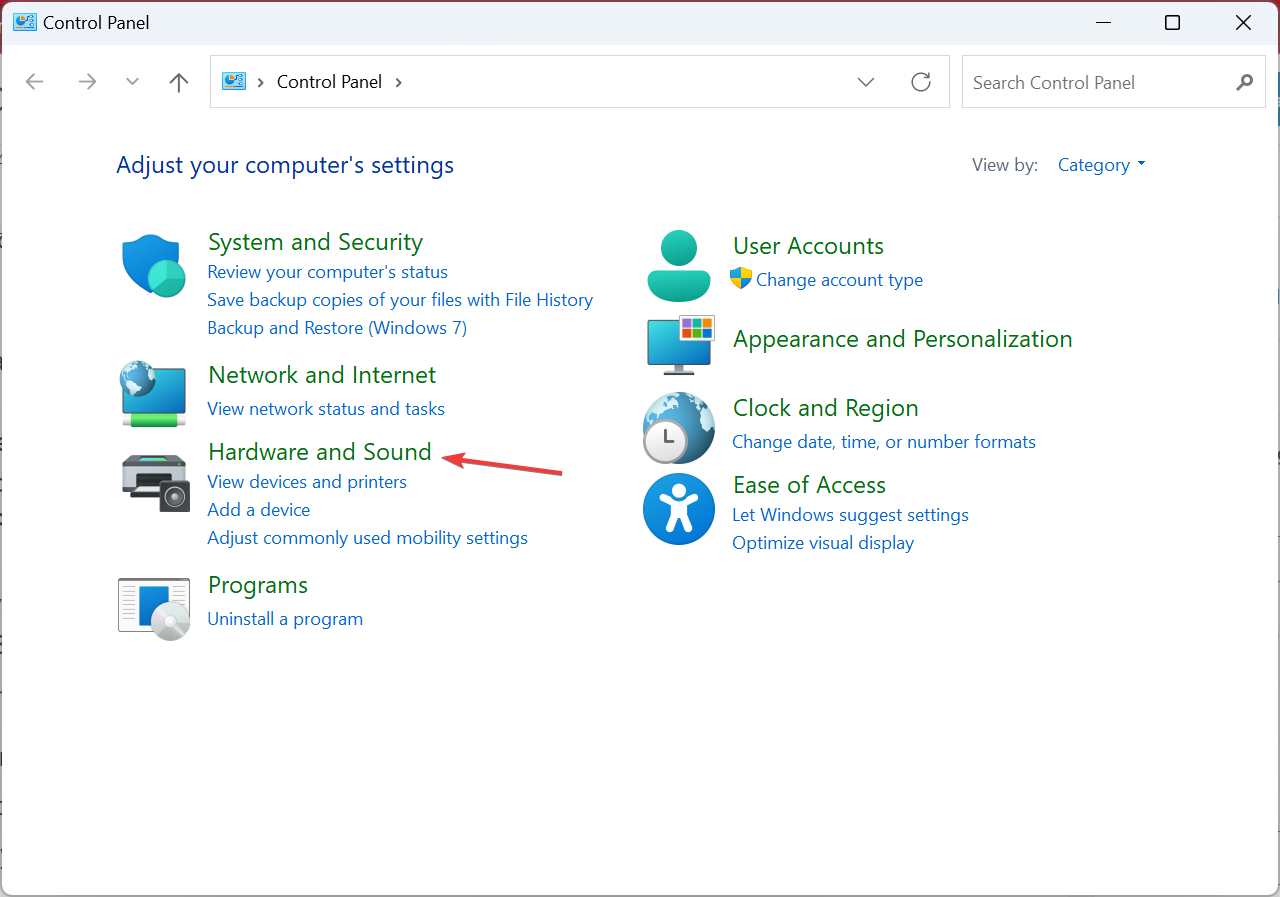
- Right-click Start.
- Select Control Panel.
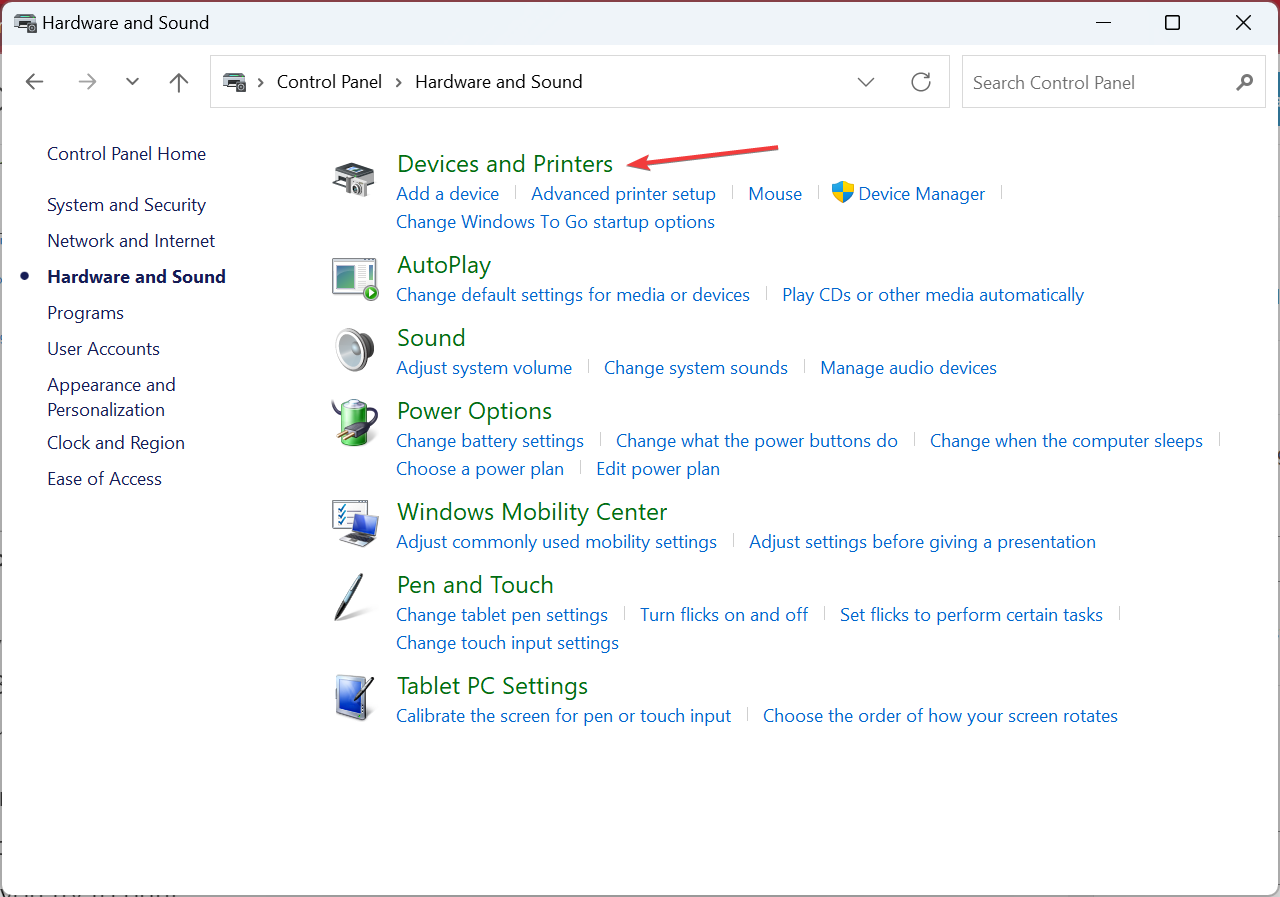
- Click Hardware and Sound.
- Click Devices and Printers.
- Right-click the USB printer device for your model.
- Select Remove device.
- Disconnect the USB cable from both your printer and computer.
- Restart your computer.
Your manufacturer may release regular printer updates, so you need to be online constantly for it to update, and also check on these and update the firmware to fix the problem. Once done, the printer shouldn’t turn off when you try to print.
4. Replace the power module
Depending on your printer model, the power supply may come with a power module inside it or outside the printer.
For an external power module, check if the indicator light is off or if there’s no light after trying the six solutions above. If this is the case, replace the power module.
For an internal power module, if the indicator light is off or there’s no light at all after trying the six solutions above, go to the next solution.
5. Service the printer
As a final resort, you can service the printer to see whether it resolves the issue. For this, we recommend contacting a professional with expertise or the official manufacturer.
They will identify any problems with the device, replace the malfunctioning parts, and get the printer to work seamlessly.
If nothing works, check the best printers available for Windows PC and get a new one.
Let us know in the comments section whether any of these solutions worked.


User forum
0 messages