How to Control a 3D Printer with a Raspberry Pi
6 min. read
Published on
Read our disclosure page to find out how can you help Windows Report sustain the editorial team. Read more
For the uninitiated, 3D printing can seem like a daunting hobby. However, once you figure out how everything works, 3D printing can become fun and enjoyable. For beginners, it might be tempting to just buy a plug-and-play 3D printer to use with Windows 10. Some examples include the Monoprice Select Mini Pro ($250) or the Snapmaker 3-in-1 3D Printer ($800), which offers laser engraving and CNC milling capabilities in addition to 3D printing. Both printers are good entry-level choices but they have a smaller 3D printing footprint and you will quickly find yourself looking to buy a bigger printer when you need to print bigger parts.
If you are interested in finding a 3D printer for beginners, I recommend the Creality 3D Ender 3. It is a good-sized 3D printer that offers consistent quality prints. In addition, the Ender 3 is a self-replicating printer, meaning the printer is capable of printing its own upgrade and replacement parts. Moreover, the printer comes as a DIY kit, which in my opinion is the best way to learn about 3D printing.
I received the Creality 3D Ender 3 as a gift from my wedding registry. I did not know what I was going to print, but I had some general ideas. I researched the web to find the best mid-range 3D printer and came up with the Ender 3. It does take a bit of a learning curve, so if you think you will buy this and be printing perfect 3D prints in no time, you are in for a rude awakening. This YouTube video gives a thorough Ender 3 review as well as some basic 3D prints and printer upgrades. Hovering around $200-$250, the Ender 3 is a great choice for the money, although some assembly is required.
Since I use the Ender 3, I have run into some issues being able to start and stop 3D printing when I am not in front of the printer. The problem with most 3D printers is that the 3D printing companies have not made an effective interface to interact with your 3D printer via your computer. In order to 3D print something, you need to go through a rather arduous process. Here’s what you do when you 3D print items using just the printer.
- Create or download an item from Thingiverse
- Edit the item so that it will successfully print using your printer (temperature settings, scale volume, etc.)
- Transfer appropriate file from your computer to microSD card
- Remove microSD card from the computer and put the microSD card in the printer
- Start print using the printer control menu
This process is frustrating because if there is an issue with the printer settings of the item you want to print, or the temperature settings are off, or something else goes wrong, you have to stop the print manually and begin the process all over again. Everything important is on that microSD card. This proved to be the most frustrating things with my 3D printer and it drove me insane until I found OctoPrint. After that, everything changed.
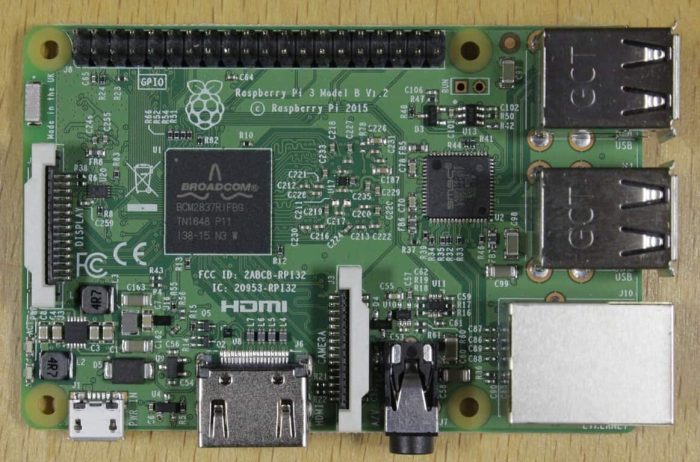
OctoPrint is an open-source web interface for your 3D printer. OctoPrint allows you to drag and drop files on your 3D printer, change printer temperature settings at will and start and stop print jobs. It’s the best and most intuitive. In order to use OctoPrint, all you need is a Raspberry Pi and you will be able to access your 3D printer via your Wi-Fi connection. Here is what you need to do to get OctoPrint up and running: a Raspberry Pi 3B or 3B+, minimum 8 GB microSD card, and OctoPi, a Raspbian-based microSD card image for the Raspberry Pi that includes OctoPrint plus all the dependencies you need to run it. More information is available on the OctoPrint download page.
While it is possible to install OctoPrint on Windows, OctoPrint does not run as consistently using Windows and you may experience unexpected bugs and crashes. The recent news that you can install Windows 10 on ARM on a Raspberry Pi is great, but in my opinion Windows 10 on ARM is not the best OS for the Raspberry Pi. You can just as easily install Windows IoT Core or Windows 10 on ARM, but the Raspberry Pi works best running Raspbian, which is a Linux-based operating system built specifically for the Raspberry Pi. I use a Raspberry Pi 3B and OctoPrint runs well on Raspbian without any issues.
With OctoPrint, you need to download this OctoPrint image file, and follow the instructions on the download page to extract and flash the disc image file to your microSD card, configure your wifi SSID and password, and then boot the Pi from the microSD card. Once you get your Raspberry Pi recognized on your WiFi network, you can connect it to your 3D printer and control your 3D printer’s settings and print projects from any device, and depending on your OctoPrint settings, even control your 3D printer remotely. Personally, I don’t use the mobile access feature because I have fire safety concerns for running my 3D printer unattended.
In my opinion, OctoPrint is the best interface for 3D printing. Octoprint provides an easy interface that offers me control over almost every aspect of my 3D printer through a web browser. I wish I could say that you can use OctoPrint with Microsoft Edge, but OctoPrint works much better using Google Chrome. OctoPrint allows me to control the temperature, see the remaining time left on the print, and stop the print to make adjustments in temperature and printer speed if needed. Overall, I have been very happy with the quality of my 3D prints. Here is an example of my 3D print quality.

The 3D print (Creality 3D Ender 3 Pug) seen above was a larger project that I was able to print after printing smaller pieces consistently. In the beginning, there was a lot of trial and error to find the best temperature and other printer settings to get consistent prints. After I got more consistent prints like the one above, I started printing bigger and larger projects.
The Raspberry Pi is such a capable single-board computer that allows me to add other extras, including a webcam to watch my 3D prints live in OctoPrint. In addition, OctoPrint allows me to add a variety of plugins to enhance the capabilities of my 3D printer through the OctoPrint browser interface. Overall, using OctoPrint with the Raspberry Pi to control my 3D printer via my Windows 10 PC is very convenient. Now, you won’t be printing things perfectly from the start, but once you figure out what works well for your 3D printer, you will find that 3D printing is a rewarding hobby. You can find more ideas on Thingiverse for what you can create.







User forum
0 messages