How to Speed Up Windows 11 Animations & Make Them Smoother
Key notes
- Windows 11 animations, when not done well, can affect the overall performance of the computer.
- Many animations come with Windows 11, and if you don't like them or feel they don't suit you, you can turn them off.
- One of the common ways of increasing their speed is through editing the Registry.

When Microsoft launched Windows 11, it came with many changes. One of the changes was increasing the number of User Interface animations. Some users would like to change the way things appear, and they have to find ways to do it. Having animations makes users feel better and friendlier.
Animations use visual effects to make the computer look more appealing and responsive. Some of them include sliding menus after a few seconds or minutes.
Having many animations on your computer can affect the PC performance, slow down, and affect your work. In such scenarios, you have to shut the animations.
The article will cover several ways users can improve the speed of their animations on the PC. You can use the Registry Editor or the customized file that you run to apply the changes.
How can I increase the speed of Windows 11’s animations?
1. Edit the Registry
- Press Windows + R to open a new Run box and type regedit inside it. Press Enter afterward.

- Enter the following path inside the search bar and locate MenuShowDelay on the right side:
Computer\HKEY_CURRENT_USER\Control Panel\Desktop
- Double click on the MenuShowDelay option and change the Value data option to any choice between 0 and 4000. To speed up the animations, input a small value that ranges from 0 to 150. Click the OK button to apply the changes and restart your PC.

When performing this process, be very careful as it can affect the computer and have some issues like a corrupt file system. It’s a simple method that anyone can implement. If you want to return to your original speed, you can repeat the same process and change the number again.
2. Use the one-click Registry hack
- Download these two files and extract them. You will have two files in the folder named Reduce Menu Animation to 200.reg and Restore Menu Animation to 400.reg.

- Double-click on the Reduce Menu Animation to 200.reg to run it and change the animation speed to 200.
This method works mainly for those who don’t want to use the Registry editor as they feel it’s complicated or hard to understand. If you want to restore the speed to the default, you can use the Restore Menu Animation to 400.reg file.
Both steps are simple to implement, and it takes less than three minutes to be through. However, some users don’t like animations and they prefer the animations disabled, and they treat them as unessential parts of their PC.
How to remove Windows 11’s animations?
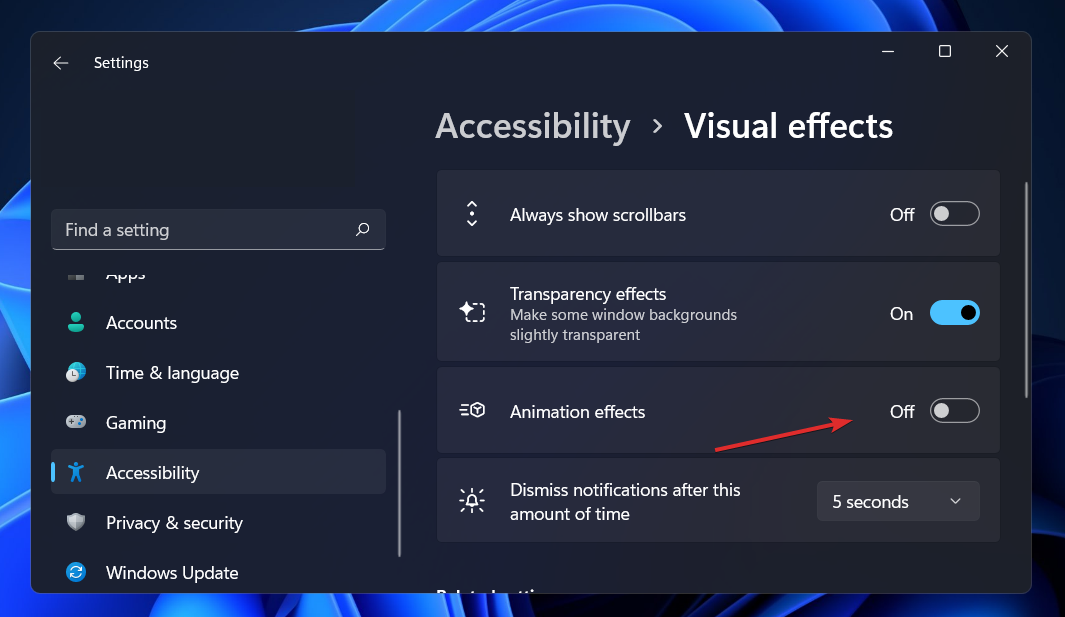
- If your Windows 11 animations are not smooth, you can disable them from the Settings app that you open by holding Windows and I together then navigate to Accessibility followed by Visual effects.

- Next, turn off the toggle next to Animation effects. If you want to turn them back on, simply turn the toggle back on. The changes will apply automatically.

Even while Windows 11’s animation and fading effects are visually pleasing, some users may find that they cause their computers to seem sluggish because they add a little delay to some operations.
This is because the features force some processes to take slightly longer to complete. To provide a user experience that is more responsive, it is straightforward to disable animations.
For more ways in which you can tweak the animation settings, take a look at our dedicated post on how to disable animations in Windows 11.
Alternatively, check out our article on how to enjoy a speedier Windows 11 with Advanced System Settings and optimize your PC.
We hope this guide proved to be helpful to you. As always, don’t hesitate to share your thoughts with us in the comments section below.
Read our disclosure page to find out how can you help Windows Report sustain the editorial team. Read more


Improve this guide


User forum
0 messages