How To Update NVIDIA Drivers on Windows 11: 3 Best Ways
![]() 4 min. read
4 min. read
![]() Published on
Published on
Share this article
Improve this guide
Read our disclosure page to find out how can you help Windows Report sustain the editorial team. Read more

Don’t know how to update NVIDIA drivers on Windows 11? Keep reading!
It can improve the graphics card performance and display quality, fix compatibility issues, add new features, and optimize the overall gaming experience.
In this guide, I’ll discuss three different methods for updating NVIDIA drivers.
Let’s begin!
How To Update NVIDIA Drivers on Windows 11
Here are three simple methods together with their use cases:
- Use Device Manager: If you don’t know your graphics card’s model and other details and want to use a built-in system utility to update drivers
- Use NVIDIA GeForce Experience: If you already have your NVIDIA driver details and want to find relevant updates on the official website
- Use a third-party tool: If you want automatic driver updates without performing any manual actions.
Now, I’ll demonstrate each of these in the upcoming sections. However, you can jump to any of them as per your requirements.
1. Use Device Manager
On Windows 11, the Device Manager tool allows you to search for particular software updates, including NVIDIA drivers. It offers you two options:
- Search for the driver over the Internet.
- Locate and install the driver manually from the local system.
Here’s how to use Device Manager to update NVIDIA drivers on Windows 11:
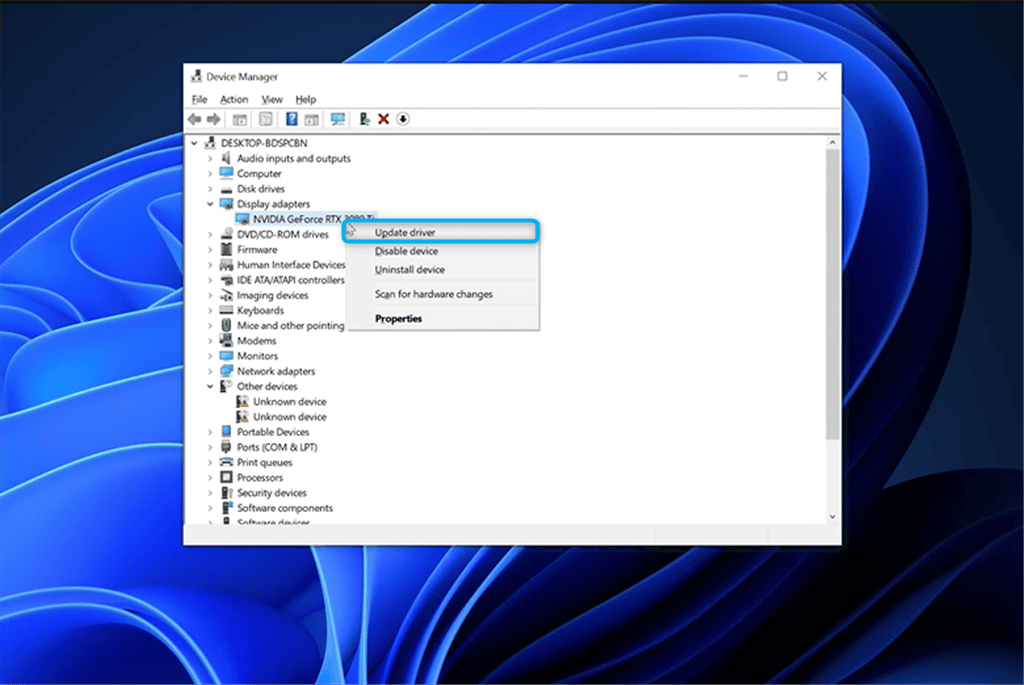
1. Launch the Windows Start menu, search for Device Manager, and click Open.

2. Expand the Display adapters drop-down menu to view your installed NVIDIA driver with version details.

3. Right-click on it and select the Update driver option from the context menu.
4. Switch to the Driver tab and click on the Update Driver button.

5. From the pop-up window, click on Search automatically for drivers.
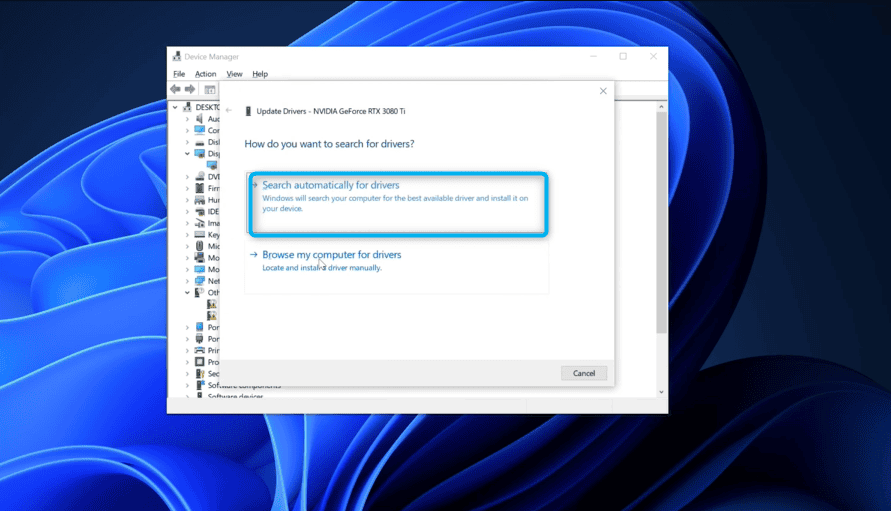
6. As you can see, the best driver for NVIDIA GeForce RTX 3080 Ti is already installed on my PC.

However, you can install the updated version if Windows suggests it after searching.
 NOTE
NOTE
2. Use NVIDIA GeForce Experience
GeForce Experience offers an automated updating system for drivers. You only have to specify your graphics card details and download the latest version straight from the official website.
Here’s how to use it:
1. Navigate to the official website and click on the Manual Driver Search option.

2. Now, enter information regarding your NVIDIA driver, which includes:
- Product Type
- Product Series
- Product
- Operating System
- Language
- Download Type, etc.
Then, click on Start Search.

3. Select the latest version of your NVIDIA driver and click Get Download.

4. Next, hit the Download Now button.

5. Choose the destination folder for the selected NVIDIA driver updater app and click Save.

6. After a successful download, open the updater app.

7. Specify the extraction path or folder where you need to save the NVIDIA driver files.
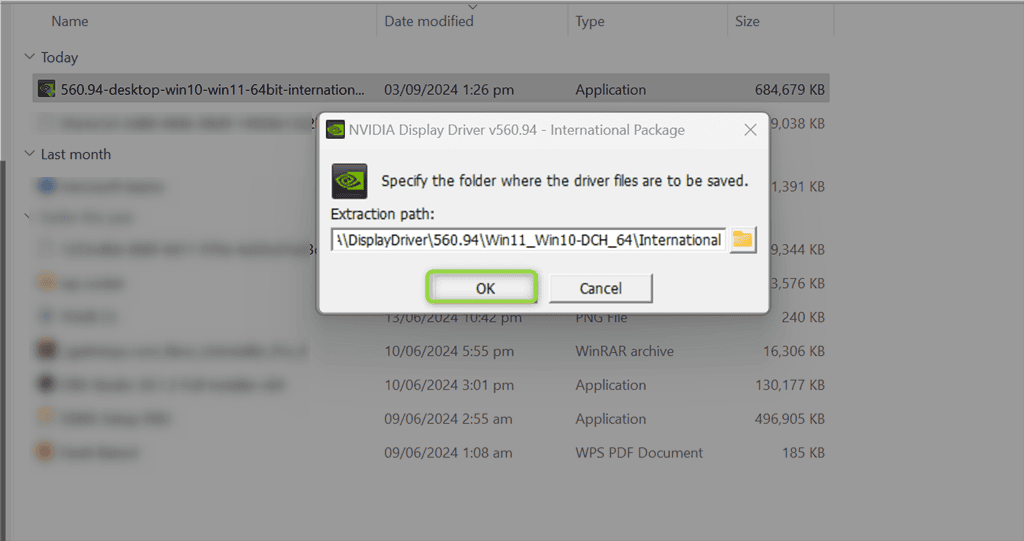
8. Wait for a few minutes while the files are saved to the system.

9. As soon as the NVIDIA driver updater launches, it checks for system compatibility.

10. Select the NVIDIA Graphics Driver and GeForce Experience option and click AGREE AND CONTINUE.

11. Choose the Express (Recommended) installation option and click NEXT.

12. As a result, the NVIDIA Installer prepares to update the relevant driver on your system.

13. Click CLOSE.

3. Use a Third-party Tool
You can also use any third-party tool to update NVIDIA drivers on Windows 11. For instance, on my system, I’ve installed PC HelpSoft Updater Driver. It automatically, downloads, updates, and repairs missing drivers, without requiring any manual actions.
Specifically, using a third-party tool is a suitable solution for those users who prefer to get driver updates automatically.
Now, follow the below steps:
1. First, install and launch your desired driver update software. In my case, I’ll open PC HelpSoft using the Start menu.

2. Click on the Check for drivers option from the right side.

3. Wait for a few seconds until the search is complete.

4. Click on the Fix All button to apply the selected updates.

5. Reboot your system to apply the new changes.
You can select to update all at once or only some.
So now you know how to update NVIDIA drivers on Windows 11. Both Device Manager and NVIDIA GeForce Experience provide manual options. On the other hand, you can perform the same thing automatically with a third-party tool.
You might also want to learn how to update AMD Drivers on Windows 11 and update outdated ones on Windows 10.


User forum
0 messages