How to Fix Media Center Error on Windows 10/11
8 min. read
Updated on
Read our disclosure page to find out how can you help Windows Report sustain the editorial team. Read more
Key notes
- Some users prefer using Media Center for their multimedia needs, but sometimes issues with this application can appear.
- The users reported some common problems you may encounter regarding Windows Media Center, so we covered them.
- You can further read our guide on how to resolve this error through verified solutions that will help you fix it.
- Depending on the issue complexity, you may resolve it just with a clean boot or by performing a system restore.

Some users prefer using Media Center for their multimedia needs, but sometimes issues with this application can appear. Speaking of issues, today we’re going to show you how to fix the most common Media Center errors.
There are many issues that can occur with Media Center, and as for issues, here are some common problems that users reported:
- Windows 10 Media Center not working, stopped working – This problem can occur due to third-party applications. To fix the issue, it’s advised to perform a Clean boot and remove the problematic applications that are interfering with Media Center.
- Windows 10 Media Center decoder error – Sometimes your drivers can be the problem, so if you’re having issues with Media Center, perhaps updating your drivers will fix the problem.
- Windows Media Center Windows 10 won’t start – This is one of the problems that can occur with Media Center, but you should be able to fix it with one of our solutions.
How can I fix Media Center errors on Windows 10?
- Perform a Clean boot
- Perform a chkdsk scan
- Make sure that your drivers are up to date
- Rename the EpgListings directory
- Download the latest updates
- Remove the problematic applications
- Perform a System Restore
Solution 1 – Perform a Clean boot
If you’re having issues with Media Center on your PC, perhaps you might be able to solve the problem simply by performing a Clean boot. In case you don’t know, by performing a Clean boot you’ll completely disable all startup applications and services.
This is quite simple to do, and you can do it by following these steps:
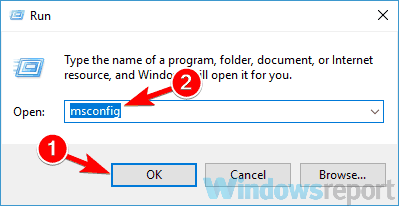
- Press Windows Key + R to open the Run dialog. Now enter msconfig in the input field and click OK or press Enter.
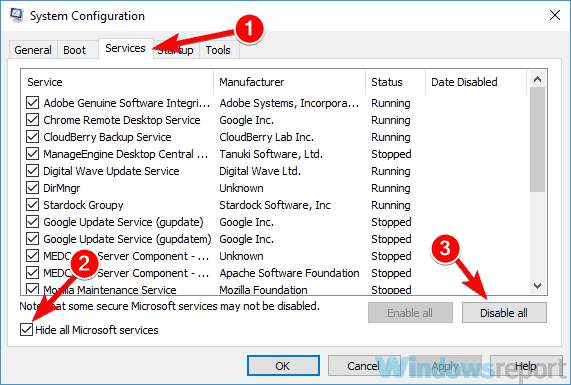
- The System Configuration window will appear. Navigate to the Services tab and check Hide all Microsoft services. Now you need to disable all non-Microsoft services. To do that, just click the Disable all
- After you disable all startup services, you need to do the same for applications. Head over to the Startup tab and click Open Task Manager.
- List of startup applications will now appear. Right-click the first entry on the list and choose Disable from the menu. Repeat this process for all startup applications on the list.
- After you disable all startup applications, close Task Manager and go back to the System Configuration Click Apply and OK to save changes and restart your PC.
Once your PC restarts, check if the problem with Media Center is still there. If not, it’s almost certain that one of the disabled applications or services was causing the issue. To pinpoint the cause, it’s advised to enable applications and services one by one until you manage to pinpoint the cause of the problem.
Bear in mind that you’ll have to restart or at least log out after enabling a set of services or applications in order to apply the changes. Once you find the problematic application or service, you can uninstall it or keep it disabled.
Solution 2 – Perform a chkdsk scan
In some cases, problems with Media Center can occur because the files on your hard drive are damaged. To fix this, it’s advised to perform a chkdsk scan and repair the files. This is actually quite simple to do, and you can do it by following these steps:
- Open Command Prompt as administrator. To do that, press Windows Key + X or right-click the Start button. Now choose Command Prompt (Admin) or PowerShell (Admin) from the menu.
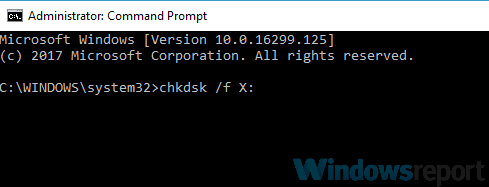
- Command Prompt should now start. Type chkdsk /f :X and press Enter. Bear in mind that you need to scan your system drive, so replace :X with your system drive letter. In most cases, that would be C.
- You’ll be asked to schedule a restart at next reboot. Press Y to confirm.
Now restart your PC. Once the PC boots, the chkdsk scan should start automatically. Bear in mind that this scan can take about 10-20 minutes, depending on the size of your system drive.
Once the scan is finished, check if the problem is still there. If certain files are damaged, the scan can take an hour or more, so keep that in mind.
Solution 3 – Make sure that your drivers are up to date
- Right click on Windows Start button and select Device Manager
- Right click on the Display adapters and select Update driver option
- Select Search automatically for drivers option to install best available drivers
- See if the best drivers for your PC are already installed
Sometimes problems with Media Center can be caused by your drivers. In order for your hardware to work properly with Media Center, your drivers need to be up to date. To fix this problem, you’ll need to ensure that all-important drivers are up to date.
To update your drivers, you’ll need to visit your hardware manufacturer’s website and download the appropriate drivers for your hardware. This can be a bit tedious, especially if you need to update multiple drivers.
However, you can speed this process simply by using third-party software that can download the latest drivers automatically with just a couple of clicks.
Solution 4 – Rename the EpgListings directory
If you’re having problems with Media Center, the issue can be caused by EpgListings directory. To fix the problem, some users are recommending renaming or removing this folder. This is quite simple to do, and you can do it by following these steps:
- Navigate to the C:ProgramDataMicrosofteHomePackages
- Locate EpgListings directory and rename it.
After doing that, the problem should be completely resolved.
Solution 5 – Download the latest updates
If you’re having problems with Media Center on your PC, it’s possible that the issue is caused by certain glitches on your system.
Glitches can sometimes appear if your system isn’t up to date, so to prevent this problem from appearing, it’s important that you keep your system up to date.
Windows 10 usually installs the missing updates automatically, but sometimes issues with Windows updates can occur and you can miss certain updates. Of course, you can always check for updates manually by doing the following:
- Open the Settings app. You can do that quickly by using the Windows Key + I shortcut. Once the Settings app opens, navigate to the Update & Security section.
- Click the Check for updates button in the right pane.
- Windows will now check for available updates. If updates are available, Windows 10 will download and install them automatically.
Once your system is up to date, check if the problem is still there.
Solution 6 – Remove the problematic applications
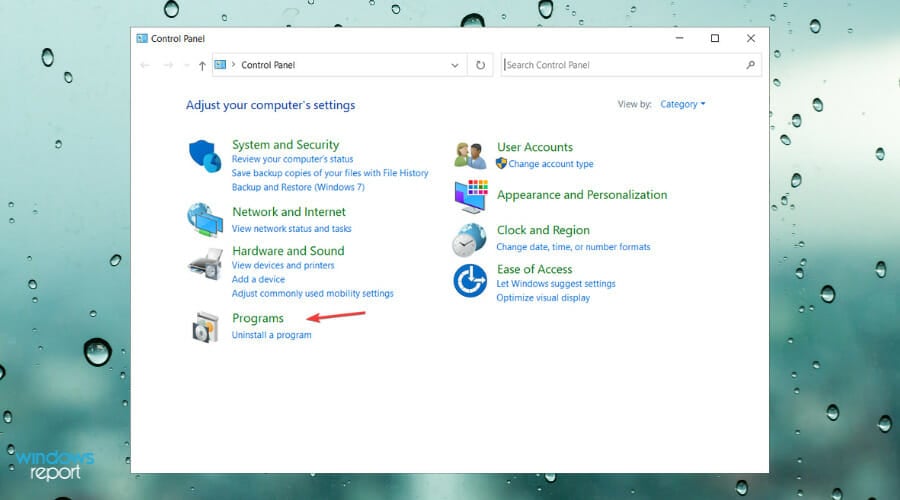
- Type Control Panel in the Search bar
- Find Programs and click on Uninstall a program
- Check the list to uninstall the problematic programs
If you’re having problems with Media Center on your PC, the issue might sometimes be other applications. Third-party applications can interfere with Media Center and they can lead to various issues.
Speaking of problematic applications, many users reported that LogMeIn software and TeamViewer caused these issues to appear. To fix the problem, it’s advised to find and remove these applications from your PC.
There are several ways to do that, but the most effective one is to use uninstaller software.
Uninstaller software is a special application that can remove the selected application from your PC completely. To do that, uninstaller software removes all files and registry entries associated with the application you want to remove.
Once you remove the problematic applications using this software, check if the problem is still there.
Solution 7 – Perform a System Restore
If the problem with Media Center is still there, you might have to perform a System Restore in order to fix the problem. If you’re not familiar, System Restore is a useful feature that allows you to restore your system to and fix various problems.
This feature is incredibly simple to use, and you can restore your system by doing the following:
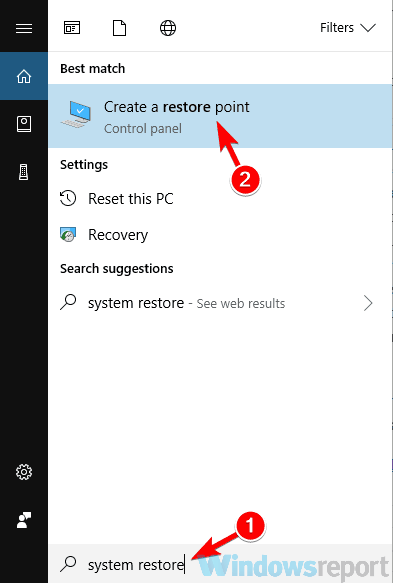
- Press Windows Key + S and enter system restore. Choose Create a restore point from the list.
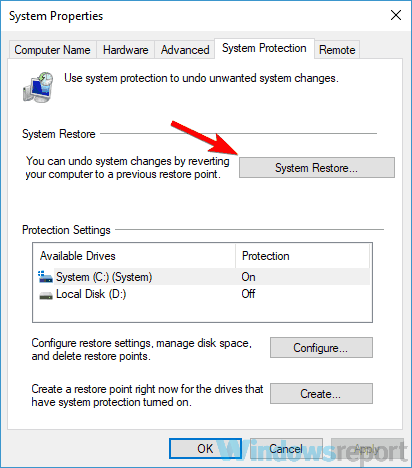
- The System Properties window should now appear. Click the System Restore button.
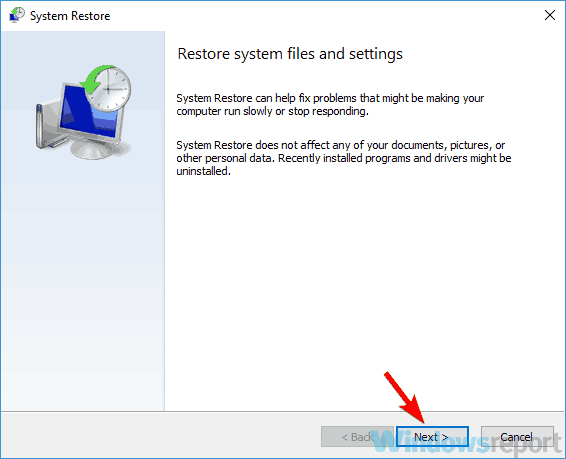
- System Restore window will appear. Click Next to proceed.
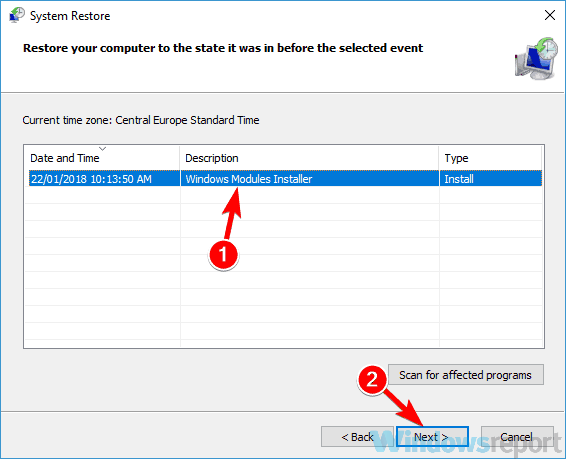
- Check Show more restore points option, if it’s available. Now select the desired restore point and click the Next button.
- Follow the instructions on the screen to complete the process.
Once your system is restored, check if the problem is still there.
Media Center is a useful tool, but sometimes problems with it can occur. However, we hope that you managed to solve your problem after reading this article.







User forum
0 messages