NVIDIA Control Panel Only Shows 3D Settings: 3 Ways to Fix It
Problem generally encountered on devices with two GPUs
Key notes
- The NVIDIA Control Panel only showing 3D settings is usually because integrated graphics cards are the default GPUs for alternative display options.
- If your NVIDIA Control Panel only has 3D settings, more options might appear on it after disabling the onboard GPU.
- Updating graphics card drivers can help when NVIDIA manage 3D settings are not working.
- Restarting the NVIDIA Control Panel might also fix missing settings issues for some users.

Some users have discussed an issue on NVIDIA’s forum that NVIDIA Control Panel only shows 3D settings.
The issue prevents users from accessing or modifying certain things in the NVIDIA Control Panel, which affects the overall graphics experience.
Here’s all you need to know about why NVIDIA Control Panel only shows 3D settings and the solutions that worked for most users.
Why is my NVIDIA control panel only showing 3D settings?
This issue generally arises on laptops with two GPUs, where one is integrated while the other is NVIDIA.
In this case, sometimes, the BIOS configuration is such that the integrated graphics card controls certain settings, and as a result, NVIDIA Control Panel only shows 3D settings on the laptop.
Also, the problem may lie with the NVIDIA Control Panel application itself, or the driver may be outdated.
Since it’s difficult to identify the problem, we recommend executing the steps in the same sequence as they are listed to fix things when NVIDIA Control Panel display settings are missing.
What can I do if I can only see 3D settings in NVIDIA’s Control Panel?
1. Update drivers for NVIDIA graphics cards
As the missing settings on the NVIDIA Control Panel can pertain to antiquated graphics card drivers, an advanced driver updating tool is a potential resolution.
Note: If your NVIDIA graphics card already has the latest driver, uninstall the NVIDIA GPU via Device Manager. Then you can utilize this tool to reinstall its driver.
2. Disable your PC’s integrated GPU
- Open the NVIDIA Control Panel and click Manage 3D settings on the left.
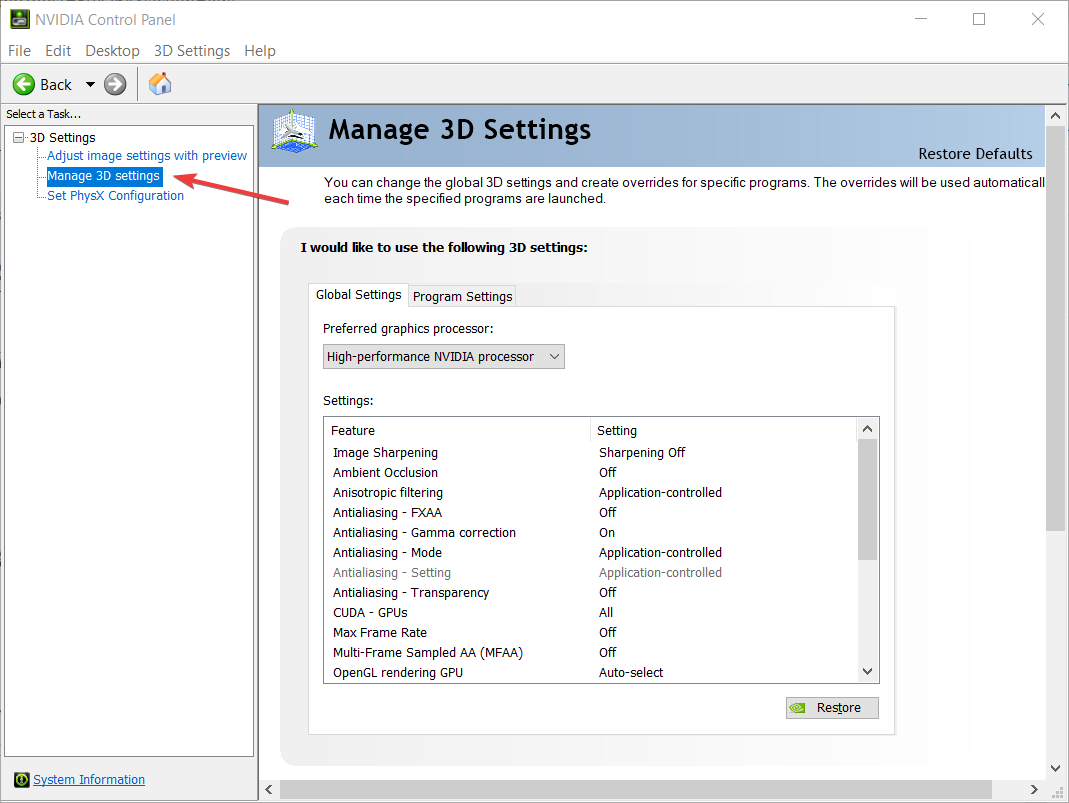
- Select High-performance NVIDIA processor in the Preferred graphics processor drop-down menu.

- Click Apply to save the changes.
- Press Windows + R to open the Run command, enter devmgmt.msc in the text field, and click on OK.

- Double-click on the Display adapters category, right-click on the integrated graphics card and select Disable device.

- Click Yes to confirm.
- Once done, restart Windows for the changes to come into effect.
After the computer restarts, check if NVIDIA still only shows 3D settings. If that’s the case, head to the next method.
3. Restart the NVIDIA Control Panel
1. Press u003ckbdu003eCtrlu003c/kbdu003e + u003ckbdu003eShiftu003c/kbdu003e + u003ckbdu003eEscu003c/kbdu003e to open the u003cstrongu003eTask Manageru003c/strongu003e.
2. Select the u003cemu003eu003cspan id=u0022urn:enhancement-c1f0b8aeu0022 class=u0022textannotation disambiguated wl-organization wl-linku0022u003eNVIDIAu003c/spanu003e Control Panelu003c/emu003e process and then click on u003cstrongu003eEnd tasku003c/strongu003e.

You can efficiently fix NVIDIA Control Panel by restarting the service with the intuitive steps presented below.
Once done, launch the NVIDIA Control Panel, and it should now show all the settings. You will now be able to access the various other customizations and make the desired modifications.
How do I check if my GPU drivers are up to date?
A simple way to check if the drivers are up-to-date would be to use the Device Manager. Simply head to the GPU adapter’s properties, and identify the driver version. You can then check the OEM’s website and verify if the one installed is the same as the latest available version.

Also, you could use an effective driver updater tool to automatically locate and install the latest version of the GPU driver. This way, the GPU, as well as the other drivers, will always be up-to-date, and you wouldn’t have to verify that time and again.
These resolutions helped users when the NVIDIA Control Panel display settings were missing in Windows 11 or the previous iterations.
Also, find out what to do if NVIDIA Control Panel is not opening in Windows.
If you still need more potential fixes, contact a support agent by clicking Chat Now under Live Chat on NVIDIA’s Consumer Support page.
Read our disclosure page to find out how can you help Windows Report sustain the editorial team. Read more


Improve this guide


User forum
0 messages