How to Exit BIOS Mode in Windows 10 &11 [Even When Stuck]
Learn to fix this issue and repair your PC
If you’re trying to exit BIOS mode safely, it can be confusing, especially when your PC seems stuck and won’t leave BIOS no matter what you do.
This usually happens because the system can’t find a proper boot device, a BIOS setting got messed up, or sometimes hardware issues interfere with normal startup.
Whatever the cause, I’ll walk you through how to get out of BIOS on startup, even when it feels stuck, and safely return your PC to normal operation.
What can I do if I can’t get out of BIOS?
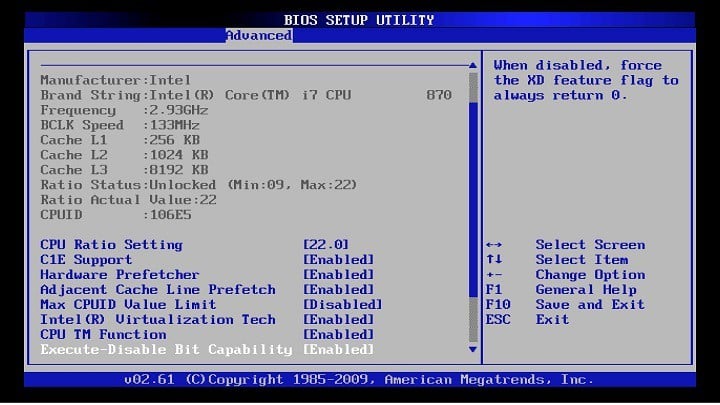
To exit BIOS, press the F10 key to save changes and boot your PC. If your model uses a different key, it should appear on the screen. However, if you can’t exit BIOS, follow the troubleshooting steps below:
1. Set BIOS settings to default
- Go to the Save & exit tab in BIOS.
- Select the Load Optimized Defaults option.
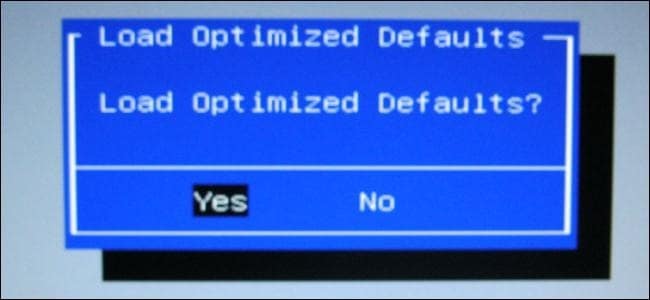
- Confirm the change
2. Make sure other components are not damaged
First, check your hard drive, as it’s often the culprit. See if it’s listed as a boot source in the BIOS. If it’s not, ensure the drive is properly connected to the motherboard and power supply.
Next, check your RAM. We suggest you remove and reset the memory modules to make sure they’re properly connected.
Also, try booting with one module at a time to identify the faulty one. If all components seem intact bu the problem persists, try the solutions below.
3. Reset BIOS
 NOTE
NOTE
- Power off your computer, and unplug it from the outlet.
- Open your case.
- Find the CMOS jumper. It is located on your motherboard, and is usually labeled with CLEAR, CLR, CLEAR CMOS, PSSWRD, or a variety of other labels.

- You’ll notice that there are three pins, and the jumper covers only two. Move the jumper to other two pins. So, if the jumper is covering the first and second pins, move it to the second and third.
- Press the power button. Your computer won’t start because the power is off, but this will discharge any remaining power stored in the capacitors. When you do this, your BIOS will reset.
- Now, just return the jumper to its original state
- Close the case, turn the power on, and start your computer.
You can also reset your BIOS by removing your motherboard battery. Simply locate the battery on your motherboard and gently remove it. Once you remove the battery, try to start your PC without it.
Without the battery, your PC won’t be able to store your BIOS settings and it will revert to default.
4. Disconnect external drives
If you have an external drive connected, your PC might try to boot from it. Since your external drive doesn’t have any bootable files on it, that will automatically start BIOS.
To fix this problem, simply disconnect all external storage, including hard drives and flash drives, and try to boot your PC without them. After doing that, check if the problem still appears.
5. Change BIOS settings
- Enter BIOS, go to Security Options and disable Secure Boot. Now save changes and restart your PC.
- Enter BIOS again and this time go to Boot section. Disable Fastboot and enable CSM (Compatibility Support Module).
- Save changes and restart your PC.
After doing that, your PC should recognize your hard drive and the issue should be completely resolved.
6. Use UEFI boot and check your Boot order
To fix this problem, users are suggesting to switch to UEFI boot. To do that, just enter BIOS, navigate to Boot section, and enable UEFI boot.
In addition, be sure to check the boot order. Set your hard drive or SSD as the first boot device and try to start your PC.
Issues like hardware damage and system failure can prevent your system from booting. However, if you address the issue as explained above you should be able to exit BIOS successfully.
If your BIOS recognizes your SSD but your PC won’t boot, check out this guide on BIOS recognizing SSD but won’t boot. Also, if your computer won’t start after a BIOS update, this fix for PC not starting after BIOS update might help explain why you’re stuck in BIOS mode.
But if you have any more questions, don’t hesitate to ask us in the comment section below.
Read our disclosure page to find out how can you help Windows Report sustain the editorial team. Read more


Improve this guide


User forum
8 messages