Local Print Spooler Service is not Running: 8 Ways to Fix it
Running related services is a reliable fix
6 min. read
Updated on
Read our disclosure page to find out how can you help Windows Report sustain the editorial team. Read more
Key notes
- If the Print Spooler service is not working in Windows, you won’t be able to get any printing done.
- Make sure that the respective software and all its dependencies are running properly.
- Updating the drivers may solve this issue on the spot and you can also do it automatically.
- In case you have a wireless printer, you can also try to check the connection with the network or the PC.
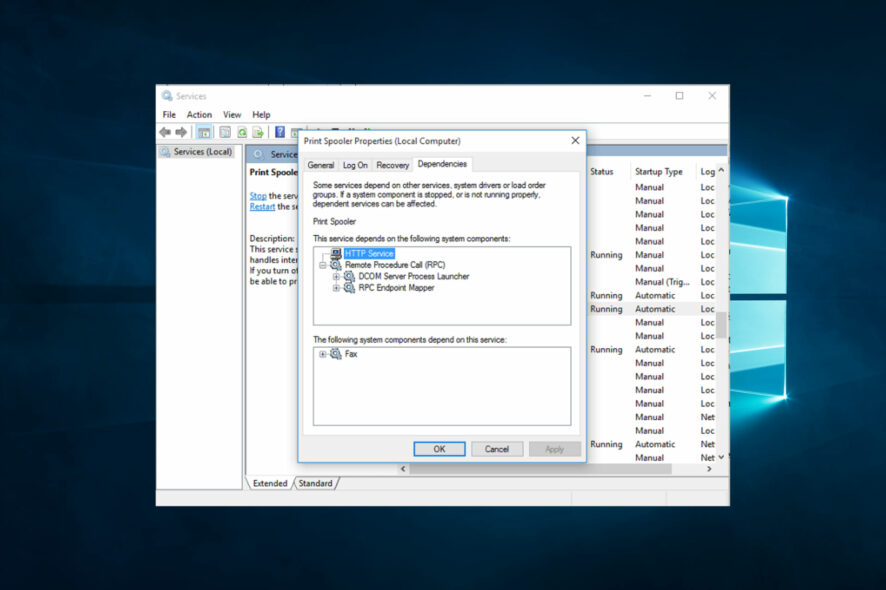
Print Spooler service is your main connector with the printer; if this service doesn’t work, you won’t be able to print your documents.
And the Print Spooler service is not working on Windows for various reasons. For example, users have been getting error messages similar to the one below:
The local Print Spooler service is not running
So, we prepared a couple of workarounds in case you have problems with the Print Spooler in Windows 10.
Why does The local Print Spooler service not running message appear?
Your Local Print Spooler Service is not running message can appear on a Windows computer when your Print Spooler service isn’t running or encounters an error while running.
The Windows Print Spooler service manages print jobs sent to a printer or print server. Some of the reasons why the Print Spooler service may not be running include the following:
- Service is stopped – The Print Spooler service may have been manually stopped or stopped due to an error.
- Printer drivers are corrupt or outdated – Corrupt or outdated printer drivers can cause the Print Spooler service to stop working.
- Malware or virus infections – Malware can damage system files, including the Print Spooler service.
- Conflicts with other services or software – Conflicts with other services or software can cause the Print Spooler service to stop working.
This can be a severe problem, and for many users, the following error messages may be associated with the problem:
- Print spooler service stops automatically in Windows 7 – Windows 7 users have reported in the past that the Printer Spooler service tends to stop occasionally.
- Print spooler service not running Windows 10 – Issues with the Print Spooler service are also standard in Windows 10.
- Error 1068 Print Spooler – Error 1068 is one of the most common problems related to the Print Spooler service you can encounter.
- Print Spooler keeps stopping – It’s also possible for Print Spooler to suddenly stop working, even if you can run it in the first place.
- Print Spooler Windows 10 not starting – On the other hand, you might not be able to run Print Spooler at all.
What can I do if the Local Print Spooler service is not running?
- Restart the Print Spooler service
- Start all dependencies
- Update the printer drivers
- Uninstall unnecessary printers
- Run the Troubleshooter
- Reset the Internet options
- Disable the Allow service to interact with the desktop option
- Set the Print Spooler on Automatic Startup
1. Restart the Print Spooler service
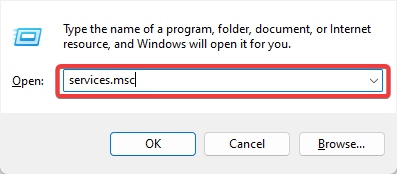
- Press Windows + R, type services.msc, and hit Enter.
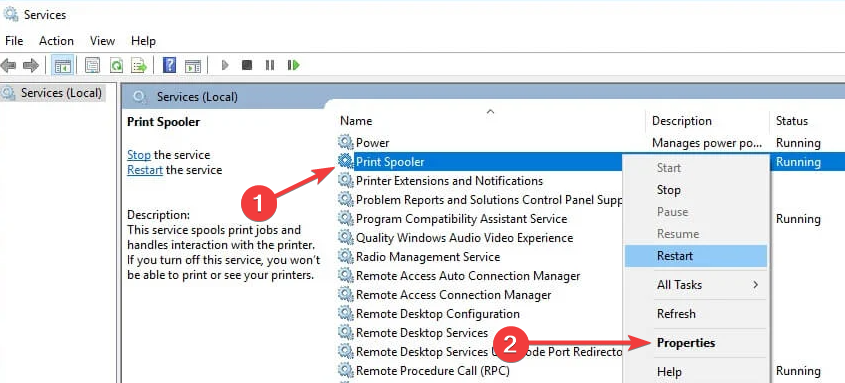
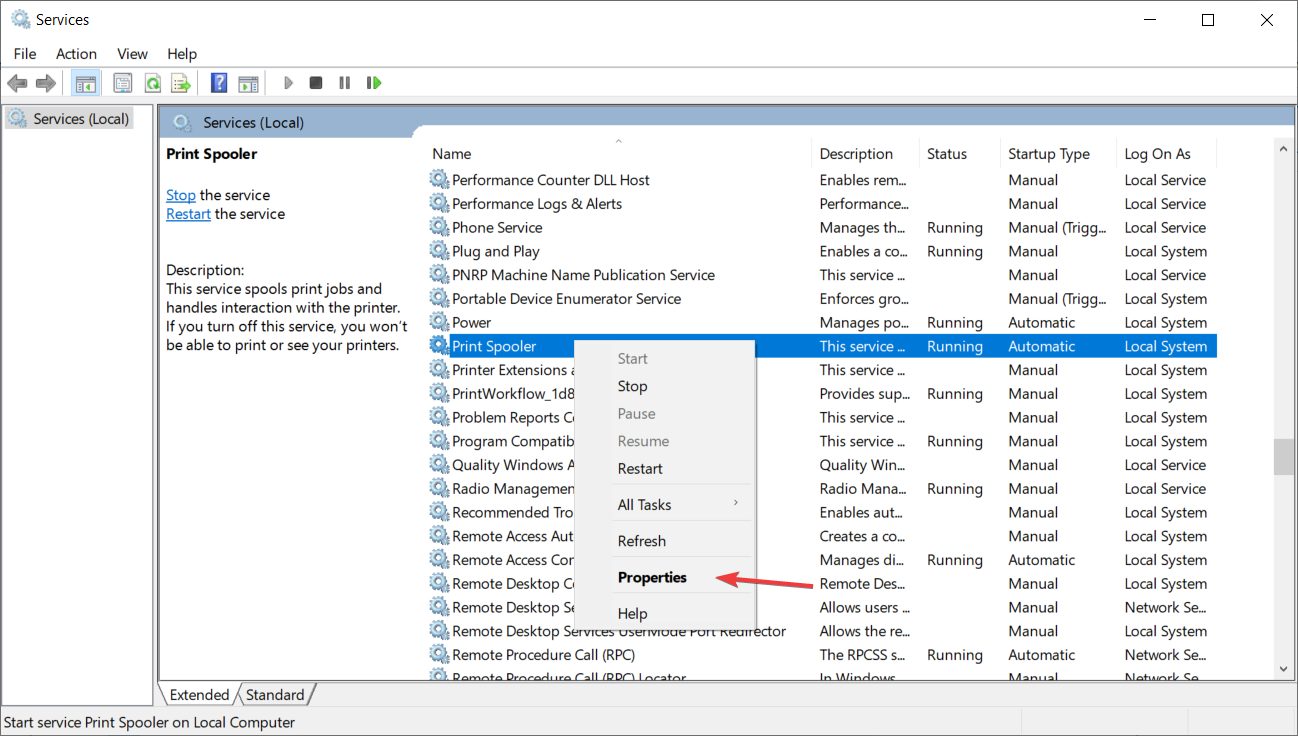
- Find the Print Spooler service.
- Right-click on it, and go to Restart, as shown in the screenshot below.
As Print Spooler sometimes stops working or has had an error occur, the first thing we should try to fix is to restart the service.
This command will restart your Print Spooler service and hopefully return to its working state. But, if restarting the service doesn’t work, try some of the following solutions.
2. Start all dependencies
- Press Windows + R, type services.msc, and hit Enter.
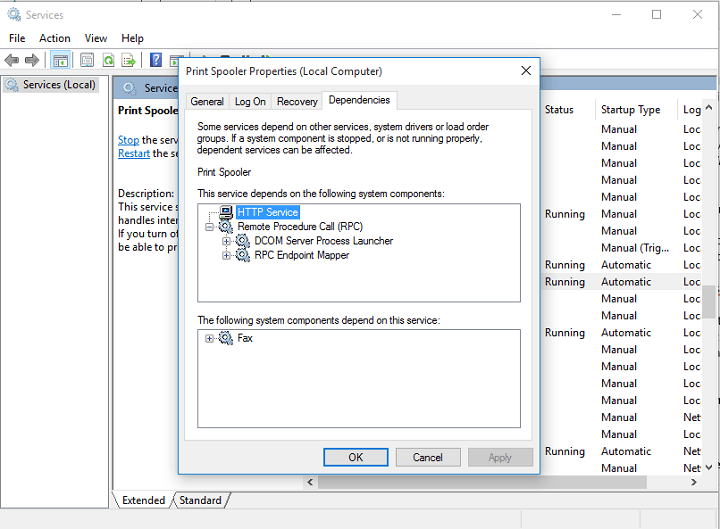
- Right-click on Print Spooler service and go to Properties.
- Go to the Dependencies tab and find which services are needed for Print Spooler to Run.
- Now, search through Services, and make sure all dependencies are running.
Print Spooler needs some other services to run to function, and if these services are stopped, the Print Spooler service will be stopped too.
3. Update the printer drivers
3.1 Manual update
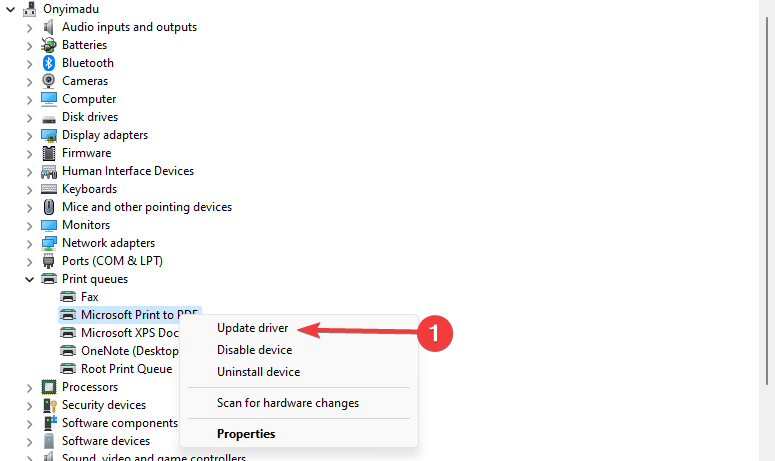
- Go to Search, type devicemngr, and open Device Manager.
- Find the printer you want to delete, right-click it and go to Update driver.
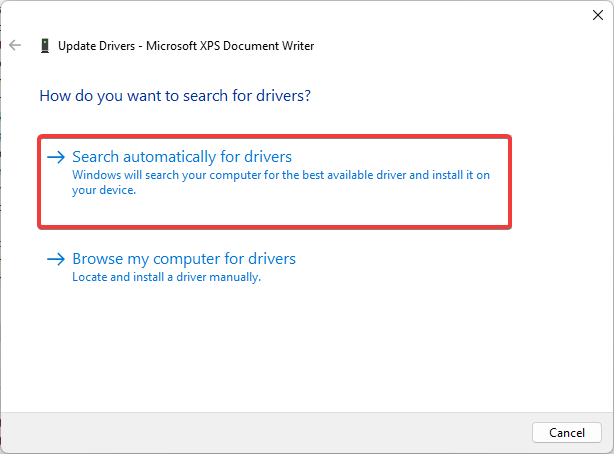
- Select Search automatically for drivers and let the wizard look for new drivers.
- Follow further on-screen instructions.
- Restart your computer.
If your printer drivers are outdated, there’s a great chance you’ll encounter some errors when printing documents.
To remove this possibility from the equation, we will update the printer driver and install the latest version of the software.
3.1 Update drivers automatically
Suppose this method doesn’t work or you do not have the necessary computer skills to update/fix the drivers manually. In that case, we strongly suggest doing it automatically using a professional driver updater tool.
The tool is straightforward to use. First, select the driver you want to update and let it complete the process. You can also set it up to automatically check and update all your drivers regularly.
4. Uninstall unnecessary printers
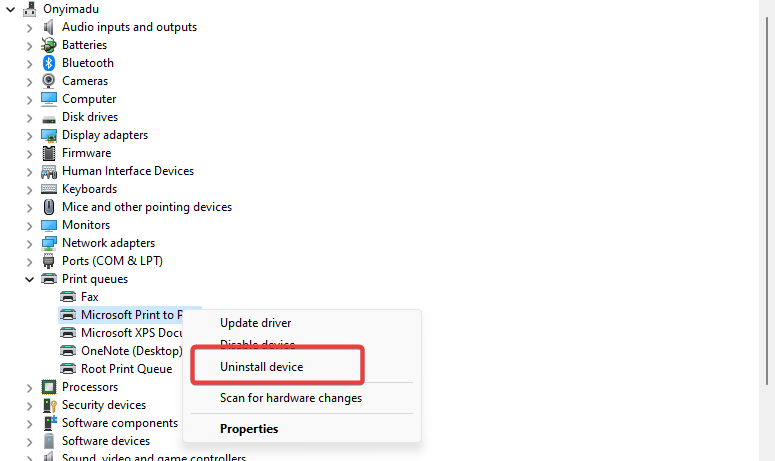
- Go to Search, type devicemngr, and open Device Manager.
- Find the printer you want to delete, right-click it and go to Uninstall device.
- Follow further on-screen instructions.
- Restart your computer.
If you have more than one printer driver installed on your computer, drivers are very likely to interfere with each other.
So, the best thing you can do is uninstall all unnecessary printers, so the one you’re currently using can work without interruptions.
5. Run the Printer troubleshooter
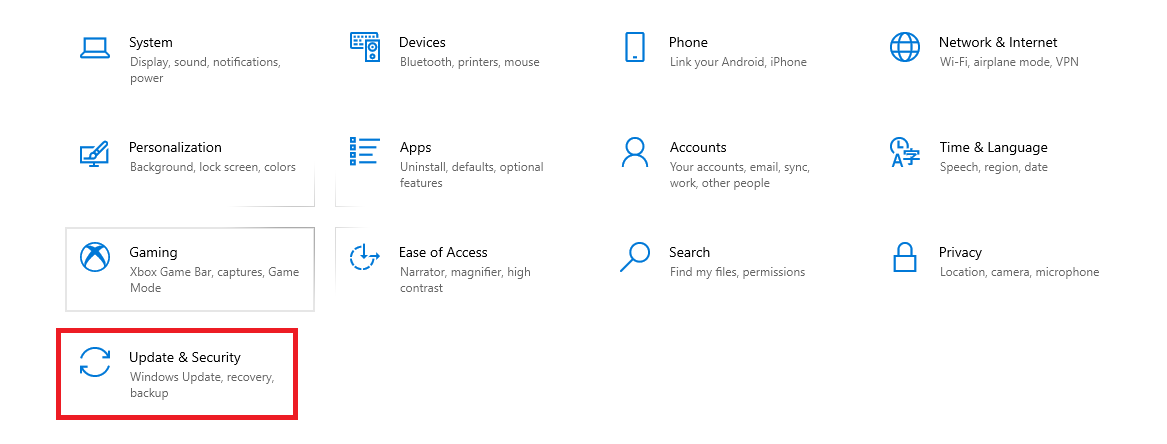
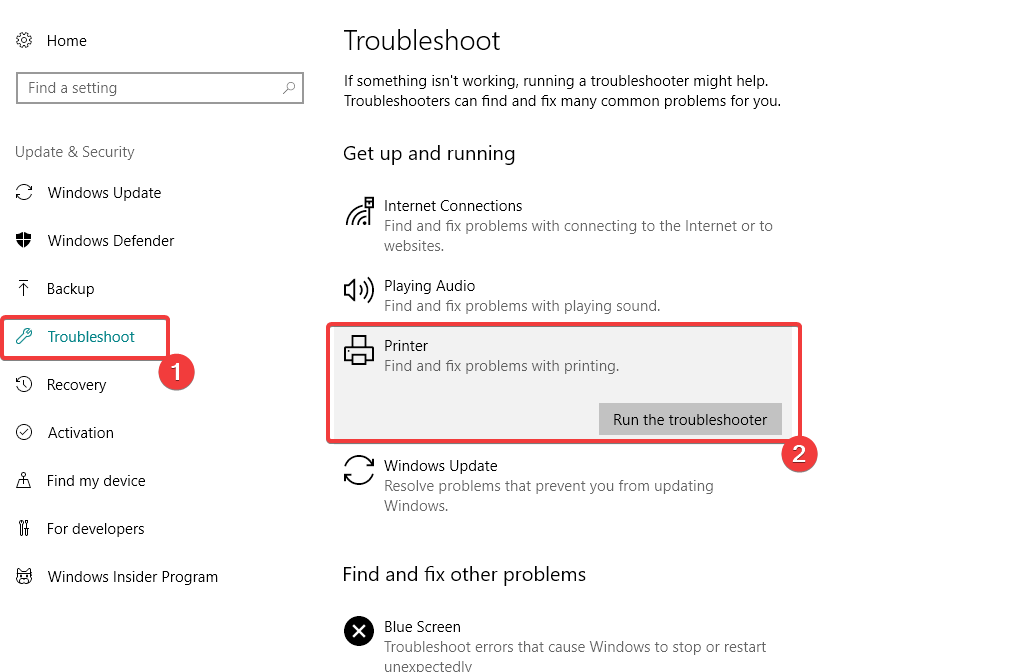
- Go to Settings by pressing Windows + I.
- Head over to Updates & Security.
- Click on Troubleshoot, click Printer, and choose Run the troubleshooter.
- Follow further on-screen instructions. Finish the procedure.
- Restart your computer.
If none of the solutions from above managed to solve the problem with the Printer Spooler, we will try Windows 10’s troubleshooting tool.
Microsoft introduced this tool with the Creators Update for Windows 10, and you can use it to solve various system-related errors, including Printer issues.
6. Reset the Internet options
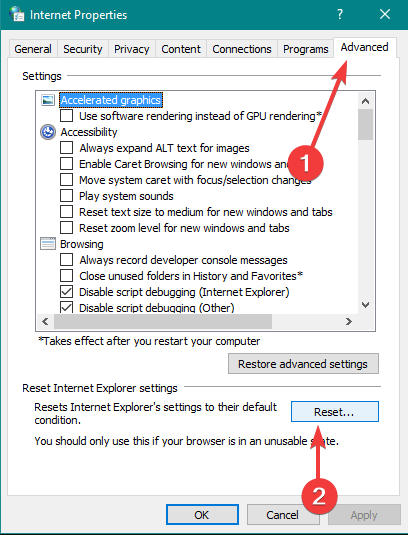
- Go to Search, type of internet options, and select Internet Options from the menu.
- Go to the Advanced tab and click Reset.
- Click the Reset button again to confirm.
7. Disable the Allow service to interact with desktop option
- Press Windows + R, type services.msc, and hit Enter.
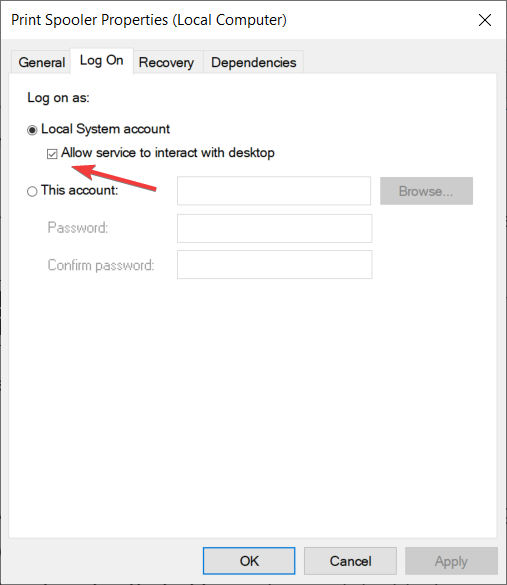
- Locate Print Spooler service. Right-click it and go to Properties.
- When the Properties window opens, go to Log on the tab.
- Locate Allow service to interact with desktop option and disable it.
- Click Apply and OK to save the changes.
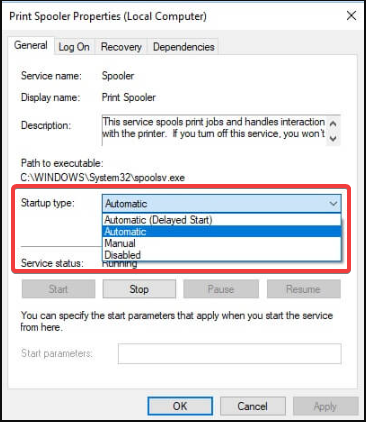
8. Set the Printer spooler on Automatic Startup
- Press Windows + R, type services.msc, and hit Enter.
- Locate Print Spooler service. Right-click it and go to Properties.
- Go to Startup type and set in on Automatic Startup.
If the service does not start automatically when you boot up your computer, this may explain why the Printer Spooler service is not working on Windows.
Having to enable the service every time you start your computer manually is time-consuming. Instead, you can quickly solve this problem by setting the Printer Spooler service on automatic Startup.
 NOTE
NOTE
That would be all. We hope these solutions helped you to solve the problem with the Print Spooler service; if you have any questions or comments, reach out to the comment section below.




User forum
1 messages