How to Remove Quick Access in Windows 11
Quick access can become pretty annoying after a while
Key notes
- You may want to remove Quick access in Windows 11 over privacy concerns and as an effort to keep File Explorer organized.
- We have provided several ways to disable Quick access from File Explorer in Windows 11 or, at least, make it less noticeable.

Quick access is a bookmarking feature in Windows File Manager that shows recently accessed files and folders to improve accessibility.
This bookmarking feature replaced the classic Favorites section, but many readers do not like it and want to remove the Quick access section from Windows 11.
Why should I remove Quick access in Windows 11?
While the Quick access feature simplifies navigating between drives and folders, many don’t like it for two prominent reasons:
- Invades Privacy – Quick Access creates privacy concerns on Windows PC as others get to know which files and folders you frequently access, especially if you share your system with others.
- Creates confusion – Over time, too many folders appear in the Quick access section, cluttering the File Explorer and making it difficult to access the folders.
If you also want to remove the Quick access feature in Windows 11, our guide will provide all the possible methods.
How can I remove Quick access in Windows 11?
1. Prevent File Explorer from opening Quick access
- Use the Windows + E shortcut to launch File Explorer.
- Click the Menu icon (three dots) located on the right end of the Menu bar and choose Options after the drop-down menu expands.

- A Folder Options dialog box will open on the screen. Expand the Open File Explorer to drop-down and choose This PC instead of Quick access.

- Finally, press the OK button to save the changes.
This method does not precisely remove Quick access in Windows 11 but ensures that File Explorer does not open to the Quick access section upon launch.
2. Disable Quick access in Windows 11
- Use the Windows + R shortcut to bring up the Run command dialog box, type the following command in the text field and press OK to execute the command.
regedit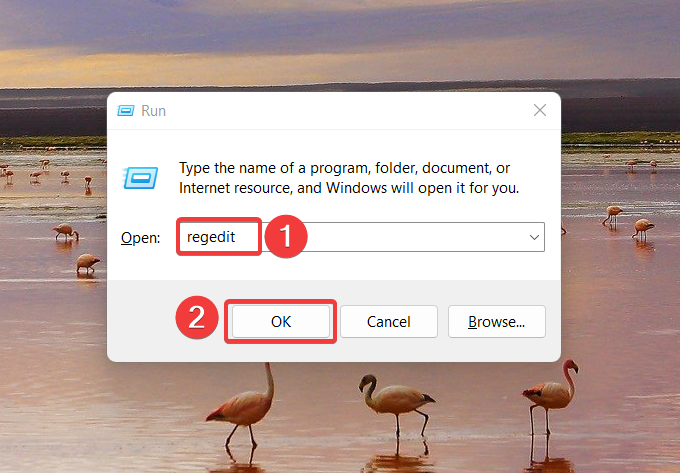
- Type or paste the following location in the Registry Editor window, and press Enter to navigate the folder.
HKEY_CURRENT_USER\SOFTWARE\Microsoft\Windows\CurrentVersion\Explorer\Advanced - You will find a list of entries inside the Advanced folder. Look for the LaunchTo entry in the right section of the registry, right-click it, and choose Modify from the context menu.

- In the Edit DWORD (32-bit) dialog box, assign 0 in the Value Data field and press the OK button to save the changes.

- After modifying the registry, reboot your Windows 11 PC to apply the changes.
This method disables Quick access in the File Explorer window of Windows 11. However, Quick access, though disabled, will still be present in the navigation pane of File Explorer.
If you don’t want the whole pane to be disabled, simply remove the Home icon in the File Explorer.
3. Permanently remove Quick access in Windows 11
 NOTE
NOTE
- Press the Windows key to launch the Start menu, type regedit in the Search bar and select Run as Administrator.

- When you access the Registry Editor on your Windows 11 PC, navigate to the following folder by pasting the path in the address bar.
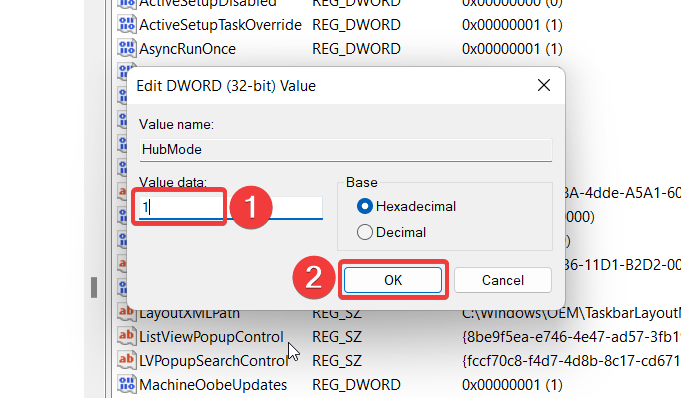
HKEY_LOCAL_MACHINE\SOFTWARE\Microsoft\Windows\CurrentVersion\Explorer - Once inside the folder, right-click anywhere in the right pane and select New followed by DWORD (32-bit) value.

- Next, rename the newly created DWORD (32-bit) as HubMode.
- Right-click HubMode and choose Modify from the context menu.

- Assign 1 in the Value Data field, press OK to save the changes, and restart your Windows 11 PC.
4. Remove pinned folders from Quick access
- Press the Windows + E key combination to launch File Explorer.

- Click the arrow preceding Quick access on the left navigation page to expand the list of folders.
- Right-click the folder you wish to remove from Quick access and select Unpin from Quick access option from the context menu. It is also possible to unpin the default folders like Desktop and Downloads from the section.

5. Prevent Quick access from showing recent files and folders
- Launch the File Explorer using the Windows + E shortcut.
- Click the Menu icon (three dots) present on the top menu bar, and select Options from the drop-down menu.

- In the General tab of the Folder Options window, uncheck the checkboxes preceding the Show recently used files in Quick access and Show frequently used folders in Quick access.
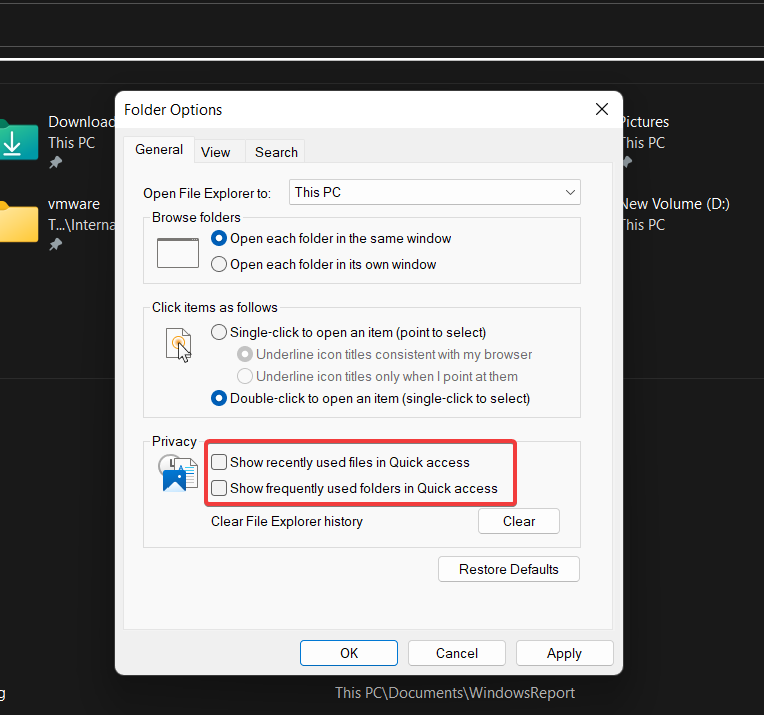
- Hit the OK button to save the changes.
Quick access will no longer show the most recently accessed files and folders in the File Explorer window.
That’s pretty much it! You can implement some of these methods in combination with others to remove Quick access in Windows 11 or make it less obstructive.
Refer to this guide if File Explorer is not responding and freezing on your Windows PC. You can reach us in the comments section with any queries or suggestions.
Read our disclosure page to find out how can you help Windows Report sustain the editorial team. Read more


Improve this guide


User forum
0 messages