Virgin Media Blocking NordVPN: Try These 10 Easy Fixes
![]() 13 min. read
13 min. read
![]() Published on
Published on
Share this article
Improve this guide
Read our disclosure page to find out how can you help Windows Report sustain the editorial team. Read more
Is Virgin Media blocking NordVPN? Unfortunately, certain internet providers may block VPNs occasionally. On the brighter side, you can easily bypass these restrictions — with the help of this guide.
Below, I’ll show you step by step how to get out of that situation and browse privately again. Let’s begin!
How Is Virgin Media Blocking NordVPN?
ISPs, like Virgin Media, don’t officially state that they block VPN services. In fact, they provide the necessary fields in their router software for configuring VPNs. Still, you might experience significantly throttled internet surfing, streaming, and downloading speeds when you start using a VPN.
Virgin Media may resort to any or all of the following tactics to unofficially block your access to premium or free VPN networks:
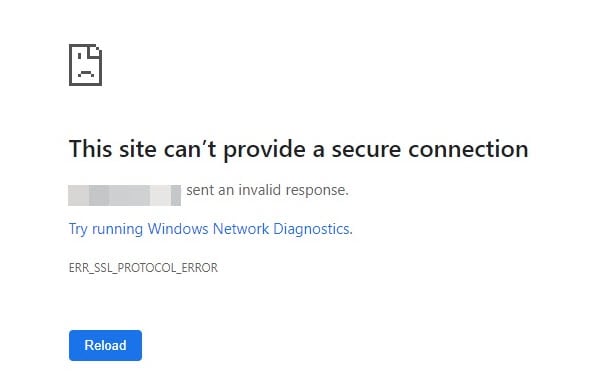
- Browser SSL Error: You’ll see this error when browsing if the ISP uses DPI (Deep Packet Inspection) via packet sniffing tools to block VPNs. DPI works by examining data packets flowing through the network. If DPI misinterprets the encrypted VPN traffic due to its inspection, it might disrupt the connection, causing the error.
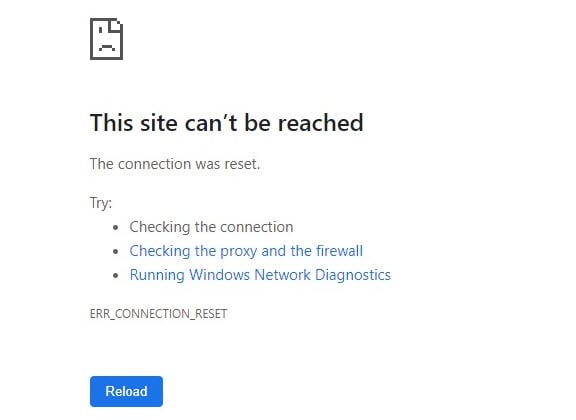
- Webpage Connection Reset Error: If the ISP disrupts the successful communication between your device and the VPN server, you might encounter a Webpage Connection Reset Error. This error indicates the connection was abruptly terminated, so you can’t access the webpage through the VPN.
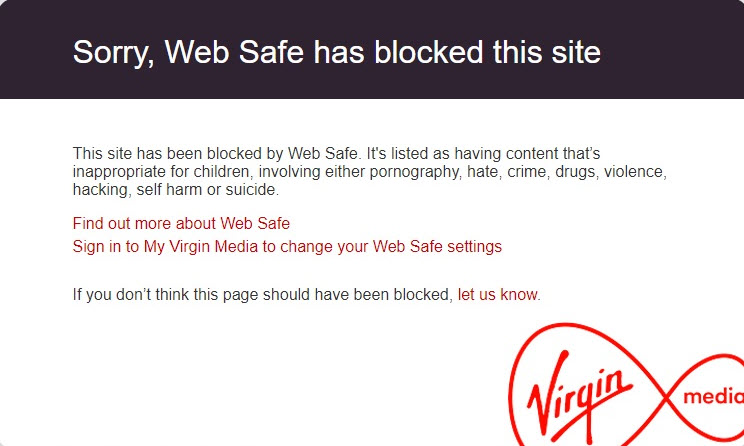
- Virgin Media Web Safe: This is a specific service offered by Virgin Media. It’s possible it includes VPN-blocking functionalities. If you’re using a VPN and you keep encountering screens that say “Sorry, Web Safe has blocked this site,” VM is to blame.
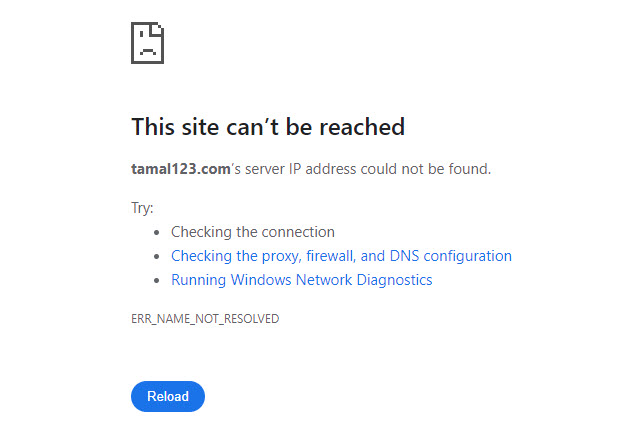
- DNS Sinkhole Error: This error usually indicates an issue with the Domain Name System (DNS). DNS translates website names into IP addresses. VM might employ DNS redirection to route VPN traffic to a dead end (sinkhole) instead of the intended VPN server. This would disrupt the connection and could cause this error. Your Chrome Browser may display Failed to Connect, Slow Loading or Timeouts, and Error Name Not Resolved.
How To Fix Virgin Media Blocking NordVPN
I’ve arranged the troubleshooting tips in order of complexity. You’ll find the simplest ones at the top:
Preliminary Checks
Give the following steps a try first before moving on to the more technical ones:
- Choose the right VPN server: Not all of Nord’s 6,000+ servers are always in their peak performance. Some might face disruptions created by technological and human factors. So, try switching to one that’s close to your location. For example, to stream VM television shows in Ireland, use NordVPN’s Irish servers. Similarly, for the Virgin TV GO app in the UK, use any one of the 440+ servers located in the UK.
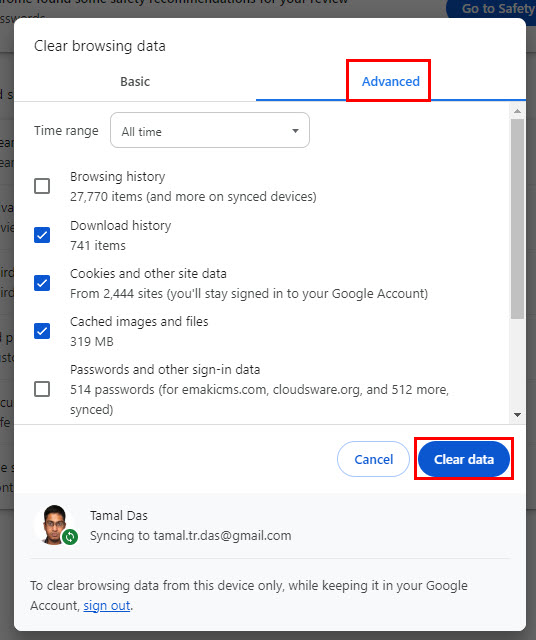
- Clear browser cache and cookies: Try clearing cache and cookies from your browser by pressing the Ctrl + Shift + Delete hotkey. You should see the Clear browsing data or a similar dialog box. There, navigate to the Advanced tab, checkmark these options, and click on the Clear data button:
- Browsing history
- Cookies and other site data
- Cached images and files
- Site settings.
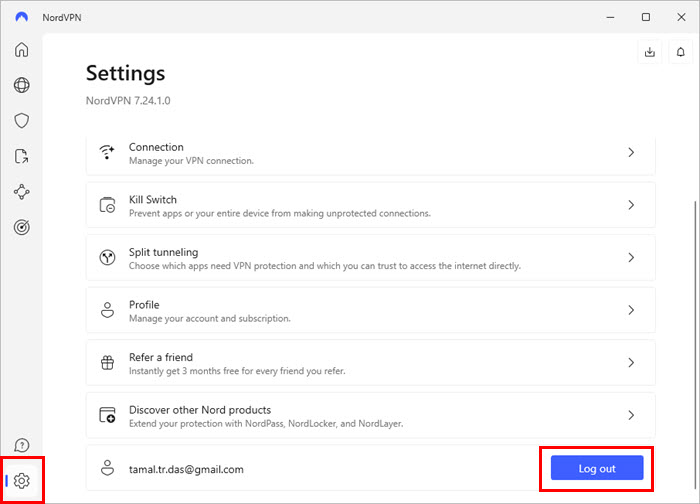
- Restart the NordVPN app: Open the app from the Windows System Tray area. You’ll find a cogwheel icon in the lower-left corner. That’s the Settings menu. Click on that to find the Logout button in the lower right corner. Click it and open the Task Manager app by pressing Ctrl + Shift + Esc. Find the NordVPN service under the Processes column, and end it by right-clicking on it. Now, open the app again from the Start Menu and log in with your registered NordVPN email.
- Restart the device: Reboot your PC, Mac, or tablet and try connecting with the VPN again.
Were you able to resolve Virgin Media blocking NordVPN so far? If not, continue with the following troubleshooting ideas:
Disable Child Safe on Your Virgin Media Account
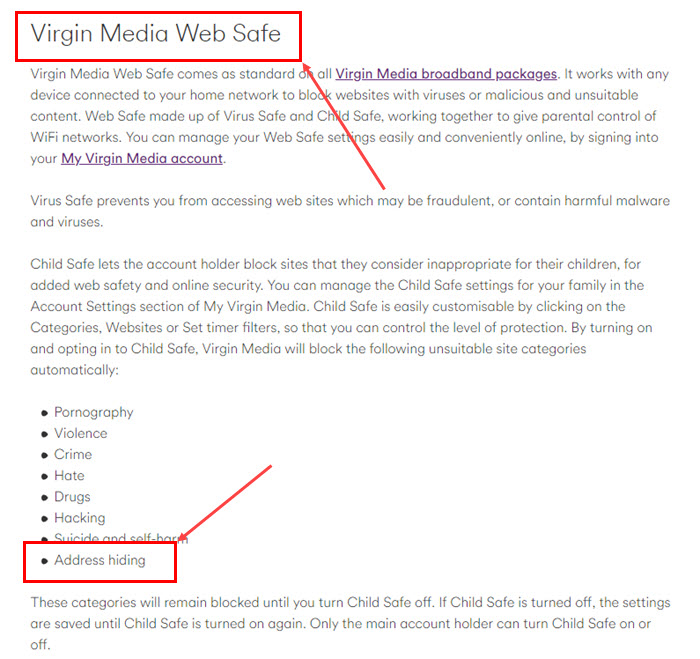
Virgin Media Web Safe feature may also prevent some VPN services from working properly or utilizing the full bandwidth of VPN servers.
If you go to the Virgin Media Web Safe portal, you’ll see that the feature claims that it prevents address hiding, which is related to VPNs.
Here’s how to undo this:
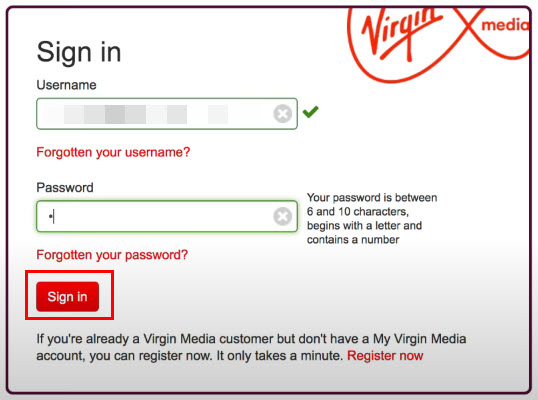
- Go to the My Virgin Media portal.
- You might need to sign up using your Virgin Media subscription credentials to activate the account if you haven’t done that already.
- Now, click on the Sign in button on the right side of the portal. It should be the My Virgin Media block.
- You’ll need to log in with your username and password.
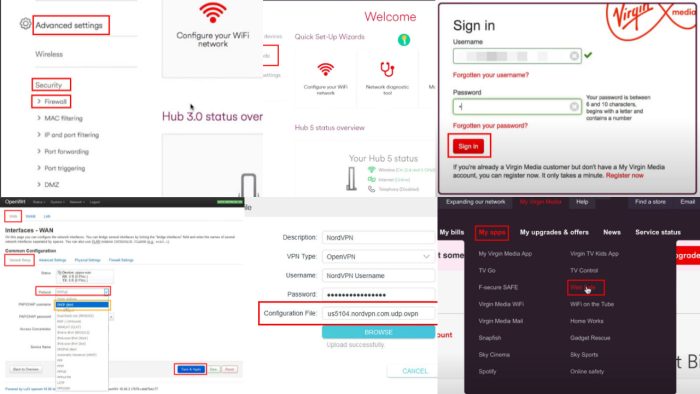
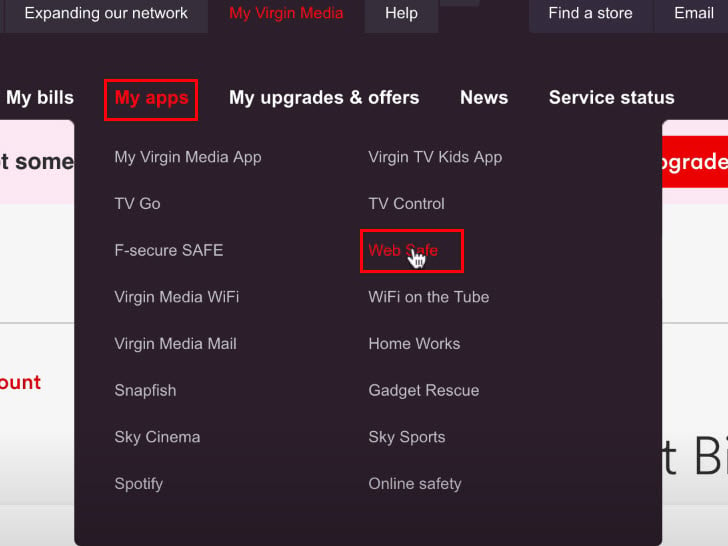
- On the top of the website, find My apps and click on that to expand the list of services.
- Click on the Web Safe hyperlink below the TV Control service.
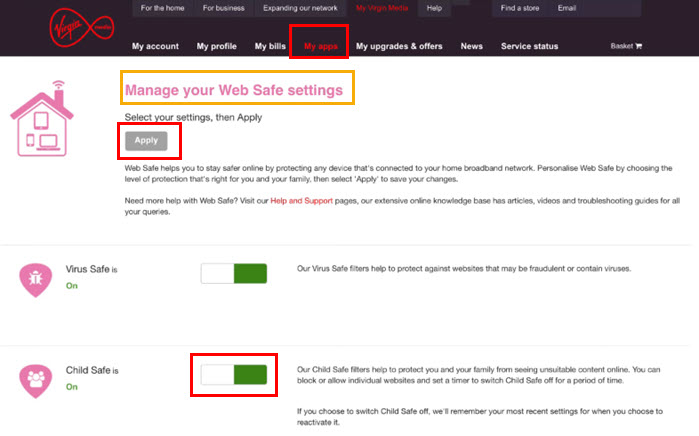
- You should now be on the Manage your Web Safe settings page.
- By default, Virgin Media keeps the Child Safe feature enabled. You need to click on the toggle button to deactivate it.
- Now click on the Apply button just below the Manage your Web Safe settings header.
Enable PPTP Pass-Through on VM HUB
You’ll have to enable PPTP Pass-Through or set it to default on all physical routers for NordVPN to work. Here’s how to do so on the VM Hub:
- Open a web browser tab and enter
192.168.1.1or192.168.0.1to access the Virgin Media Hub control interface. - If prompted, you’ll need to log in with your username and password. These are typically printed on a sticker on the Hub, but if you’ve changed them before you’ll need to use your custom credentials.
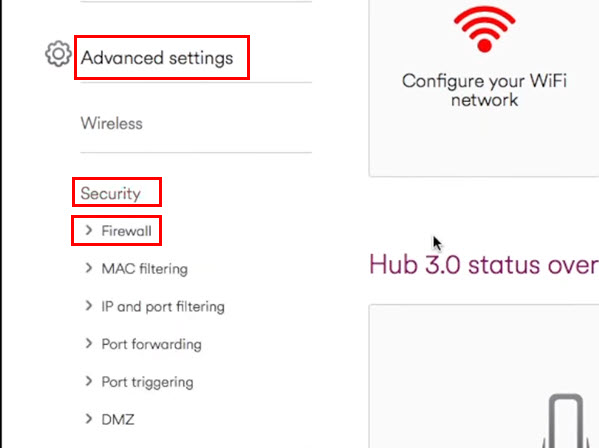
- Once logged in, you’ll need to find the Advanced Settings section. The exact way to get there depends on your Hub model:
- Hub 3 models: Look for Advanced Settings or Network Settings.
- Hub 2 models: Try the Firewall option under the Security settings.
- Once you’re in Advanced Settings, look for a section related to VPN or Advanced VPN Settings.
- Look for the PPTP Pass-Through setting and check the toggle switch.
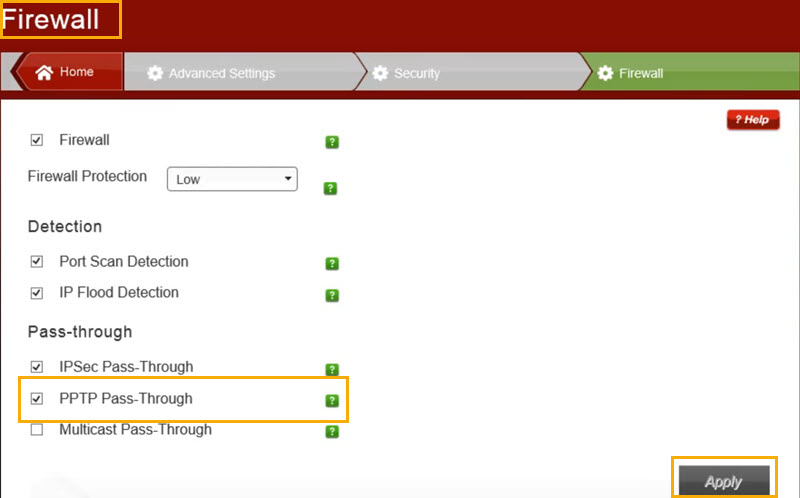
- Click the Save or Apply button to confirm your configuration.
- Restart the router.
- Restart the NordVPN app.
- Now, try to visit a streaming site using NordVPN again on your Virgin Media broadband network.
Use the NordVPN Browser Extension
Nord’s browser add-on allows you to enforce VPN settings exclusively on your web browser.
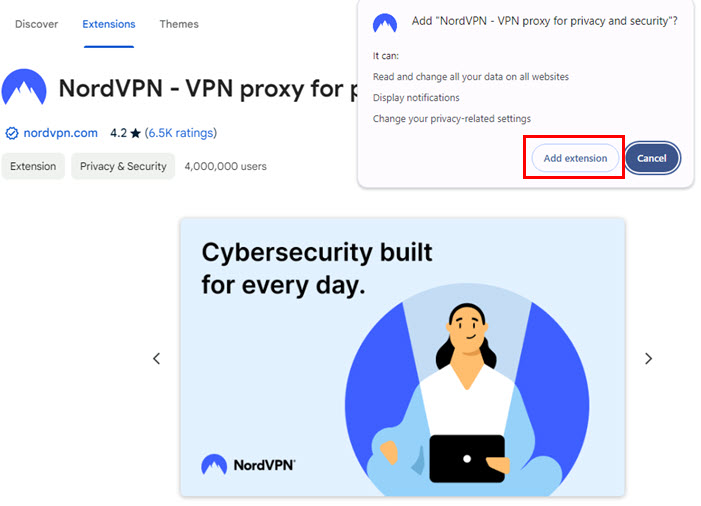
- Go to the NordVPN – VPN proxy Chrome Extension page.
- Click on the Add to Chrome button and then the Add extension button.
- Navigate to the Extensions menu in the top-right corner of Chrome.
- Click on the Pin icon near the NordVPN extension.

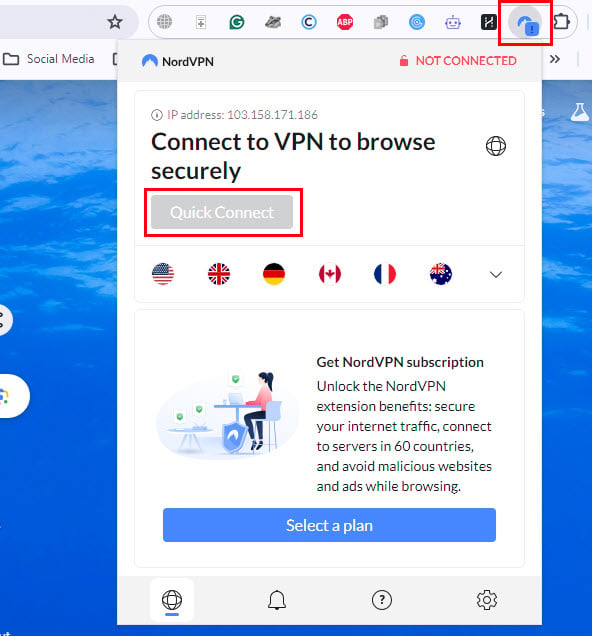
- Now, open the NordVPN extension from the Extensions tab on Chrome.
- Click the Login button and enter your credentials.
- Hit the Quick Connect button to connect to a VPN server.
Uninstall and Reinstall NordVPN App
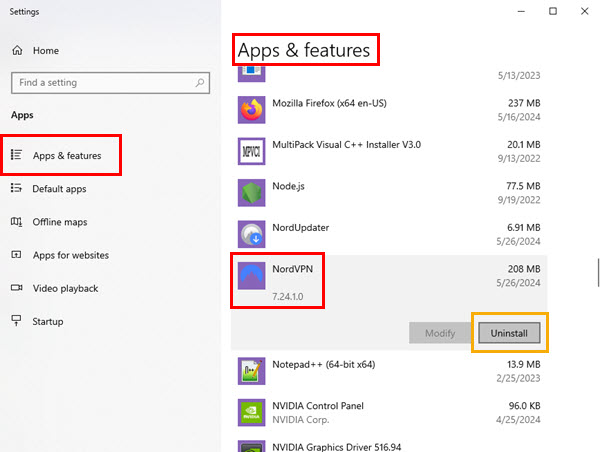
- Open Apps and features from the Start Menu.
- Find NordVPN in the list of installed apps.
- Click the Uninstall button.
- Once the uninstallation is complete, visit this site to get the most recent version of NordVPN.
- Download and install the app.
- Log in with your NordVPN credentials.
- Test the VPN again.
Try Resetting the TCP and UDP Ports
TCP and UDP ports facilitate successful communication between your device and websites, apps, IPTV portals, etc.
Here’s how you can close and reset these ports to fix NordVPN blocks imposed by Virgin Media:
- Click on the Start menu and type Command.
- On the right side of the Command Prompt result, you’ll see the Run as administrator option. Click on that.

- In the Command Prompt window, type the following command exactly as shown here:
netsh int ip reset.
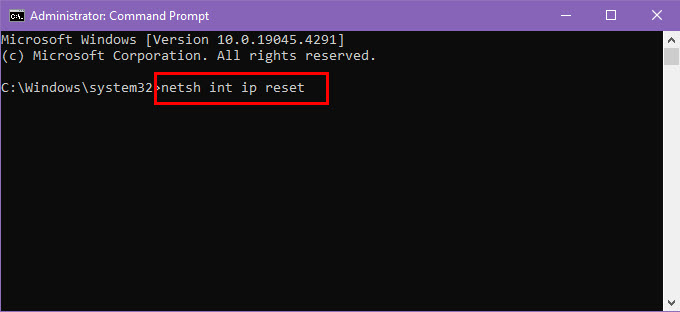
- Press Enter to execute the command.
- The reset process may take a few moments.
- Once complete, you’ll need to restart your computer for the changes to take effect.
Try Disabling the Router and Device Firewall
To deactivate Virgin Media Hub’s firewall, follow these steps:
- Open a web browser and enter the IP address
192.168.0.1or192.168.1.1in the address bar to access the Virgin Media Hub settings page. - Log in using your admin credentials. The default username is usually admin and you can find the default password on the hub’s sticker.
- Navigate to the Advanced settings or Security section, then select Firewall.
- Turn off the firewall by unchecking or switching off the firewall option.
- Save the changes by clicking the Apply or Save button.
Switch to a Third-Party Router
Instead of using the Virgin Media Hub as the primary router, use another brand’s router. For example, you can go for Cisco, TP-Link, Tenda, D-Link, etc. They’re unlocked routers. That means you can modify their settings any way you want.
Also, you can avoid the risk of Virgin Media embedding programs in the router to disallow VPN servers no matter what you do.
However, you must use the Virgin Media Hub to receive a broadband signal. Here’s how to shift routing to a third-party device:
Use Virgin Media Hub as a Modem Only
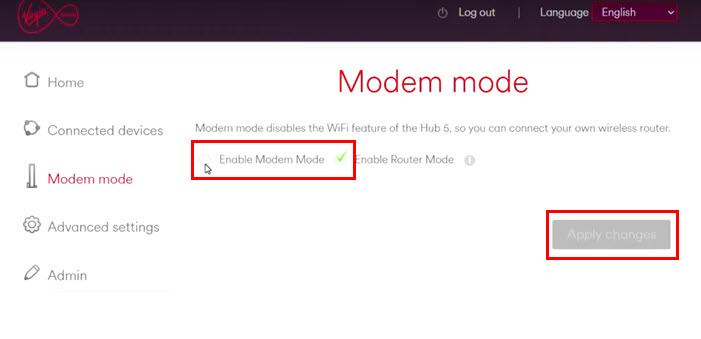
- Access the Hub console by going to
192.168.0.1. - Log in with your administrative username and password.
- You should see the Welcome screen.
- Click on the Modem mode link on the left side navigation panel.

- Select the Enable Modem Mode radio button.
- Click on the Apply changes button.
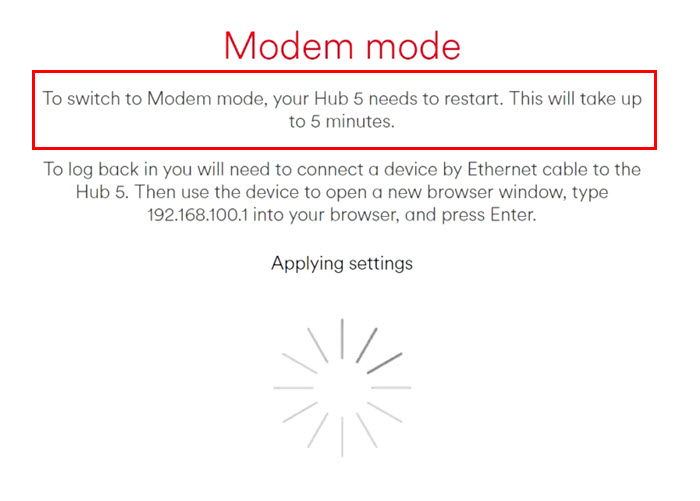
- You’ll see a status page as shown below.
- It might take up to 5 minutes to re-configurate the router to modem mode.
Now, if you ever want to enable the modem and router mode of your Virgin Media Hub, you can do that easily by reversing the above steps. Instead of going to 192.168.0.1, this time you need to use 192.168.100.1 as the IP address for the Virgin Media Hub Modem Mode. The remainder of the steps are the same.
Set Up a New Router
Now, follow these instructions to route broadband connectivity from the Virgin Media Hub to your own router. I’m using a Cisco device for the tutorial. However, the steps are similar for any popular make and model.
- Take the LAN cable provided by the Virgin Media Hub and connect that to the no. 1 LAN port at the back of the Hub.
- Ensure that other Hub cables are connected, like the coaxial cable coming from outside and the power cable coming from the adapter.
- Connect the other end of the LAN cable to the third-party router’s Internet or WAN LAN port.
- If it’s a Wi-Fi router, connect to that network from your PC.
- If it’s an Ethernet-only router, connect the LAN cable provided to the PC’s LAN port.
- The other end of this LAN cable should go into the first (no. 1) LAN port on the third-party router.
- Open the router control panel and log in.
- You should find its IP address and password on a sticker on the back.
- For me, the default IP was
192.168.1.1. - Inside the control panel, click on the Network drop-down at the top.
- Choose the Interfaces option from the menu that opens.

- You’ll see all the usable Interfaces for the Cisco or your own router.
- Click on the Edit button for the WAN interface.
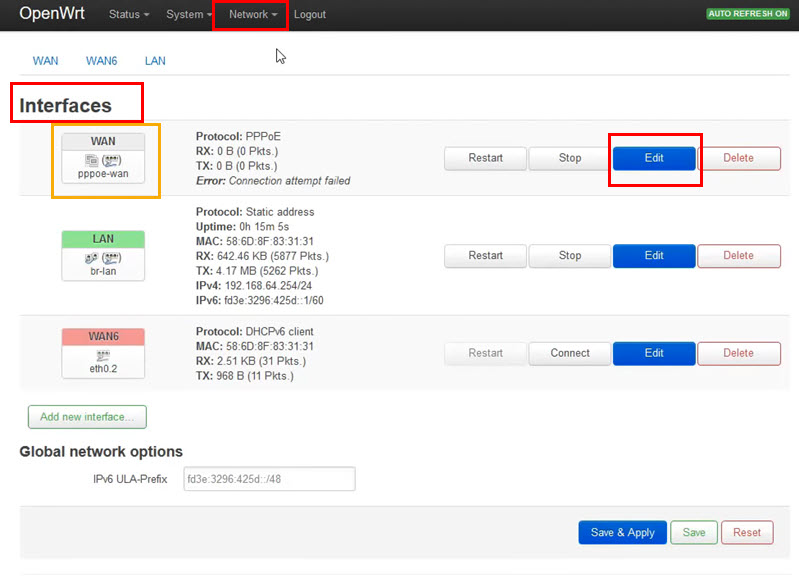
- Go to the Protocol drop-down menu and change that to DHCP client from PPPoE.
- Click the Save & Apply button at the bottom.

- It can take up to one minute for the Virgin Media Hub to transfer the public IP to the third-party router.
- Once done, restart the third-party router.
- Now, try to access a website using NordVPN. It should work this time.
Use a VPN Within the Router
Here’s how you can set up NordVPN at the router level to avoid VPN restrictions imposed by the ISP. I’ve used a TP-Link model for this tutorial. However, you’ll see that the steps are similar for all major router makes and models.
- Log in to the TP-Link router console by visiting
192.168.1.1. - Click on the VPN Client menu in the left-side navigation panel.
- Checkmark the Enable checkbox for VPN Client.
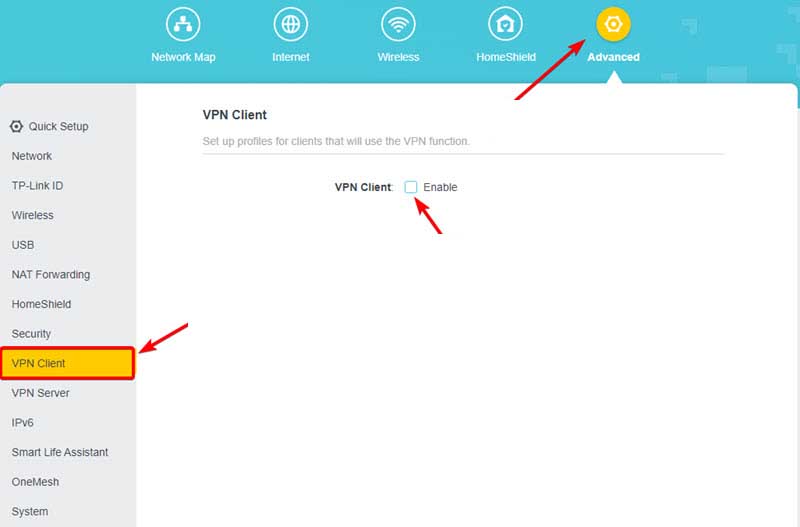
- Bring up the new profile configuration window by clicking Server List and then by clicking Add.
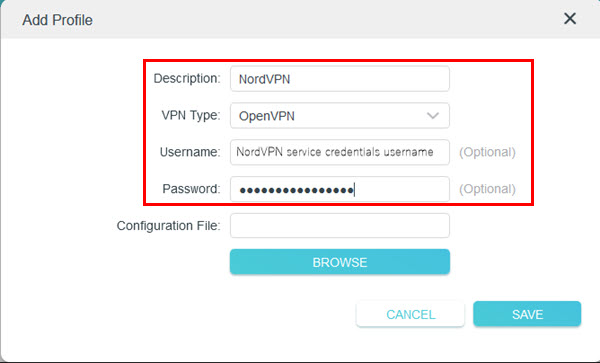
- Fill in the fields of the pop-up window that follows:
- Description: NordVPN
- VPN Type: OpenVPN
- Username: NordVPN subscription username
- Password: NordVPN subscription password
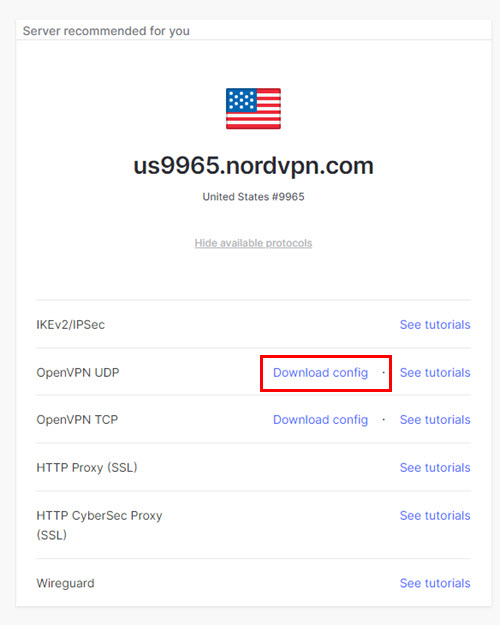
- Visit the Server Tools portal to download OpenVPN client configuration files.
- You can download either the TCP or UDP configuration files.
- Upload the configuration file in the Add Profile dialog.
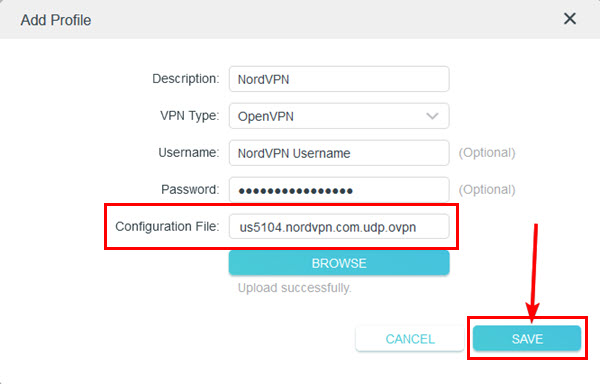
- Go back to the Server List page and add the newly created profile.
- On the Device List page, add the devices from which you want to use the VPN.
Use a NordVPN Alternative
If none of the above work, you can try these alternatives in your VM broadband network:
Browsec
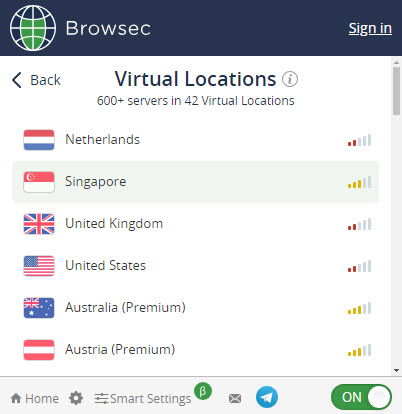
Browsec is one of the best free Chrome Browser-based VPN solutions. In the free edition, you can swap within only three VPN servers from the US, the UK, Singapore, and the Netherlands. Also, the surfing and streaming speed is throttled. You can get a paid plan for unlimited bandwidth and access to more servers than the default four destinations.
The best thing is you can easily check out if the VPN solution will work with Virgin Media. If it works, you can buy it. If it doesn’t, simply skip it.
Get Browsec for free!
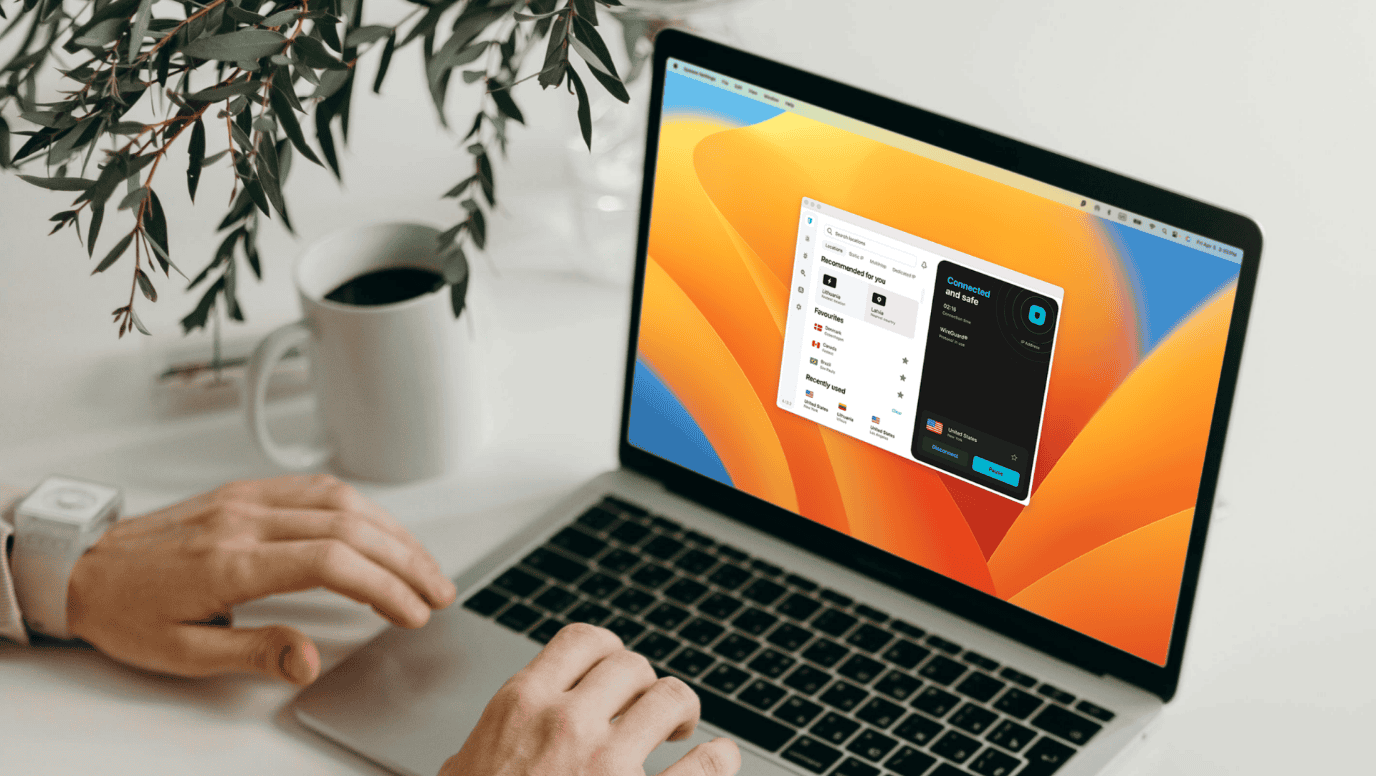
Windscribe
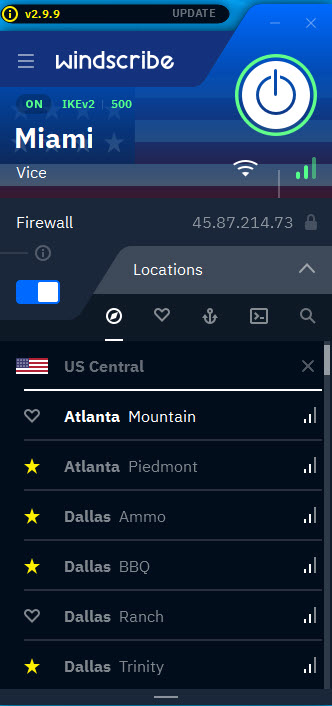
If you wish to apply a VPN from the system level, you can use Windscribe. You can get its desktop app for macOS, Windows, and Linux devices. It comes with a 10 GB free surfing and downloading quota. The free usage renews every month. It also offers more free VPN servers than Browsec.
I’ve been using it to surf, stream, and download seamlessly on any ISP. I haven’t experienced any ISP-level block on it.
Get Windscribe
ExpressVPN
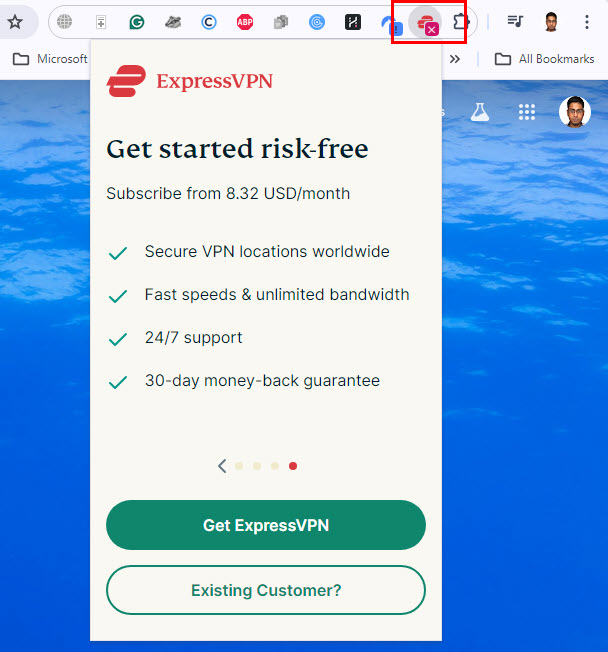
ExpressVPN is a premium VPN tool with no free trial. However, there’s a money-back guarantee if you’re not satisfied with its service.
Moreover, it has servers in 105 countries. When I reviewed this VPN solution, it didn’t disclose how many servers it maintains. You can install it on a desktop, mobile, and Chrome Browser. It allows you to simultaneously run a VPN on eight devices from one subscribed account. Furthermore, you can set up Express VPN within the router as well.
Get ExpressVPN
Proton VPN

Proton VPN is a Switzerland-based VPN solutions provider. It comes with a no-log policy. That means it won’t log your browsing habits on any server for any reason. Also, it uses AES-256-CBC encryption so ISPs can’t decode your browsing behavior.
Furthermore, you can experience download speeds of up to 10 Gbps. You can run the tool on up to 10 devices with a single subscription. Moreover, it offers an effortless router setup option as well.
Try the free trial and see if it works on Virgin Media before subscribing.
Get Proton VPN
Summary
So, now you know what to do when Virgin Media is blocking NordVPN. I can also help you if you’re encountering the same problem on your Firestick.
Just follow my instructions in the same order as above and I’m confident you’ll be able to fix the problem in no time.
Comment below if the article helped or if you know a better technique than the ones mentioned here.


User forum
0 messages