Volume Mixer Settings Not Saving? 5 Ways to Fix it
Give a try to these tested solutions right away
Key notes
- The volume mixer on your Windows PC allows you to adjust the sound level for each of the programs and applications at any given time.
- However, sometimes, you may come across a situation where the volume mixer is not saving any changes in the settings for system sounds after a recent update, or after you restart your PC.
- Apparently, the issue is mostly related to driver issues, corrupted system files, or a glitch with the hardware.

Sometimes, when trying to lower the Skype sound in the volume mixer and save it for the future, you notice that it’s not saving the settings as soon as you close the window.
While there are ways to fix this issue, you may also refer to our detailed post for some quick workarounds if the sound volume is too low on your Windows PC.
Why doesn’t Windows save settings in the volume mixer?
There could be different reasons why the volume mixer is not saving the settings, such as:
- A hardware conflict – It could be possible that there’s a problem with the built-in audio device.
- Outdated or corrupted audio drivers – If the drivers are not updated to the latest version or are damaged, it can interfere with the volume mixer functionality.
- The app does not have exclusive control of the device – If it’s a problem with a specific app, it may not have exclusive control of the device.
- Damaged system files – Corrupted system files can affect the various functions of the system, including sound. It may also lead to the volume mixer not showing sound.
- A recent Windows update – It may be possible that the last Windows update is corrupt and hence, causing the volume mixer issue.
- Windows Explorer not working properly – Chances are that the Windows Explore process is not functioning correctly.
- A virus in the system – There could be a virus or other threats preventing the normal functioning of the volume mixer.
However, the good news is that we have a list of solutions that may help you fix the volume mixer not saving settings issue.
How do I fix the volume mixer if it’s not saving the settings?
Before you proceed with the main methods below, we suggest you try the following:
- Install any pending Windows Update.
- Run a virus scan and remove any threats.
- Uninstall the recent Windows Update that may be causing the problem.
- Remove any third-party apps that may be interfering with the volume mixer.
However, if the volume mixer still does not save the settings, you can follow the below methods to fix the issue.
1. Run the Windows audio troubleshooter
- Press the Win + I keys simultaneously to launch Windows Settings.
- Click on System on the left, and then click on Troubleshoot on the right.

- On the next screen, under Options, click on Other trouble-shooters.
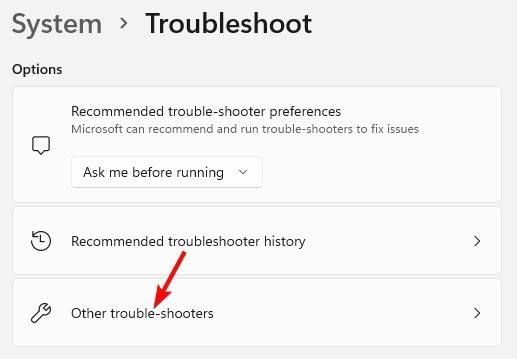
- Next, go to Playing Audio and click on Run. Windows will now start looking for any issues, and if found, will apply the fix automatically.

When you are done, you can check if the volume mixer is now saving the settings.
But, if the Windows troubleshooter has stopped working for some reason, you can refer to the solutions in our detailed post here.
2. Take actions related to the audio driver
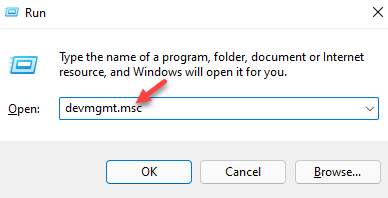
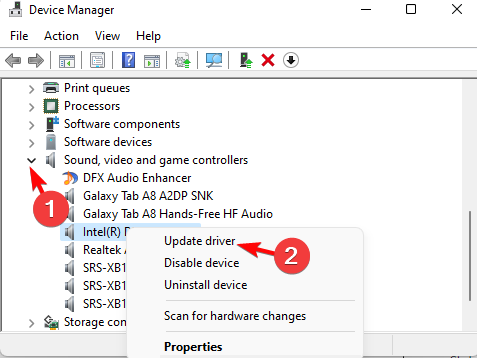
2.1 Update audio driver
- Press the Win + R shortcut keys to open the Run console.
- Type devmgmt.msc in the search bar and hit Enter.
- Next, expand the Sound, video, and game controllers section, right-click on the device and select Update driver.
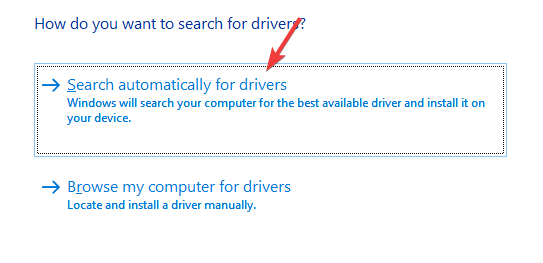
- Next, in the new window, click on Search automatically for drivers. Windows will detect the latest version and automatically install the driver.
In fact, you can also uninstall the driver and visit the manufacturer’s website to download & install the latest driver version manually to fix the issue.
Alternatively, you can use driver detector software for Windows 10/11 from our recommendations to help fix your device drivers quickly.
Another safe and fast way to update your drivers is with Outbyte Driver Updater. Outbyte Driver Updater is a simple and powerful tool that finds all outdated drivers and updates them to the latest version.

Outbyte Driver Updater
Get your audio driver updated along with all other outdated drivers in no time2.2 Roll Back the audio driver
- Open the Run console by pressing the Win + R keys simultaneously.
- In the search field, type devmgmt.msc and hit Enter.
- Click to expand the Sound, video, and game controllers section, right-click on the device, and select Properties.

- In the Properties dialog, go to the Driver tab and click on Roll Back Driver (if it’s highlighted).

Once done, reboot your PC, and now, the volume mixer should be saving the settings.
3. Allow the application to take exclusive control of this device
- Press the Win + R hotkey to open the Run console.
- Type sndvol in the search box and hit Enter.

- This will open the classic Volume Mixer panel. Here, go to Device and click on the speaker icon.

- In the Properties dialog, navigate to the Advanced tab, and select Allow applications to take exclusive control of this device and Give exclusive mode application priority.

- Press Apply and OK to save the changes.
Now, open your volume mixer and check if it’s saving the settings or if you are still facing the issue.
4. Restart the Windows Explorer Process
- Press the Ctrl + Shift + Esc keys simultaneously to open Task Manager.
- Go to the Processes tab, and locate Windows Explorer under Windows processes.
- Right-click on Windows Explorer and click on Restart.

You can now launch the volume mixer, modify the settings and check if it’s saving the changes.
5. Repair corrupted system files
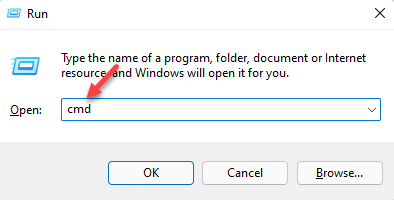
- Press the Win + R keys together to open the Run console, type cmd, and press the Ctrl + Shift + Enter hotkey to open the elevated Command Prompt.
- Next, in the Command Prompt (Admin) window, run the below command and hit Enter:
sfc /scannow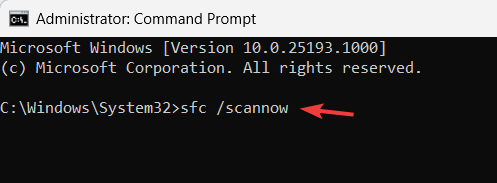
- The scanning process takes a while so, wait till it’s over.
If you were wondering how do I make my volume mixer permanent when it’s not saving settings, one of these methods should have helped.
How to save volume mixer settings?
Nevertheless, in the usual circumstances, you can follow the below instructions to make sure that the volume mixer saves any changes in the settings:
- Press the Win + I keys together to open Windows Settings.
- Type sound mixer in the search box on the left and click on Sound mixer options.

- On the next screen, go to the Apps section and move the slider under System sounds to the left or right to adjust the sound settings for your apps.

Alternatively, you must also check if the headset you are using is damaged or if the volume button is defective. In such cases, you can replace the headset with a new one.
But, if none of the above methods work, you can perform a factory reset of your Windows 11 PC, and this should help you fix the volume mixer not saving settings issue.
Make sure you know how to access the Volume Mixer properly after you fix the problem. Follow this easy guide on how to open the Sound Volume Mixer in Windows 11 or 10 and check if your app settings appear correctly.
For any other queries on the volume mixer or audio issues, do leave a message in the comments box below.
Read our disclosure page to find out how can you help Windows Report sustain the editorial team. Read more


Improve this guide


User forum
0 messages