What is Wermgr.exe & How to Quickly Disable It
To disable this wermgr.exe, just use the Registry Editor
3 min. read
Updated on
Read our disclosure page to find out how can you help Windows Report sustain the editorial team. Read more
Key notes
- Employing the Services window can disable this specific process if necessary.
- To handle this situation effectively, make a few changes in the registry.

The wermgr.exe is a helpful error reporting service that sends error logs to Microsoft. This executable also notifies you when there’s an issue with the operating system or a program.
We previously covered how to disable the Windows error reporting service in our guide, and now we find ourselves in a similar situation.
However, it’s essential to identify the underlying issue before addressing the problem.
What is the Wermgr.exe process?
The wermgr.exe executable is a crucial component of the Windows Error Reporting Manager. Its primary function is to manage the errors that occur within the Windows operating system.
It is used to identify and report any crashes or errors to determine the root cause of your program’s failure.
Should I disable the wermgr.exe?
It’s recommended to keep this process enabled, as disabling it may lead to certain Windows components malfunctioning.
It’s important to ensure the smooth functioning of all aspects of the operating system. Therefore it should remain enabled.
How can I disable wermgr.exe?
1. Use the Services window
- Hold the Windows + R keys together to open up a Run window.
- Type services.msc and click OK to open the Services screen.
- In the services screen, scroll down and locate Windows Error Reporting Service. Now, right-click on it and choose Properties.
- Next change the Startup Type from Automatic to Manual.
- After configuring the Startup Type to Manual, it is recommended that you Reboot your system. Following this, a check of the Task Manager should reveal the absence of wermgr.exe.
2. Use Registry Editor
- On your home screen type in regedit in the search bar and click Open.
- The moment the UAC pops up click Yes.
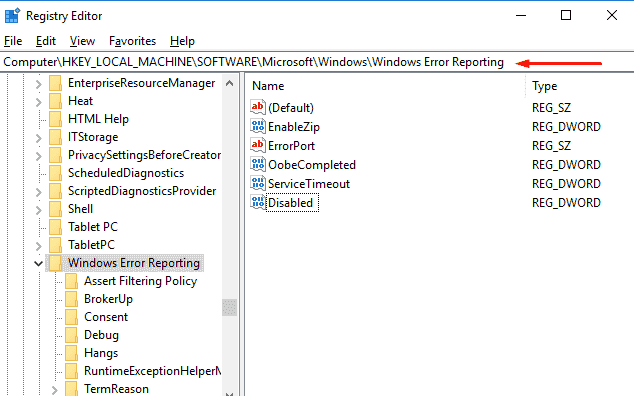
- Next, locate the following path
HKEY_LOCAL_MACHINE\SOFTWARE\Microsoft\Windows\Windows Error Reporting - Now, shift to the right panel and find Disabled.
- Double-click on the Disabled DWORD key and change the value from 0 to 1. Then save it by clicking OK.
After making these changes, the wermgr.exe will be disabled.
We hope this guide has provided you with the necessary assistance to address your concern. Resolving this issue is not as daunting as it may initially seem.
If you encounter any additional challenges, we suggest looking at our comprehensive manual on Windows 11 error logs. This guide may offer comparable solutions to address your issue.
We value your opinion on this topic and would be delighted to hear your thoughts. Kindly share your feedback by leaving a comment below.


User forum
0 messages