
How to Fix Wi-Fi Repeater Not Working [Can't Connect]


 3 min. read
  Updated on

Wi-Fi repeater/extender won’t connect? We’ll give you all the information you need to fix it.
There are cases in which your Wi-Fi works without any issues until you’re trying to connect an extender. Then, your device tells you that it can’t connect to the network, or, in some cases, can’t connect at all.
What do I do if the Wi-Fi extender isn’t working?
Firstly, make sure that you have connected it correctly, according to its manual. Every Wi-Fi repeater comes with a connection diagram or steps that you mush follow in order to make it work.
Now, let’s get to more advanced fixes.
1. Reset Wi-Fi extender/repeater
All WiFi extenders come with a reset button. All you have to do is press/switch the reset button and wait for 10 seconds. It’s usually located at the back of your extender, near the Ethernet cable port.
This will turn settings to default and let you adjust them. We recommend not changing anything before you check whether the extender works now. If it’s all working, be mindful of how you adjust your setup.
2. Forget the network from your PC
- Press Windows + I key combination to open Settings.
- Select Network & Internet.
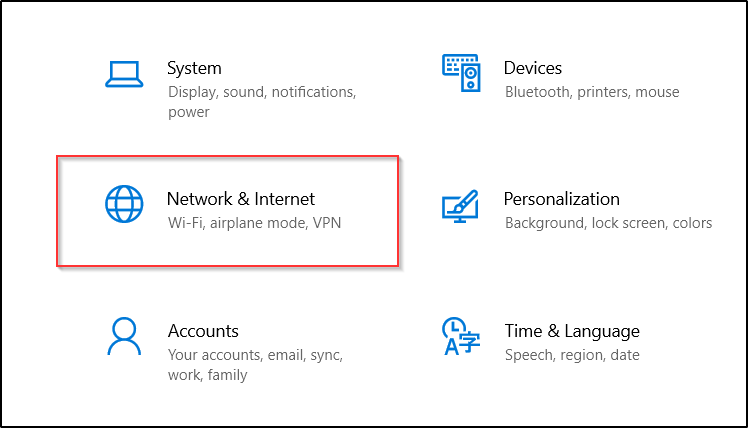
- From the left pane, choose Wi-Fi.

- Click on Manage known networks.

- Click on your Wi-Fi repeater/extender and select Forget.

- After you click on Forget, the network will disappear from the list. Go to the right corner of your taskbar and click the Wi-Fi icon.

- Search for the repeater’s network and connect to it again.
3. Check to see if your Wi-Fi repeater is on the same network
Check your router’s SSID and check to see if another similar network is available by using another device (phone, tablet, etc.).
For example, if your router SSID is TP-Link_Router, the default SSID for your extender would be TP-Link_Router or Link_Router_EXT.
To change these settings, you will need to access the IP address for router settings your internet provider gave you, by using your PC‘s browser.
4. Check for hardware issues
If no LED is on, either the device is broken, the charger or the power outlet has an issue. To conclude that is a repeater problem, you can check the power outlet with another device, to see if it’s working properly.
In this article, we explored some of the best troubleshooting methods if your Wi-Fi repeater is not working and you are not able to connect to the Internet.
Please feel free to let us know if this guide helped you solve your issue, by using the comment section below.

Read our disclosure page to find out how can you help Windows Report sustain the editorial team. Read more



Improve this guide



User forum
6 messages