Fix: Windows 10 update error 0x803c0109
While Windows 10 should be a certain upgrade over its predecessors, it inherited few common issues. Additionally, with Microsoft cutting off support for previous systems, Windows 10 becomes the only viable option in the upcoming years.
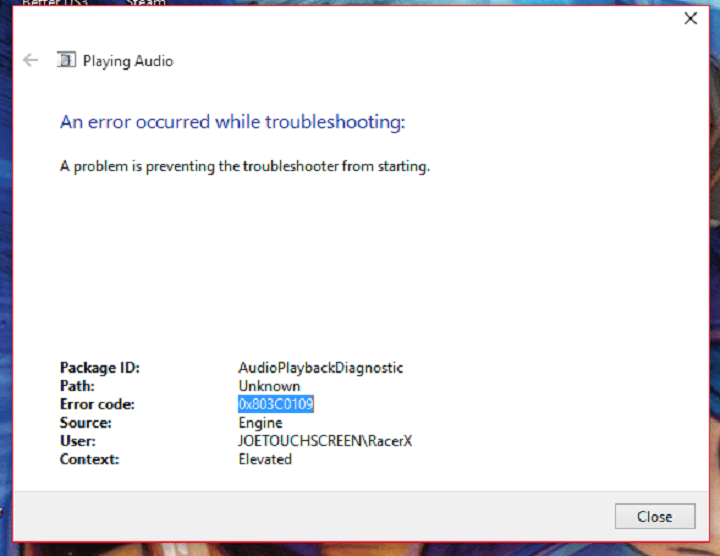
The majority of errors is somehow connected with updates and all of them can manifest different issues. One of those errors that commonly appear after updates, bears the code 0x803c0109. As some users reported, this issue affects sound and sound device drivers. The main culprit is a failed update or a defective build. However, don’t worry, because we have a few workarounds that should resolve this annoyance, in case it bothers you.
How to fix error 0x803c0109 on Windows 10
Table of contents:
- Check Speaker Properties
- Reinstall Driver Manually
- Restart Update Services
- Check system integrity with SFC
- Uninstall previous updates
- Run DISM
- Run the Update troubleshooter
- Restart Update components
- Make sure the BITS service is running
- Disable antivirus
- Install the update manually
Fix – Update error 0x803c0109 in Windows 10
1. Check Speaker Properties
Your first step should be checking sound devices and connect them to an alternative source. Additionally, some updates can change your settings, so follow these steps and make sure everything is set as it’s supposed to be.
- Right-click in the Volume icon in Notification area.
- Open Volume Mixer and make sure the Speakers volume is not muted.
- Right-click Volume icon again and open Playback Devices.

- Right-click preferred device and Set as Default.
- Select the preferred device and choose Properties from the bottom.
- Open Advanced tab and set Default format to 16bit 44100hz (CD quality).
- In the same tab, check both Exclusive mode boxes.
- Save and test your sound.
That should resolve all potential issues with the Speaker settings. However, if the problem is persistent, move on to the next step.
2. Reinstall Driver Manually
As you might be aware of, Windows 10 Update will occasionally install a few drivers on your PC, too. In some cases, that can be a good thing. However, more time than not, the generic drivers are not the best solution. So, you’ll probably need to uninstall Sound drivers and get the new ones from the manufacturer’s official site. In order to do that, follow these instructions:
- Right-click Start and open Device Manager.
- Find Sound, video and game controllers.
- Select your device, right-click and open Properties.
- Open Details tab.
- In the drop-down menu, select Hardware Ids.
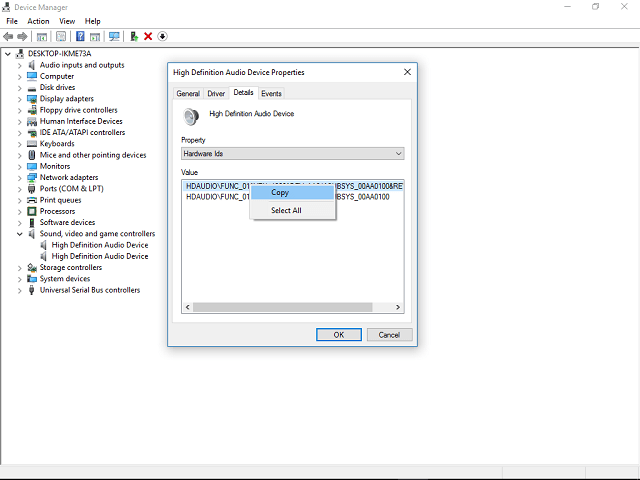
- Copy the first line and paste it into any web Search Engine (Google, Bing etc.).
- You should see your sound device’s official manufacturer and support drivers.
- Download and install.
In addition, we advise you to download drivers exclusively from the official site, and not from non-trusted sources. That way you can be secure and obtain a valid driver.
2.1 Update drivers automatically
In order to prevent PC damage by installing the wrong driver versions, we strongly suggest to do it automatically by using a third-party tool.
An automatic tool will help you update all outdated drivers safely. After several tests, our team concluded that this is the best-automatized solution:
- Download and install Outbyte Driver Updater.
- Launch the software.
- Wait for the app to detect all faulty drivers.

- Now, it will show you all the malfunctioning drivers listed to select the ones to Update or Ignore.
- Click on Update & Apply Selected to download and install the newest versions.
- Restart your PC to ensure the applied changes.

Outbyte Driver Updater
Secure your Windows PC with Outbyte from various errors caused by problematic drivers.3. Restart Update Services
As we already stated, the previously installed updates are the reason for sound issues. At least, most of the time. Due to corrupted or incomplete updates, you can experience performance drops or malfunction of certain peripheral devices. This is how you can try and fix updates in the first place:
- Press Windows key + R and type services.msc
- Press Enter to confirm.
- Find Background Intelligent Transfer Service (BITS).
- Make sure that the status is set to Running.
- If it isn’t, right-click and choose Start.
- Right-click again and open Properties.
- Choose the Recovery tab and make sure that First failure and Second failure are set to Restart service.
- Save and try updating.
That way you’ll make sure that the main update service is working. Try updating and see is the problem maybe resolved.
4. Check system integrity with SFC
Additionally, if the updated system files are corrupted or incomplete due to malware or misuse of any kind, various errors can occur. However, you can solve that in a few easy steps with the SFC tool. And this is how:
- Right-click on Start and run Command Prompt (Admin).
- In the command line type sfc/scannow and press Enter.
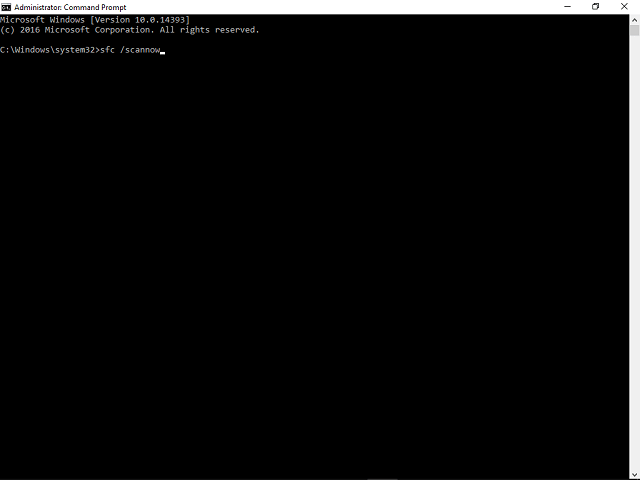
- Wait for the process to complete and restart PC.
- Try updating.
Hopefully, after that, you’ll be able to install new updates and possibly fix the sound issue.
5. Uninstall previous updates
Even though the Updates are forced, you still can uninstall the ones that cause problems of any sort. This exact problem impacts sound but its main source is faulty update. And if your sound worked just fine prior to an update, that is the reason more to get rid of them. So, in order to do so, follow these steps:
- Choose Windows Search and type Updates.
- Open View installed updates.
- Right-click on the latest update and choose Uninstall.
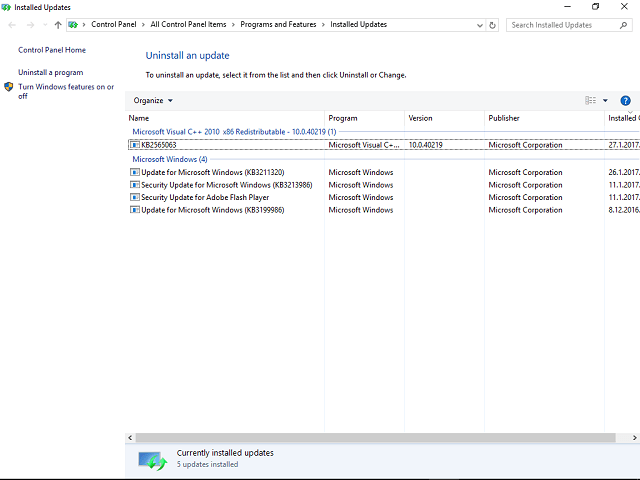
- Save and restart your PC.
Most of the time, Microsoft address this issues, so you can expect a fix with the upcoming updates.
6. Run DISM
If running the aforementioned SFC scan didn’t get the job done, you can try with DISM. Deployment Image Servicing and Management is a command-line tool that deploys the system image all over again. Maybe this process will help with updating problems.
Here’s how to run DISM in Windows 10:
- Open the Command Prompt as shown above.
- Enter the following command and press Enter:
- DISM.exe /Online /Cleanup-image /Restorehealth

- DISM.exe /Online /Cleanup-image /Restorehealth
- Wait for the process to finish.
- Restart your computer.
- In case the DISM can’t obtain files online, try using your installation USB or DVD. Insert media and type following command:
- DISM.exe /Online /Cleanup-Image /RestoreHealth /Source:C:RepairSourceWindows /LimitAccess
- Make sure to replace ”C:RepairSourceWindows” path of your DVD or USB.
- Follow further on-screen instructions.
7. Run the Update troubleshooter
We mention Windows 10’s built-in troubleshooter in almost every article. And that’s for a reason. Microsoft introduced this tool to automate troubleshooting in Windows 10 and make it easier for end-user. As the troubleshooter offers solutions for various problems, we can use it for resolving update issues, as well. Hopefully, the system will recognize what’s wrong and resolve the issue for us.
Here’s how to run Windows 10’s built-in troubleshooter:
- Go to Settings.
- Head over to Updates & Security > Troubleshoot.
- Select Windows Update, and go to Run the Troubleshooter.

- Follow further on-screen instructions and let the process finish.
- Restart your computer.
8. Restart Update components
If the troubleshooter failed to resolve the problem, we’ll have to go back to our own. So, the next thing we’re going to do is resetting crucial Windows update components, in order to get them back to a (hopefully) working state. Here’s what you need to do:
- Start Command Prompt as administrator.
- When Command Prompt starts, run the following commands:
- net stop wuauserv
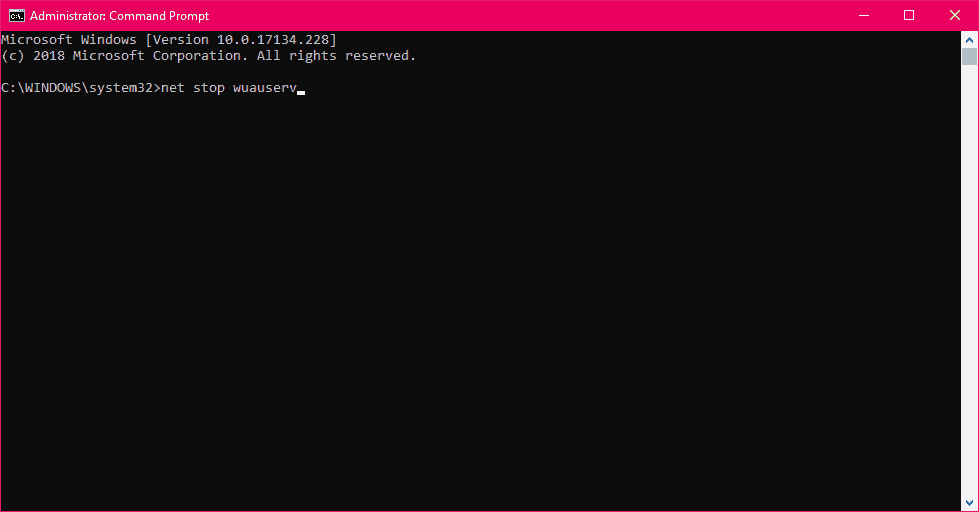
- net stop cryptSvc
- net stop msiserver
- ren C:WindowsSoftwareDistribution SoftwareDistribution.old
- ren C:WindowsSystem32catroot2 Catroot2.old
- net start wuauserv
- net start cryptSvc
- net start msiserver
9. Make sure the BITS service is running
Background Intelligent Transfer Service (BITS) is a key service for delivering Windows updates. So, the first thing we’re going to do is restarting it. This should help to eiminate any possible interferences. After that, we’ll enable the service and make sure it stays on.
Here’s what you need to do:
- Go to Search, type services.msc, and open Services.
- Find Background Intelligent Transfer Service. Right-click and open Restart.
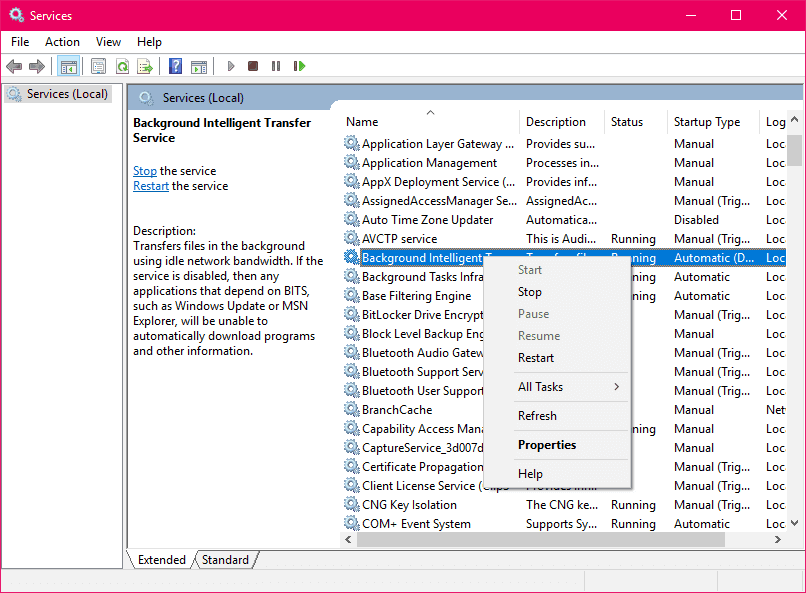
- Wait for the process to restart.
- Now, on the General tab, find Startup type and choose Automatic.
- If the BITS is not running, right-click and choose Start.
- Confirm selection and close window.
10. Disable antivirus
Third-party antivirus programs and Windows updates are not designed to work in harmony. Because of that, it’s quite possible for your antivirus to block the incoming update. To eliminate the doubt, disable your antivirus for a few minutes, and try to install updates once again. If you succeed, the problem is resolved. If not, well…
11. Install the update manually
And finally, if none of the previous solutions managed to resolve the problem, we’ll have to surrender and install the update manually. Here’s how:
- Copy the name of the issued file.
- Go to Microsoft Catalogue here.
- Paste the name into the search box.
- Download the file. Keep mind on your system architecture (x86 or x64).
- Install the update file.
- Restart your PC.
- Check for additional updates to make sure the update is up and running.
That is it. We hope you’ll manage to get your sound back and resolve additional issues.
If there is anything you would add, the comments section is bellow.
For more Windows Update workarounds, and additional info, make sure to check our Windows Update hub.
Read our disclosure page to find out how can you help Windows Report sustain the editorial team. Read more


Improve this guide


User forum
0 messages