How to Disable Admin Shares in Windows 11
You can easily disable admin shares using Registry Editor
![]() 2 min. read
2 min. read
![]() Published on
Published on
Share this article
Improve this guide
Read our disclosure page to find out how can you help Windows Report sustain the editorial team. Read more
Disabling administrative shares in Windows 11 can help improve security by preventing unauthorized remote access. However, it’s not a recommended procedure since many tools use the admin shares to push software on the endpoints. The SCCM won’t work as intended and you might need to fix other unforeseen problems.
How do I disable admin shares in Windows 11?
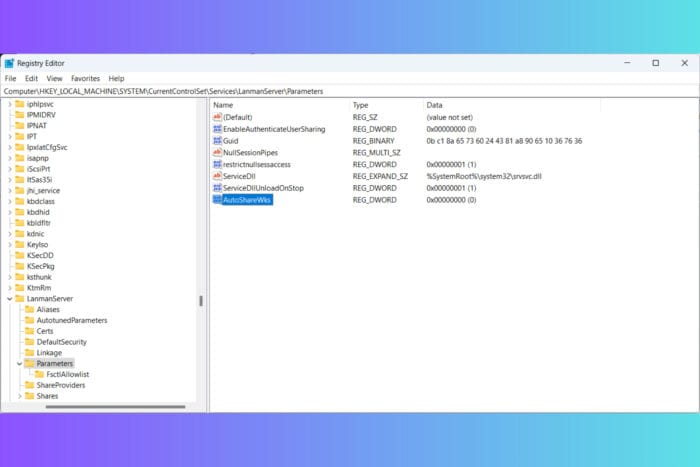
1. Use the Registry editor to modify the AutoShareWks value
 NOTE
NOTE
- Press Win + R to open the Run dialog, type regedit and press Enter to open the Registry Editor.
- If prompted by User Account Control (UAC), click Yes to allow changes.
- In the Registry Editor, navigate to the following path:
HKEY_LOCAL_MACHINE\SYSTEM\CurrentControlSet\Services\LanmanServer\Parameters - Look for a value named AutoShareWks in the right pane.
- If it doesn’t exist, create it by right-clicking on the empty space in the right pane, selecting New > DWORD (32-bit) Value, and naming it AutoShareWks.
- Double-click on AutoShareWks and set its value to 0, then click OK to save the changes.
- Close the Registry Editor and restart your computer to apply the changes.
2. Disable admin shares on Windows Server
If you are working on a Windows Server, the process is similar but with a different registry value:
- Press Win + R, type regedit, and press Enter.
- Allow changes if prompted by UAC.
- Navigate to the LanmanServer Parameters key:
HKEY_LOCAL_MACHINE\SYSTEM\CurrentControlSet\Services\LanmanServer\Parameters - Look for AutoShareServer in the right pane.
- If it doesn’t exist, create it by right-clicking on the empty space, selecting New > DWORD (32-bit) Value, and naming it AutoShareServer.
- Double-click on AutoShareServer and set its value to 0, then click OK to save the changes.
- Close the Registry Editor and restart the server to apply the changes.
To check if you made the changes correctly, open Computer Management, then go to System Tools > Shared Folders > Shares. Verify that the administrative shares (e.g., C$, ADMIN$) are no longer listed.
As you can see, disabling admin shares in Windows 11 and Windows Server is pretty easy, but once again, it’s not a recommended procedure.


User forum
0 messages