Fix: Surround Sound is Not Working with HDMI on Windows 11
Make sure you have the right HDMI components for surround audio
Key notes
- Surround sound means that a system of three or more speakers envelops the listener in sound from more channels and directions.
- The new OS supports this technology, but some of our readers have reported an issue with Windows 11 HDMI surround sound.
- Make sure that the HDMI cable and ports between the PC and sound system are compatible with surround protocols.

Surround sound means a stereophony system that surrounds the listener with three or more speakers to create a more realistic effect.
However, a Windows 11 HDMI surround sound issue is common among Windows 11 users. In this article, we are going to discuss what to do if surround sound isn’t working through HDMI on Windows 11.
Any audio player might have this problem on both 7.1 and 5.1 surround sound systems. Your system won’t produce sound through your rear speakers if this problem arises.
The affected consumers claim that the Realtek sound card is typically to blame for this problem. Other sound card users could, however, also experience this issue.
Does Windows 11 support surround sound?
Yes, it does! Windows 11 gives you the option to choose between three alternative spatial sound providers: Windows Sonic for Headphones, Dolby Atmos for Headphones, and Dolby Atmos for Home Theater.
However, this is only the software part. For the full experience, you will also need a surround sound board installed on your PC.
What can I do if surround sound isn’t working through HDMI on Windows 11?
1. Run the Audio troubleshooter
- Type audio troubleshooter into Windows Search and press Enter.

- Click on Advanced and then turn on the Apply repairs automatically checkbox.

- Click Next and follow the on-screen instructions to execute the audio troubleshooter.

2. Turn on mono audio
- Click on the Start button and select Settings.

- Select System and then click Sound.

- Turn the Mono audio switch to On.

3. Download the HD Audio Codecs
- Visit the sound card manufacturer’s website, such as the Realtek Audio Codecs.

- Look for your device’s HD Audio Codecs and download them.
- Run the installation file and follow the on-screen instructions to install the audio codecs.
4. Unmute any device
- Right-click the taskbar Speaker icon and then choose Open Volume mixer.
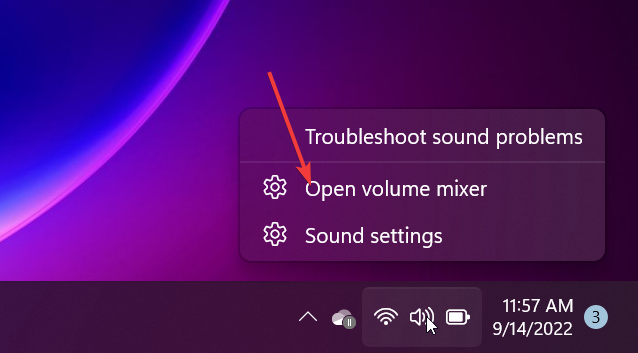
- Unmute any devices whose volume is currently muted.
5. Restart the audio services
- Press the Windows + R hotkey to start the Run command box.
- Enter services.msc and click OK.
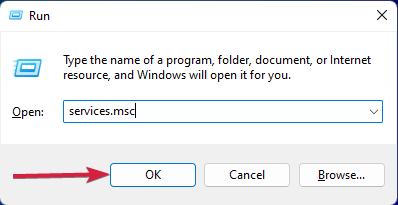
- Right-click on the Windows Audio service and choose Restart.

- Do the same with the Remote Procedure Call (RPC) and Windows Audio Endpoint Builder services.
6. Check your surround sound speaker’s configuration settings.
- Press Windows + R key combination to launch the Run window.
- Type mmsys.cpl and then select OK.

- Select the Playback tab and choose your speaker.
- Choose Set as Default Device. If the option is grayed out, that means that it’s already set as the default device.

- Choose Configure from the menu.

- Depending on the sort of speakers you are using, choose 5.1 or 7.1 Surround in the speaker settings and then click Next. If you don’t have these options, your soundboard is either not installed or doesn’t have surround capabilities.
- Select the check boxes next to Center, Subwoofer, and Side pair, and then click Next.
- Hold off until the configuration is finished and click Finish to finish the configuration after that.
7. Switch on Speaker Fill.
- Press Windows + R key combination to launch the run window.
- Type mmsys.cpl and then select OK.

- Right-click on your speaker under the Playback tab and choose Properties.

- Select the Enhancements tab and then activate the Speaker Fill or Surround sound settings.
8. Attempt various audio formats.
- Press Windows + R key combination to launch the Run console.
- Type or paste mmsys.cpl just like in the previous solutions and hit Enter or click OK.

- Choose your speaker from the list and then click Properties.

- Select a different audio format from the drop-down box on the Advanced tab.
- Click Apply and then OK to save your settings.
How do I enable Dolby on Windows 11?
Dolby Atmos is available in Windows 11, so you can use it but you won’t benefit from the best results unless you also install the required hardware.
First, get the Dolby Access app from the Microsoft Store to enable Dolby. The setup process is quite simple, and the software will walk users through it.
Choose With my home theater if you have both a receiver and a home entertainment system.
If you own headphones, pick With my headphones instead. The app will request that Dolby Atmos is enabled for headphones when the trial has been activated.
Surround sound not working with HDMI on Windows 11 is a common issue among many Windows 11 users.
When you are faced with this issue, you do not have to seek help from a technician. As you can see above, you can fix the problem on your own without any problems.
You should also check our list including the best virtual surround sound software that might help you enjoy this audio effect.
If you have any questions regarding this problem or other suggestions on how to fix it, use the comments section below.
Read our disclosure page to find out how can you help Windows Report sustain the editorial team. Read more


Improve this guide

User forum
0 messages