Windows 11 Can't Mount ISO? How to Enable it in 3 Steps
Key notes
- One of the best features of later versions of Windows is the ability to mount ISO files without the use of a third-party tool.
- However, various users have encountered problems when attempting to mount ISO files on a Windows 11 PC.
- If you are looking for a quick fix for the error message Sorry, there was a problem mounting the file, these easy guide will help you.

Windows 11 includes mounting ISO disk images as well as VHD virtual HDD image files.
When attempting to mount a file on Windows Server 11, several users report getting the Sorry, there was a problem mounting the file message. The problem has only been reported with the built-in ISO file mount in Windows.
If you’re one of those who have experienced such difficulties and want to learn how to fix ISO issues on Windows 11, you’re in the right place.
You can view or extract the contents of an ISO image without using third-party software, and this article will show you how to do so on Windows 11.
How do I fix the ISO file mount error on Windows 11?
1. Open the ISO file with Windows Explorer
- Locate the ISO file through File Explorer.
- Right-click the file and choose Open with and Chose another app from the menu.

- Select Windows Explorer from the list. Check Always use this app to open .iso files and click OK.
2. Use a third-party repair tool
Another method we tested to restore corrupted ISO files was to use a third-party repair software that’s both reliable and practical.
The recommended solution is to use professional Windows repair software, which does a deep scan of your Windows system, identifying and automatically repairing system files and components that are causing Sorry, there was an error mounting the file error message.
3. Unmount all drives
- Type in Search bar This PC and click on it.
- Expand Devices and Drives.
- Right-click on individual virtual drives and click Eject.
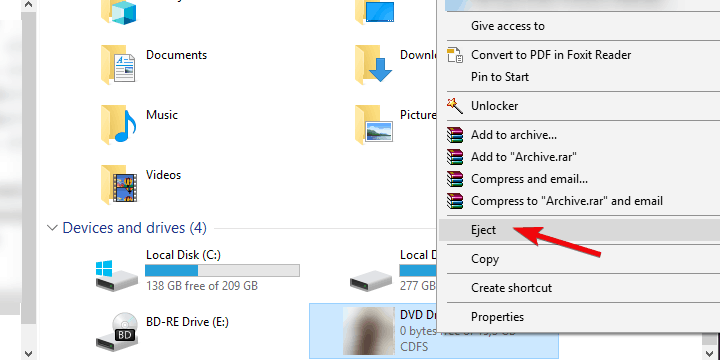
- Restart your computer and retry to mount the desired ISO file in any open slot.
That virtual drive appears in File Explorer with its drive letter and functions exactly like a DVD. You can, for example, copy files from the virtual DVD to any other disk drive.
Copy the VHD file from one location to another, rather than cut and paste, and you’ll be able to mount it. This is also a workaround to fix Sorry, there’s was a problem mounting the file error message.
Last but not least, there’s always the alternative of using third-party software to automate the process of mounting an ISO file on your Windows 11 PC if doing it manually overwhelms you.
To have an extra layer of security, we recommend using a compatible antivirus solution for Windows 11 PC, so you can be on the safe side when mounting ISO files.
If you encountered other issues and errors while mounting ISO files in Windows 10, in the article we covered more troubleshooting steps to help you resolve them.
Furthermore, having the most recent security upgrades should keep you safe from mounting a damaged ISO file, avoiding any issues. Leave us a comment and tell us if this easy fix resolved your issue.
Read our disclosure page to find out how can you help Windows Report sustain the editorial team. Read more


Improve this guide


User forum
0 messages