Customize the Windows 11 Start Menu With These 5 Tips
Key notes
- Windows 11 Start Menu is one of the most frequently used features, so customizing it according to your own preferences is always a good idea.
- You’re allowed to pin apps and rearrange them in any way you need.
- Adding the most important folders would save much more of your work time.
- For a more personalized environment, you can tune recommendations for Windows 11 Start Menu.
![How to customize Windows 11 Start Menu [Full Guide]](https://windowsreport.com/wp-content/uploads/2021/08/Untitled-design-81-1-1-1-886x590.jpg)
Windows 11 brings up some new and improved features and the Start menu is one of them.
However, the opinions are divided. Some users are extremely excited about the latest upgrades, while others are not that happy with the refreshed Start experience.
To build a more personalized environment, the OS design allows you to customize the Windows 11 Start menu in various ways.
Before anything else, you should know that the newest design looks quite different from the Windows 10 version. For a full comparison between Windows 10 and Windows 11, check out our dedicated article.
What’s new about the Windows 11 Start Menu customization?
You can access the Start menu home page by hitting the Windows key on your keyboard or by clicking on the Windows icon from your centered desktop taskbar.
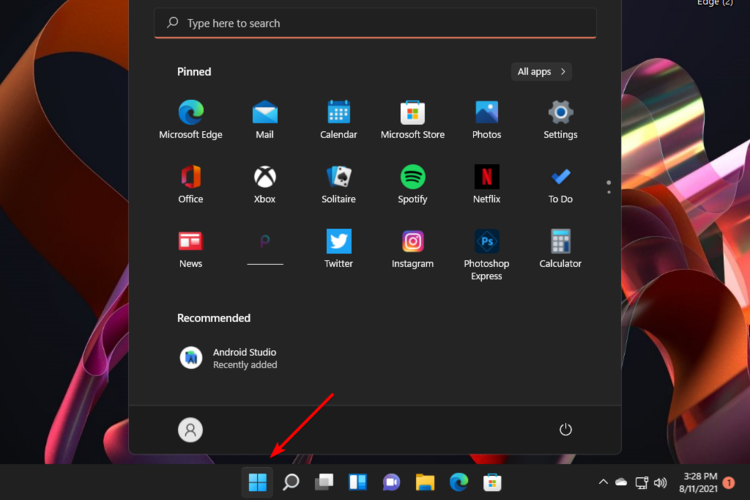
Pinned apps are displayed at the left top, and the All apps list button is placed on the right top side of the window.
Also, for perfect customization, you have the option to add and view recommended and recent items, which appear in the bottom half of the page.
As you can see in the picture below, Windows 11’s Start menu comes up with a brand new design, which also includes the round corner feature.

Now let’s see how this menu can be customized according to your own preferences. To build a unique Windows 11 Start menu, make sure you read each of our recommendations.
How can I make a great Windows 11 Start Menu customization?
1. Pin apps
- Press on the Windows key, then click on the All apps button.

- Search for the app you want to pin in the Windows 11 Start menu, then right-click on it, and select to Pin to Start.

- If you go back to the Start menu, the app will appear in the Pinned section.
- Repeat the process for any app you want.
This is a great option that will let you personalize one of the most used features. We also recommend checking more solutions to pin apps to the Start menu in Windows 11.
Note that if you ever change your mind, you can easily unpin certain apps, following the first two steps, but instead of the Pin to Start option, you’ll have to choose to Unpin from Start.
2. Rearrange pinned apps
- After pinning the desired apps, you can also manage them, by moving it to any position. To simply do it, left-click on the app, then hold and drag it wherever you need.
- Note that if you pin more than 18 apps to the Windows 11 Start Menu, then a second page will be added. You can scroll to move between different pages of pinned apps.
- You can also search for Windows 11 apps in alphabetical order. To simply do it, you have to open the All apps section, then click on any alphabet letter.

3. Tune recommendations
- Hit the Windows key, then open the Settings menu.

- Go to Personalization, then select the Start section.

- To find the new apps or programs in Windows 11 Start Menu, you can enable the Show recently added apps, right after installing it. With this feat you’ll be able to save time by not scrolling through the entire app list to find a newly installed app.

- You can also turn on the Show the most used apps option. This will help you get recommendations of frequently used apps.

- Now look at the Show the most used apps option, then if the toggle button is greyed out, you’ll have to enable a privacy setting to make it work, by following the next 3 steps. If it is not, jump directly to the step 9.
- To easily do it, jump to the Privacy & Security section (from the Settings home menu), then navigate to General.

- There, look at the Let Windows improve Start and search results by tracking app launches section, then enable it.

- Go back and open the Personalization page once again. Now you’ll be able to turn on the Show the most used apps option.
- In the same page, you can enable the Show recently opened items in Start, Jump Lists and File Explorer option. You’ll get quick access to files and programs you access across your Windows 11 Start Menu.

4. Add folders
- Access again the Windows 11 Settings menu.
- Go to Personalization, then navigate to Start.
- Select the Folders section.

- By setting the toggle button on On, you can add folders such as Downloads, Documents, Pictures, and more to the Start Menu.

- To view these folders, go to the right bottom side of Start menu (next to the Power button). There, you can quickly access important folders, without being necessary to scroll through your pinned apps.

- You can also add a custom folder to the Start menu. Right-click on that folder select the Pin to Start option.
5. Get back to the classic Start menu
- Hit the Windows key, type Registry Editor, then open it.

- Navigate to the following location:
HKEY_CURRENT_USER\Software\Microsoft\Windows\CurrentVersion\Explorer\Advanced - Look at the left window pane, right-click on the Advanced option, then select New, and DWORD (32-bit) Value.

- Enter the following value name, then press on Enter to save it:
Start_ShowClassicMode
- Double-click on the same value, then change its data to 1, and click on OK.

- Restart your PC.
If you’re not happy with the newest aspect, Windows 11 Start menu customization is the key, by switching back to the old design.
What are the most common Start menu issues?
Like any other Windows feature, the Start menu can sometimes run into trouble. Take a look at the following list and be prepared for future possible problems.
- Minor system issues – Your OS might sometimes be affected by small errors (random and temporary) that would prevent the Start Menu from properly starting. However, do not panic! It is possible that your system won’t be affected by critical bugs.
- Critical errors affecting your OS – Beside the first case scenario, your Start Menu might also be occured by much more serious bugs. In these terms, we have to consider aspects like malware which can corrupt or damage your operating system. To prevent such situations, you should check these antivirus options for Windows 11.
So these are the most popular ways to customize your Windows 11 Start menu. We hope you’ll better enjoy your digital experience by applying each of them.
Some users already reported some Start Menu-related troubles. If you’re one of them, checking a full guide on how to solve Windows 11 Start menu not working issues would definitely help you.
In addition to the Start Menu, did you know that you can customize File Explorer in Windows 11? That’s right, and it’s easier than you think.
Want to enable the new Start menu in Windows 11? Follow this quick guide before personalizing the layout.
Do not forget to share your thoughts and opinions with us by leaving a comment in our dedicated section.
Read our disclosure page to find out how can you help Windows Report sustain the editorial team. Read more


Improve this guide


User forum
0 messages