How to Get 2 Rows (or More) on Your Windows Taskbar

Follow the trick mentioned in this guide to get back the two rows

Reading time icon 6 min. read


Readers help support Windows Report. When you make a purchase using links on our site, we may earn an affiliate commission. Tooltip Icon

Read the affiliate disclosure page to find out how can you help Windows Report effortlessly and without spending any money. Read more

Key notes

  • Windows 11 although comes with multiple new features, it misses out on quite a lot of essential ones.
  • One of which is the option to expand the taskbar to get two or more rows to house more apps.
  • This guide explains how you can get back two rows on Windows 11 taskbar using a third-party tool.
windows 11

With Windows 11, Microsoft revamped its operating system. It brought in a more modern user interface and a bunch of new features. It now looks a bit more MacOS-ish.

There are a bunch of new features such as new icons, new themes, a new centered Taskbar, widgets, a new Start menu, an updated settings menu, integrated Microsoft Teams, tablet mode, integrated Android apps, improved gaming experience.

It also packs essential upgrades such as Secure Boot through device encryption, Virtualization-based Security (VBS), and more.

However, apart from all these gains, the Windows 11 operating system misses out on a bunch of features, that were essentially very important for users.

We are talking about several Taskbar features. While you still get to decide if you wish to set the taskbar centered or not, you cannot shift it at the top, at the bottom, or at left or right. That feature is totally gone.

Another important feature that is missing is the ability to expand the Taskbar to house more pinned apps and background apps in more rows.

There are several users looking out for solutions to have the Windows 11 taskbar 2 rows back. If you are among them, then you are in the right place.

Because in this guide, we will show you how you can get back 2 rows in the taskbar in Windows 11, just like Windows 10. Let us get right into it.

Can you resize the taskbar in Windows 11?

Sadly, Microsoft has removed the ability to resize the taskbar in Windows 11. You can still find several user queries if this is correct or not, which is correct.

Having the ability to resize the taskbar in Windows 10 was wonderful, as you could easily drag and enhance the size of the taskbar to accommodate more pinned apps and background apps.

The taskbar looked cleaner previously as compared to the locked taskbar we have with Windows 11.

Now with Windows 11, you only get a flat pane of the taskbar that houses and displays apps only in a single row, and nothing much. Overall, it has lost the customizability that it used to offer earlier.

How do I make the taskbar have two rows?

1. Use the ExplorerPatcher tool

  1. Open this Github page.
  2. Click on the latest available ExplorerPatcher app version under Releases on the right side.
  3. Scroll down and click on the EXE file.
  4. Download the ExplorerPatcher tool.
  5. Launch the program.
  6. Your taskbar will go black for some time, as it will replace the Windows 11 taskbar with the good-ol’ Windows 10 taskbar.
  7. After the taskbar loads, you can right-click on it and uncheck the Lock the taskbar option.
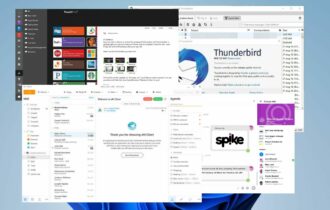
  8. Now, you can see all the abilities back you used to have with the Windows 10 taskbar.

Here is the official list of features that you get with the ExplorerPatcher tool:

  • Choose between Windows 11 or Windows 10 taskbar (with label support, small icons, and lots of customization).
  • Disable Windows 11 context menu and command bar in File Explorer and more.
  • Open Start to All apps by default, choose several frequent apps to show, display on the active monitor, and more.
  • Choose between the Windows 11, Windows 10, and Windows NT Alt-Tab window switcher with customization.
  • Skin tray menus to match Windows-style, make them behave like flyouts, and center them relative to the icon.
  • Choose action when left and/or right-clicking the network icon.
  • Revert to the Windows 7 search box in File Explorer, or disable Windows Search altogether.
  • Disable immersive menus and use mitigations that help you run the real classic theme without glitches.

This is the only way via which you can get back the full-functional Windows 10 taskbar and all its functionalities.

The process of using it is also very easy, and you get extra rows for all of your pinned apps and background apps.

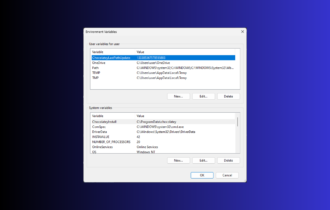
2. Use the Registry Editor

  1. Press the Win + R keys on your keyboard to open the Run dialog.
  2. Type regedit to open the Registry Editor.
  3. Navigate to the below path. HKEY_CURRENT_USER> Software> Microsoft > Windows> CurrentVersion> Explorer> StuckRects3
  4. Double-click on the Settings key file.
  5. A file named edit binary value will show up.
  6. Check out the 00000028 row and FE column in that file.
  7. You need to change the data to 02. This will add another row. In simple terms, if you want two rows in the system tray area, enter 02.
  8. Press Ctrl + Alt + Del button to open the Task Manager.
  9. Locate the Windows Explorer in the Processes tab.
  10. Click on it and select Restart from the bottom.
  11. Your taskbar will get refreshed and now you will see the change.

Do note that using this process, you would get two rows for the notifications tray icons. This won’t get applied to the entire taskbar.

But this is great for the scenario if you have a notification area stacked with icons. This will save space on the taskbar and give more room for your notifications tray.

How do I ungroup icons on taskbar Windows 11?

  1. Open the Github page for Open-Shell.
  2. Find the OpenShellSetup EXE file and click on it.
  3. Run the installer.
  4. Click on Next.
  5. Agree to the terms.
  6. Click on the dropdown menu beside Classic Explorer and select Entire feature will be unavailable.
  7. Do the above for Classic IE and Open-Shell update.
  8. Complete the installation.
  9. Launch the Open Shell Menu Settings program from the Start menu.
  10. Select the desired Start menu and make your choices.
  11. Press the Win + R keys on your keyboard to open the Run dialog.
  12. Type regedit to open the Registry Editor.
  13. Navigate the following path. HKEY_CURRENT_USER\Software\Microsoft\Windows\CurrentVersion\Policies\Explorer
  14. Select Explorer on your left.
  15. Right-click on the blank space on the right and select DWORD (32-bit) Value.
  16. Name the key NoTaskGrouping and hit Enter.
  17. Double-click on the new key file.
  18. Enter 1 as the Value data.
  19. Click on OK.
  20. Right-click on an empty spot on the taskbar.
  21. Select Taskbar settings from the pop-up menu that appears.
  22. Scroll down to the Taskbar behaviors section.
  23. Click on the Taskbar alignment option and select Left.
  24. Press the Win + R keys on your keyboard to open the Run dialog.
  25. Type regedit to open the Registry Editor.
  26. Navigate to the below path. HKEY_LOCAL_MACHINE\SOFTWARE\Microsoft\Windows\CurrentVersion\Shell\Update\Packages
  27. Select Packages from the left side.
  28. Now select New > DWORD (32-bit) Value.
  29. Name the new value as UndockingDisabled.
  30. Double-click on the new value and enter 1 in the Value data field.
  31. Click OK.
  32. Press Ctrl + Alt + Del button to open the Task Manager.
  33. Locate the Windows Explorer in the Processes tab.
  34. Click on it and select Restart from the bottom.
  35. Your taskbar will get refreshed and now you will see the change.

That is it from us in this guide. We hope that you were able to get back the two rows features on your Windows 11 PC using the above-mentioned methods.

Let us know in the comments below if you come across any issues while following the above guide.

More about the topics: Windows 11