FIX: Windows DVD Maker fails to burn disks
![]() 6 min. read
6 min. read
![]() Updated on
Updated on
Share this article
Improve this guide
Read our disclosure page to find out how can you help Windows Report sustain the editorial team. Read more
Key notes
- If you're unable to burn a DVD in Windows 10 the culprit may be your System Registry.
- Another cause could be that you need to modify a certain value in your Services folder.
- Using built-in multimedia software might help you solve the problem regarding burning a disc on your Windows 10 PC.
- A quick solution is to use a smart tool from Adobe with advanced features.
It can sometimes be annoying when you want to burn a CD or DVD and it interrupts right in the middle of the process.
There are a few methods that you can try in order to fix your Windows DVD burner and prevent any further damage when you try to burn a DVD or a CD. Follow the steps below in the order they are listed to fix the problem.
The Windows DVD burner application in Windows 10, might interrupt at some point in the burning process mainly because you have some corrupt system drivers or the DVD drive is not reachable via an assigned drive letter.
So, if your Windows DVD Maker cannot create DVD, here’s how you can fix the problem.
How do I solve Windows DVD maker unable to burn disks?
1. Use Adobe Premiere Pro
Before going through any of the troubleshooting steps written below, maybe you should consider using a third-party tool that can burn your DVDs.
Most often than naught, third-party tools greatly simplify the process of what they are tasked to do.
In the case at hand, a great tool to consider is Adobe Premiere Pro, a world-leading video editor that has all the tools to turn a simple video recorded on your mobile into a movie of near-Hollywood proportions.
Besides the fact that it can open any video format and edit in whatever way you see fit, you can also use it to then burn your work of art to DVD for safekeeping.
2. Burn DVD with Windows Media Player
- Move the mouse cursor over to the upper right side of the window, click on the Search feature and in the search dialog box write: Windows Media Player.
- Click on the Apps feature and from the Apps menu, click on the Windows Media Player icon.
- In the upper right side of the Windows Media Player app, click Switch to Library, then in the new window access the Burn tab.
- Click Burn Options then click on the Data CD or DVD feature.
- Now place a blank DVD or CD into the DVD Burner.
- Now select the drive letter that corresponds with the DVD burner you placed the DVD in.
- Drag and drop the items you wish to burn from the details panel to the list panel to make a burn list.
- Now after you made the list you will need to left click or tap on the Start burn button.
- Check to see if your burning process works in this application.
Some users have claimed that they fixed the problem in regards to burning a disc in Windows 10 by using Media Player. This is a rather easy solution to an issue that may seem more complicated than it actually is.
There are plenty of other third-party apps that you can use to burn a DVD if you are not fond of Windows Media Player. This applies when you want to use a converter that has additional video editing features, such as trimming an element, creating a DVD menu, adding music or a picture, and adding a subtitle.
3. Run the Hardware and Sound Troubleshooter
- Hold Windows+R hotkeys to open the Run window, in the dialog box write control then press Enter.
- Open Control Panel and in the upper search box type troubleshooter.
- Left-click or tap on the Troubleshooter icon after the search has finished.
- Under the Hardware and Sound topic left click or tap on the Configure a device feature.

- Follow the instructions on the screen to finish the troubleshooting process.
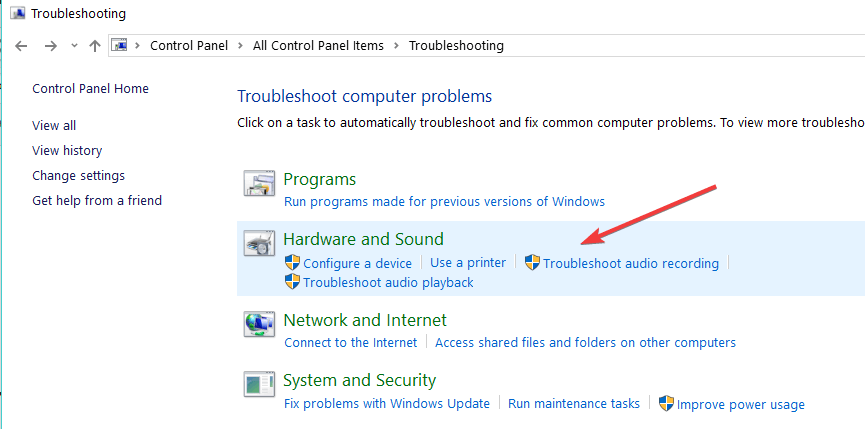
Another solution for when you’re unable to burn a CD in Windows 10 is to run the Hardware and Sound Troubleshoother.
By performing this action you can ensure yourself that all multimedia hardware settings are in place, and thus there are no errors that can disrupt your recording process.
Note: you might be prompted by a window where you need to write your administrator account and password in.
4. Tweak your Registry
- Reboot your Windows 10 operating system then log-in with your administrator account
- On the Start screen press and hold Windows+R hotkeys.
- In the run dialog box write regedit the line below and press Enter.
- In the Registry Editor window double click on the HKEY_LOCAL_MACHINE folder.
- In the HKEY_LOCAL_MACHINE folder open the SYSTEM folder then access the CurrentControlSet folder.
- In the CurrentControlSet folder open the Control folder, then access the Class folder.
- Now open the {4D36E965-E325-11CE-BFC1-08002BE10318} folder then on the right side pane left click on the UpperFilters registry, click Yes.

- Click on the LowerFilters in the right-side panel and do the same steps as for the UpperFilters to remove it.
- Reboot your operating system.
- Try again your Windows DVD burner to see if the process works normally this time.
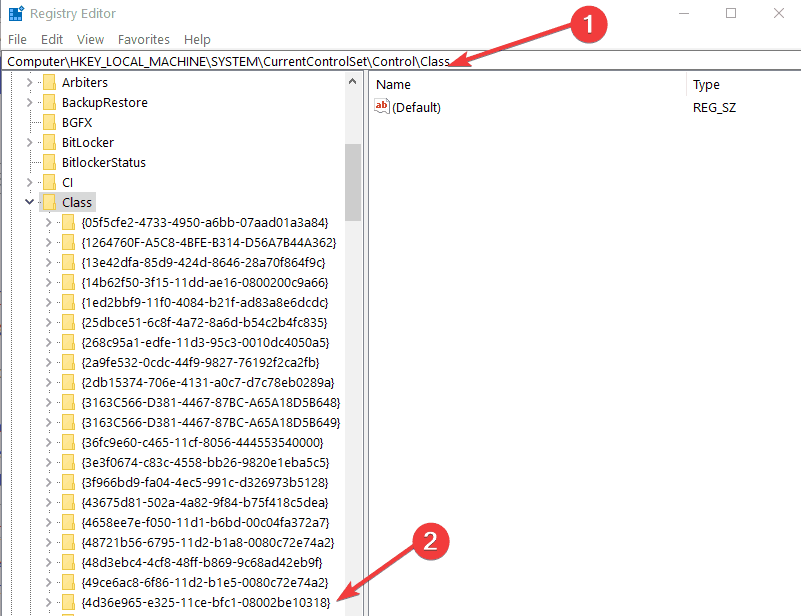
If you cannot burn a DVD in Windows 10 then applying some small changes to your System Registry may fix the issue, since this procedure followed by a system reboot can fix certain errors.
Note: Before doing the steps below you will need to make a backup copy of the system or at least your important documents and files that you might need later on.
5. Change EnumDevice DWORD
- Press Windows+R hotkeys to open the Run window, type regedit, then press Enter.
- In the Registry Editor window open the HKEY_LOCAL_MACHINE folder from the right-side pane, then access the SYSTEM folder.
- Open CurrentControlSet, access the Services folder, then right-click on the atapi folder, then click on the New feature.

- From the New submenu click on the Key feature, then as a name write Controller0 then press Enter.
- Click the Controller0 feature and click on the New option, from the submenu click on the DWORD(32-bit) Value option.
- For the DWORD write EnumDevice, then press Enter. Click on the EnumDevice1 DWORD, then tap on the Modify feature.
- Next to Value Data feature write 1 then click OK.
- Close the Registry Editor window and reboot your operating system.
- Check again to see if your Windows DVD burner works for you.
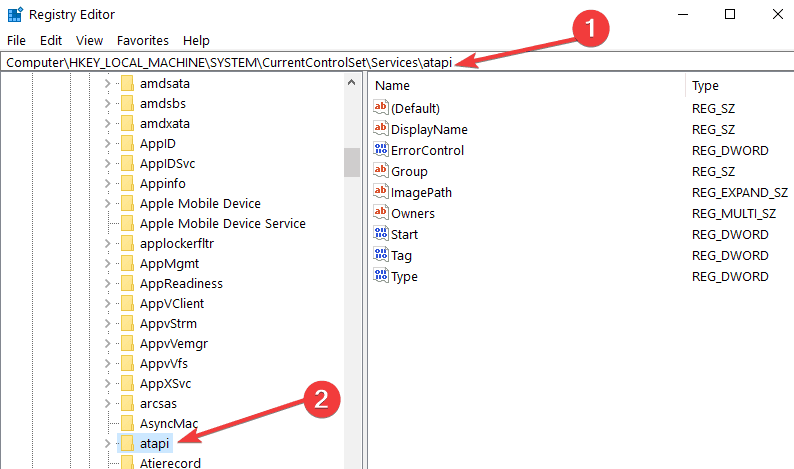
Changing the EnumDevice DWORD is one option if you encounter issues burning a DVD. Simply start off by opening the Registry Editor and follow another few easy steps to complete the procedure.
In this article we presented you with all the efficient solutions you can apply if you’re unable to burn a DVD in Windows 10, because it fails in the middle of your burning process.
If you have further questions regarding this article, you can always write to us in the comments section of the page situated below and we will help you further as soon as possible.


User forum
0 messages