FIX: Windows couldn't complete the requested changes
3 min. read
Updated on
Read our disclosure page to find out how can you help Windows Report sustain the editorial team. Read more
Key notes
- Windows couldn't complete the requested changes or Error code: 0x80070002 is a common system error when trying to enable the .NET Framework feature.
- The problem is usually fixed by forcing Windows to update or by repairing the system files. Keep reading to find out how.
- You can find other troubleshooting guides in our Troubleshooting System Errors Hub.
- And more guides can be found on our Windows 10 Fix page.

The Error message Windows couldn’t complete the requested changes. The system cannot find the file specified. Error code: 0x80070002 sometimes appears when users are trying to turn on certain Windows features.
The usual behavior is the following: you open Control Panel, thenPrograms and Features. Here, Turn Windows features on or off and you try to enable .NET Framework.
It has also been reported when trying to enable HyperV, Services for NFS, or Windows Hypervisor Platform.
In most cases, it’s possible that the process starts, but it either fails almost immediately, and uninstall itself, or reboot your computer, and then fail and uninstall.
How can I fix the Windows error code 0x80070002?
1.Run the sfc/scannow command
- In the search bar, type cmd from the keyboard.
- Launch it as administrator.
- In the command prompt window, type in sfc /scannow and press Enter.
This process may take several minutes and should detect and repair any issues with the registry files or system references.
You will have to reboot your computer. It is possible that you get another error message saying that the system could not complete the changes and the process will be undone. Nevertheless, go back to Programs & Features to see whether the features are active or not.
If the process was unsuccessful, continue with the following step.
2. Deploy .NET Framework from installation media
- In the search bar, type cmd from the keyboard.
- Launch it as an administrator.
- In the command prompt window, type in
DISM /Online /Enable-Feature /FeatureName:NetFx3 /All.
Alternatively, mount the installation media and run the following command: DISM /Online /Enable-Feature /FeatureName:NetFx3 /All /Source:[drive_letter]:sourcessxs /LimitAccess.
Note that Source:[drive_letter]: refers to the location of the files that are needed to restore the feature.
3. Check for updates
- Type Update in the search box.
- Select Check for Updates.
- Wait for the process to finish and reboot your computer.
- Then try to enable the desired features once more and see if it works.
- Alternatively, you can run the Windows update troubleshooter from the Troubleshoot menu.
4. Perform a clean boot
- Type System Configuration in the taskbar and select Run as administrator.
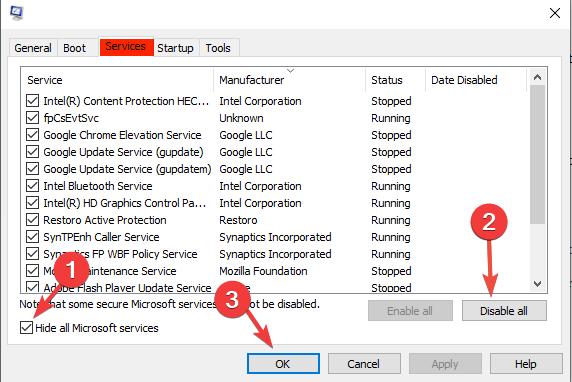
- On the Services tab, select Hide all Microsoft services, and then select Disable for all.
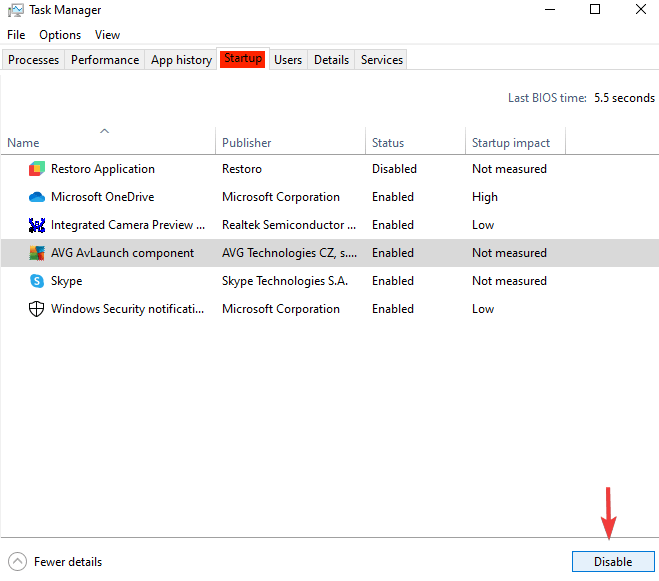
- On the Startup tab, open Task Manager, and Disable all items.
- Close the Task Manager and click OK in the System Configuration window.
- Restart your device and try again to enable the features you wanted.
This should show if any other installed program is preventing respective features from running, so you can uninstall it.
Afterward, set your device to boot normally by opening the System Configuration as shown previously, and in the General tab, check Normal startup, then OK.
5. Run the.NET Framework Repair Tool
You can use the Microsoft .NET Framework to repair and fix any related issues.
Go to this page to save and download the utility to Windows Then open it, click the Next button to initiate the repairing process.
Note: In case you’re still having trouble enabling the .NET Framework, follow this guide.
In today’s guide, we explored some of the most efficient methods to resolve the 0x80070002 error code. If any of these methods have proven useful, don’t hesitate to let us know in the comment below.


User forum
0 messages