Why Do Games Stutter on High-End PCs? Causes & How to Fix It
Elite hardware is not error-free but can escape the matrix
![]() 8 min. read
8 min. read
![]() Published on
Published on
Share this article

Improve this guide
Read our disclosure page to find out how can you help Windows Report sustain the editorial team Read more
It should be a no-brainer that investing in top-tier hardware should give you a pass when it comes to most game issues but even high-end PCs experience some stutter occasionally.
However, this doesn’t mean that your hardware is faulty, you just need to know the right buttons to push to achieve an immersive gaming experience that is stutter-free.
Why is my PC suddenly stuttering in games?
1. Storage bottlenecks
You may have the space requirements to install a game but as you play a game, your game file size also grows. This includes any addition of mods or supporting software to enhance your game.
Within no time, your 1TB storage solution won’t seem so big anymore. So if you’ve been wondering why games are major storage space consumers, here is your answer.
It therefore becomes slow because of the time taken to access files because of their size. Slow load times can impact game performance and cause some stuttering as your system can’t fetch data quickly enough.
2. Limited graphics card
Although your PC may be a high-end one, most of them come with an integrated GPU. They’re not bad for everyday tasks but if you’re gaming, you’ll need a strong contender for this position. Most modern games have high graphic demands so an integrated GPU may struggle with performance.
Further, your integrated GPU is competing with your CPU for RAM so sharing of resources may leave your games with insufficient resources hence the stuttering.
3. Inadequate cooling
If you don’t have a proper cooling system, your GPU shifts its performance to stop your PC from overheating instead of rendering graphics. Without prioritizing its main tasks during gameplay, your games are bound to experience a lot of stuttering.
Coolers don’t come cheap so if yours has given out, consider getting a second-hand AIO cooler. It’s more affordable and will revolutionize how you cool your PC.
Other causes of stuttering include overdue system maintenance and games not meeting system requirements.
What can I do to fix game stuttering on my high-end PC?
1. GPU-related issues
1. Update your graphics driver
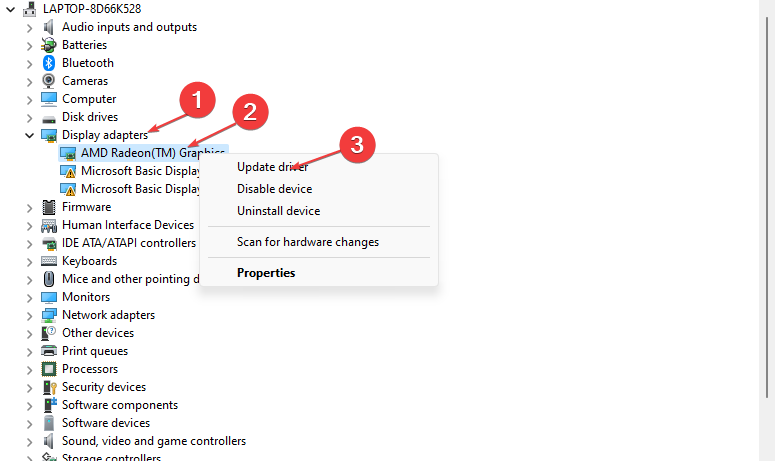
- Press Windows + R key to launch the Run dialog box, type devmgmt.msc, and click OK to open the Device Manager.
- Expand the Display adapters, right-click the graphic driver, and click Update driver.

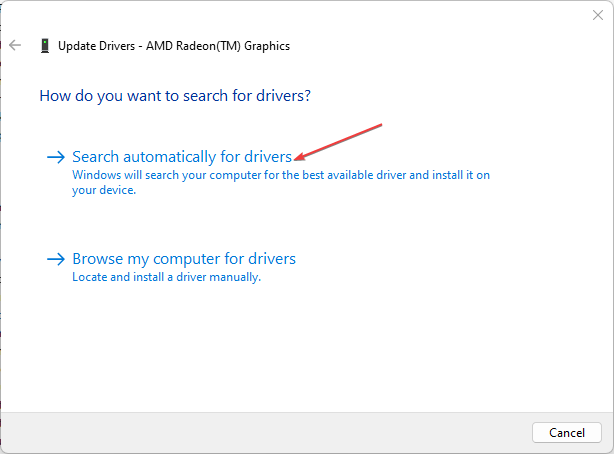
- Then select Search automatically for drivers.

- Restart your computer and check if the issue persists.
2. Upgrade graphic performance settings
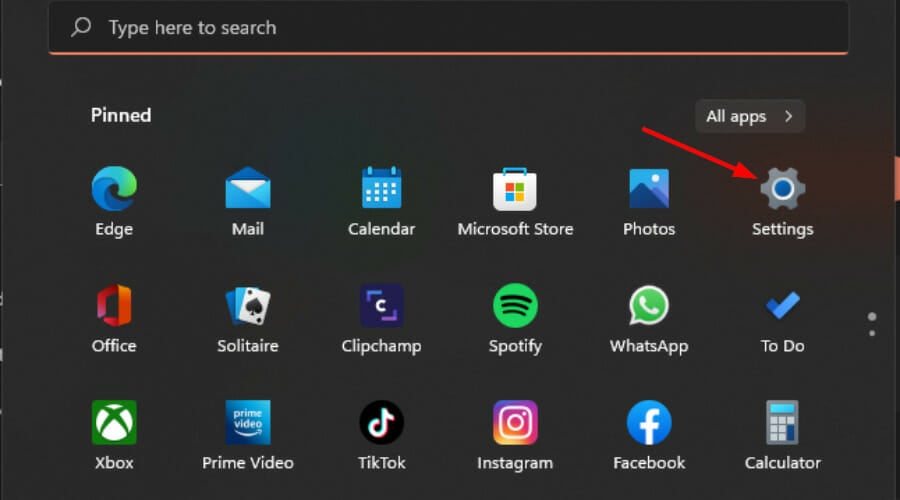
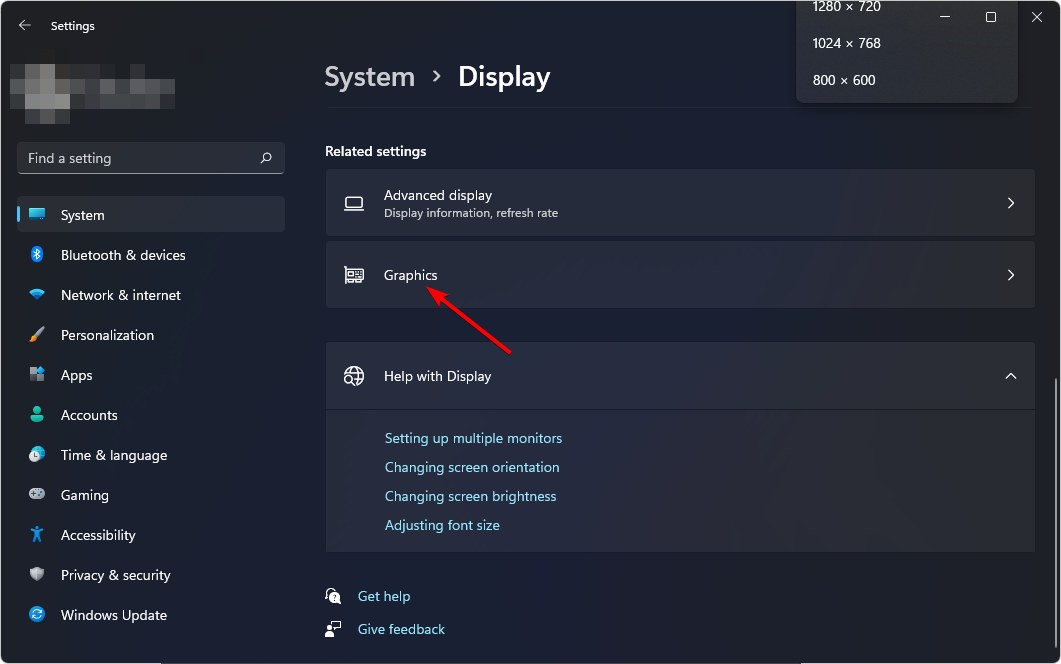
- Press Windows + I to open Settings.

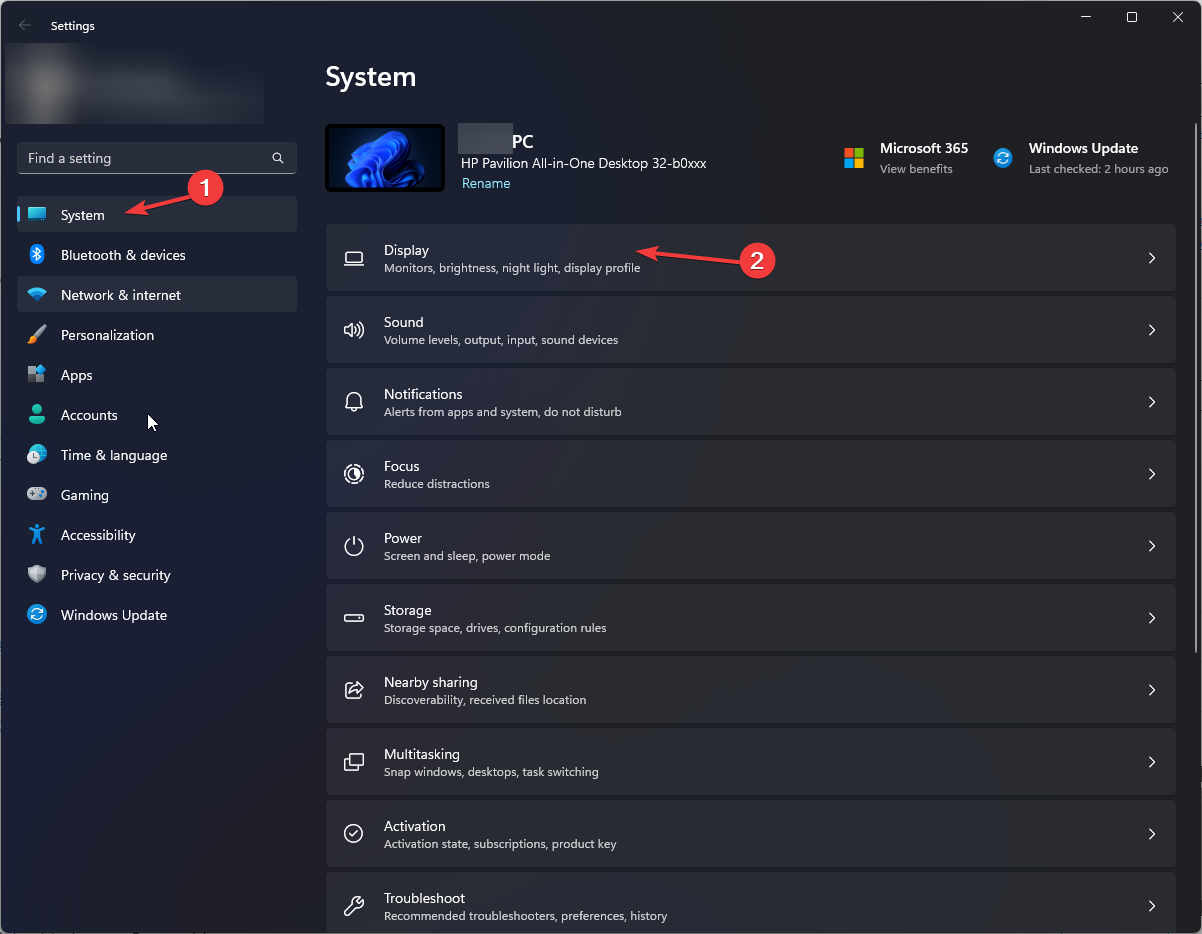
- Click on System on the left pane then select Display.

- Under Related settings, click on Graphics.

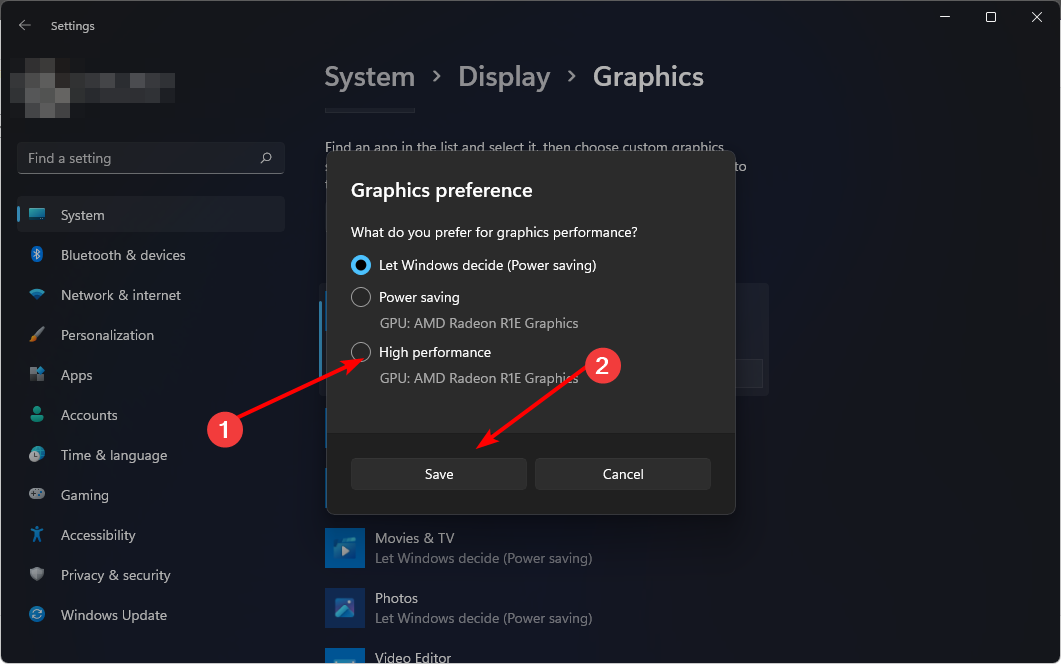
- Select your preferred game from the list, and click on Options.
- Now, choose High Performance and click Save.
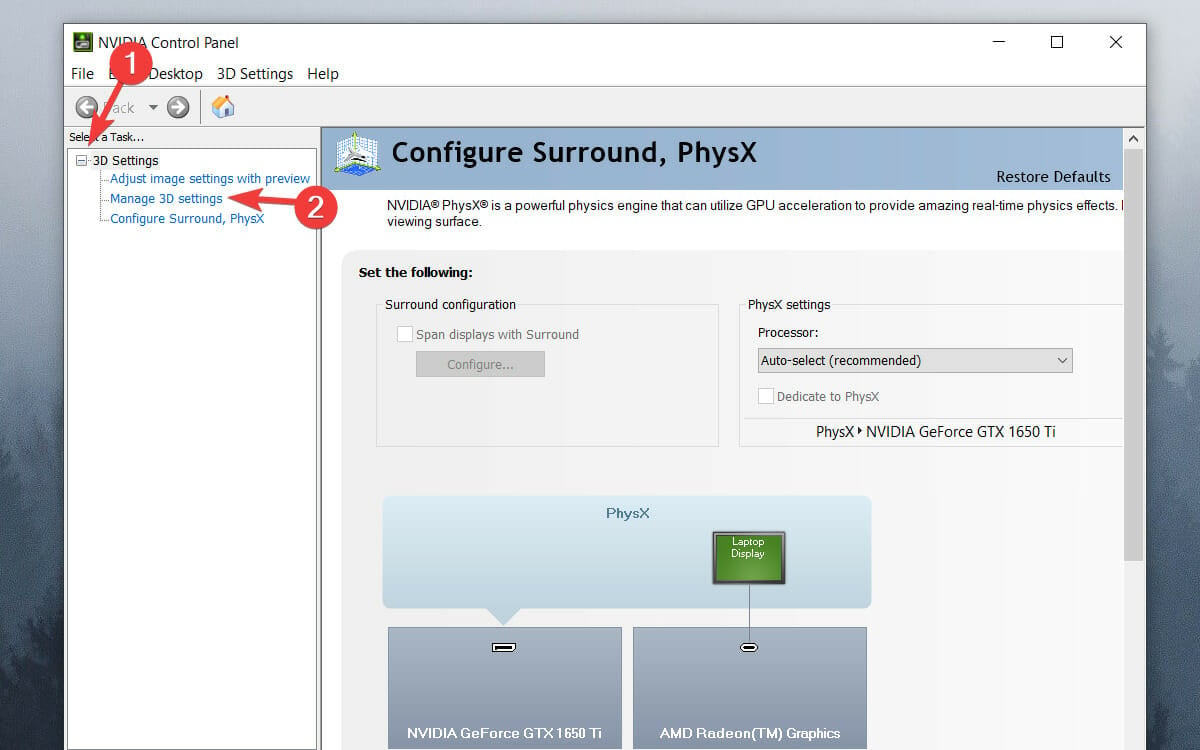
3. Use a dedicated GPU
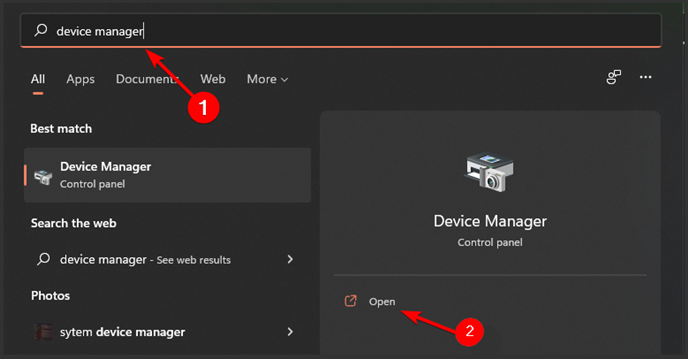
- Click on the Start Menu icon, type Device Manager in the search bar, and click Open.

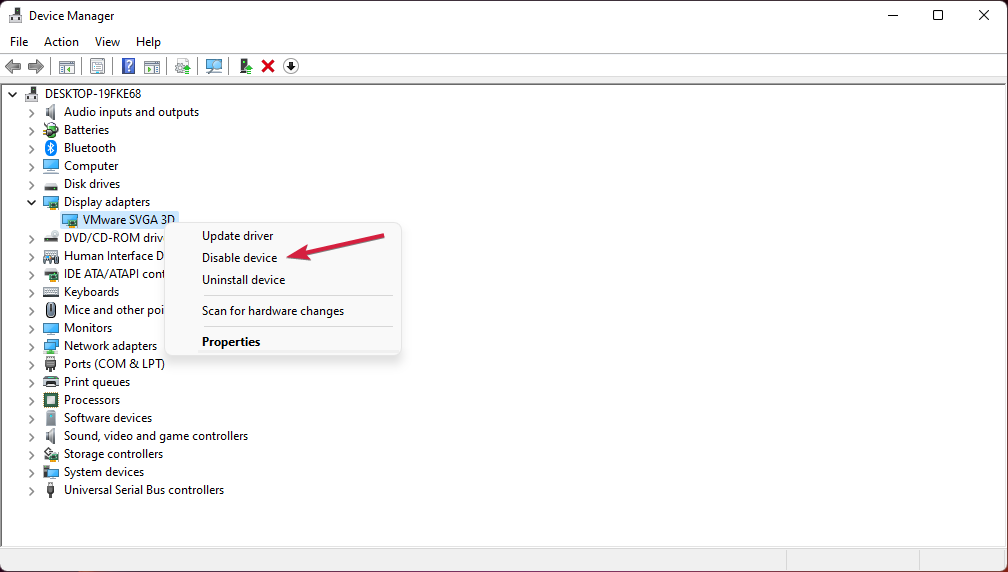
- Navigate to Display adapters to expand, right-click on your graphics card, and select Disable device.

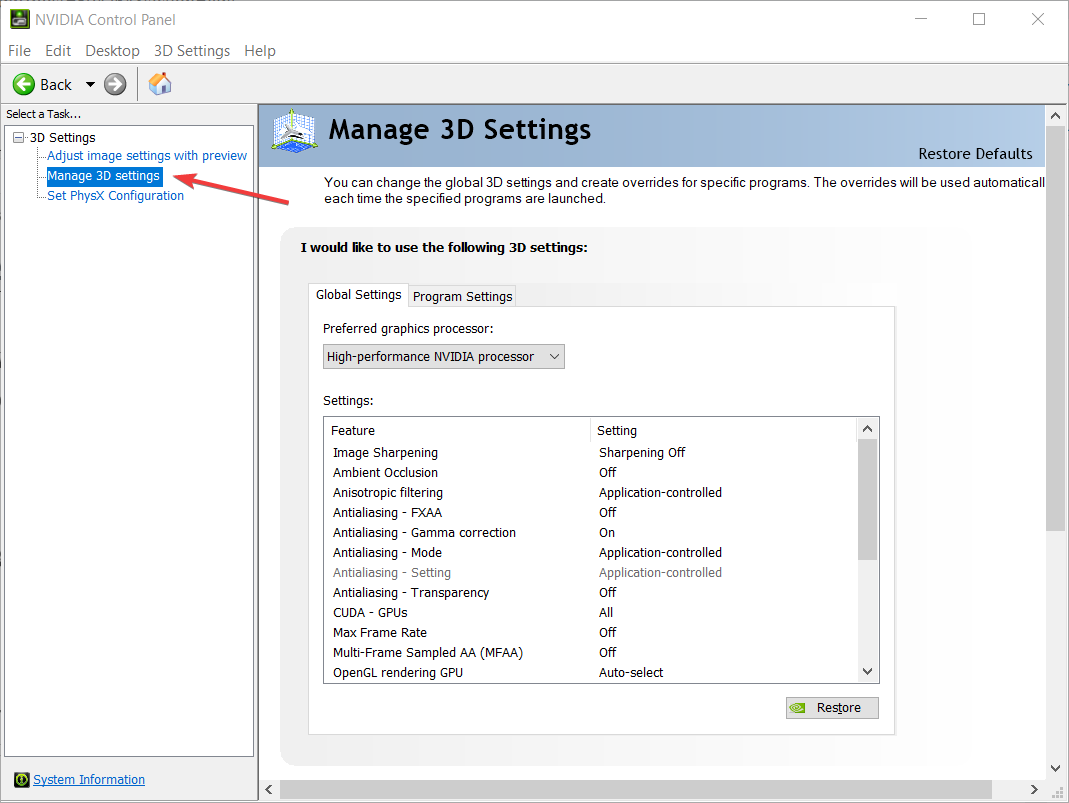
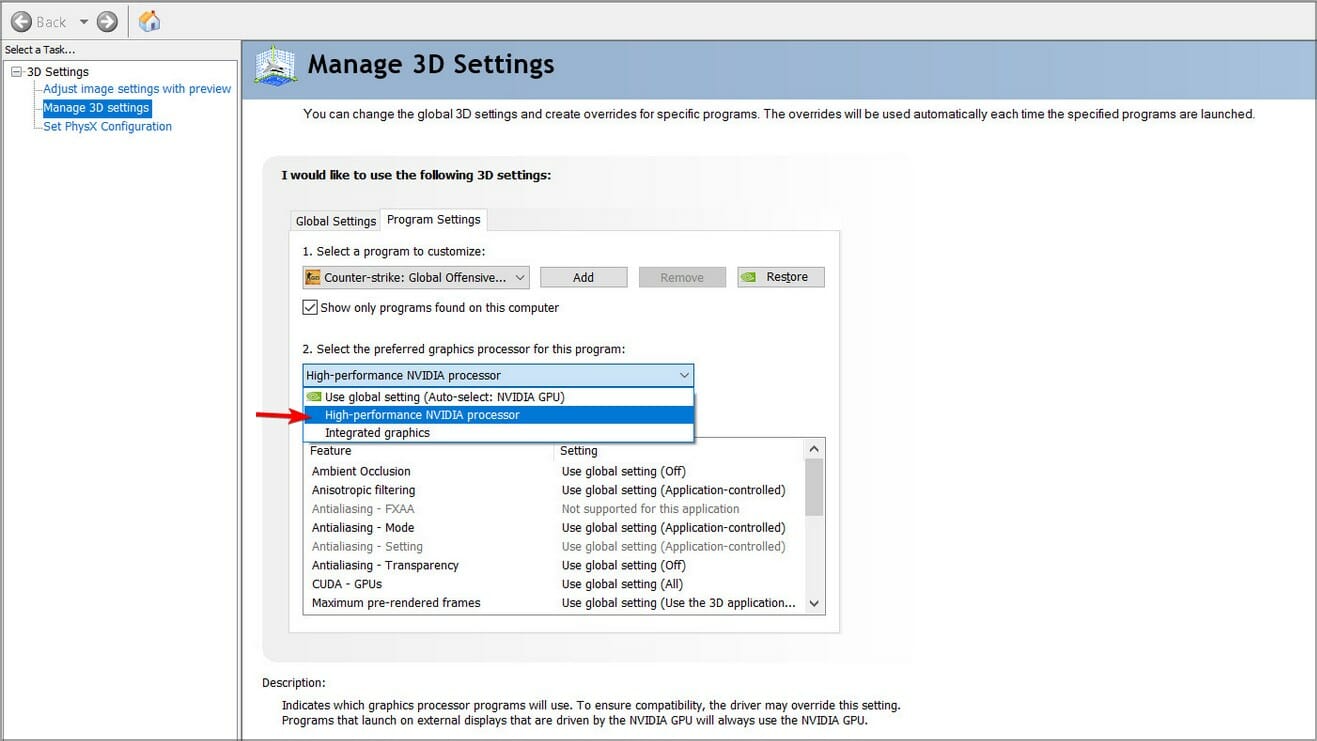
- Next, launch your dedicated graphics card control panel (In this case, Nvidia Control Panel).
- Select Manage 3D settings from the navigation pane on the left.

- Choose a High-performance NVIDIA processor from the Preferred graphics processor dropdown menu.

4. Enable hardware acceleration
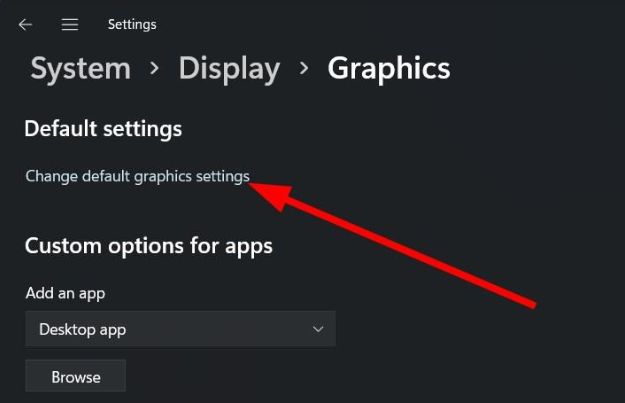
- Hit the Windows key and select Settings.
- Click on System on the left pane, then Display on the right pane.
- Scroll down and select Graphics.
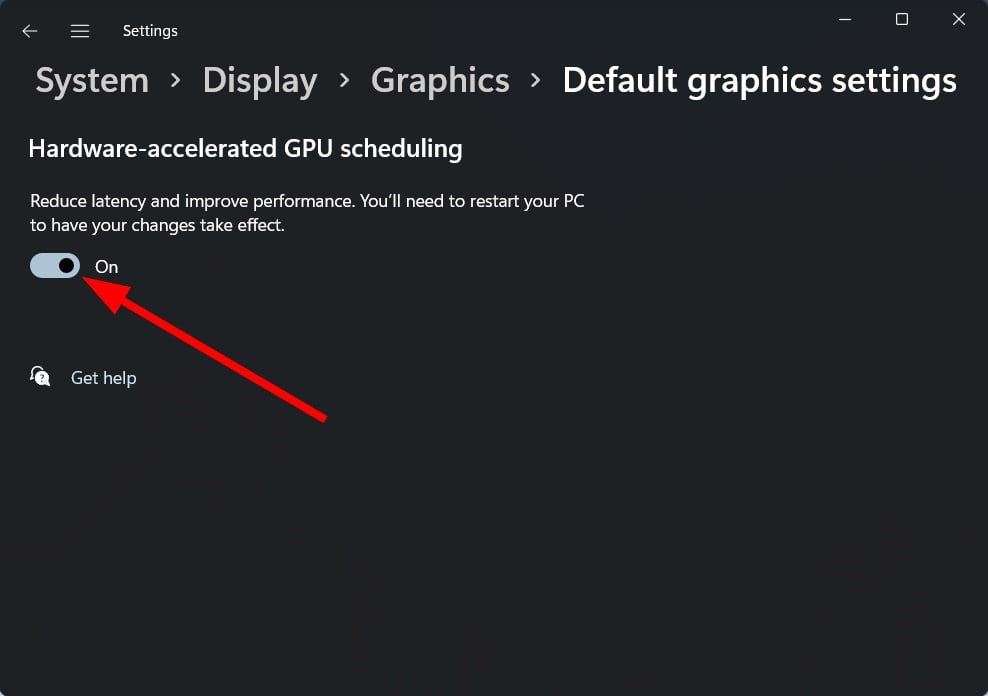
- Select the Change default graphics settings option.

- Now, toggle on the Hardware-accelerated GPU scheduling option.

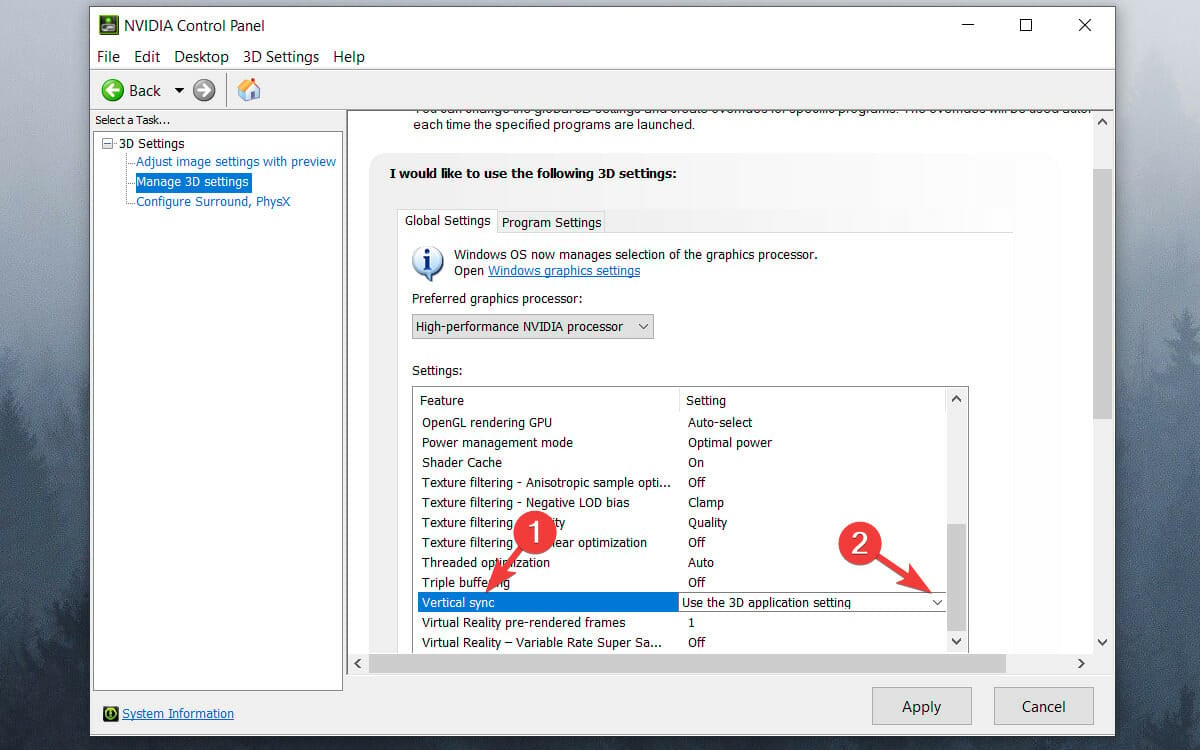
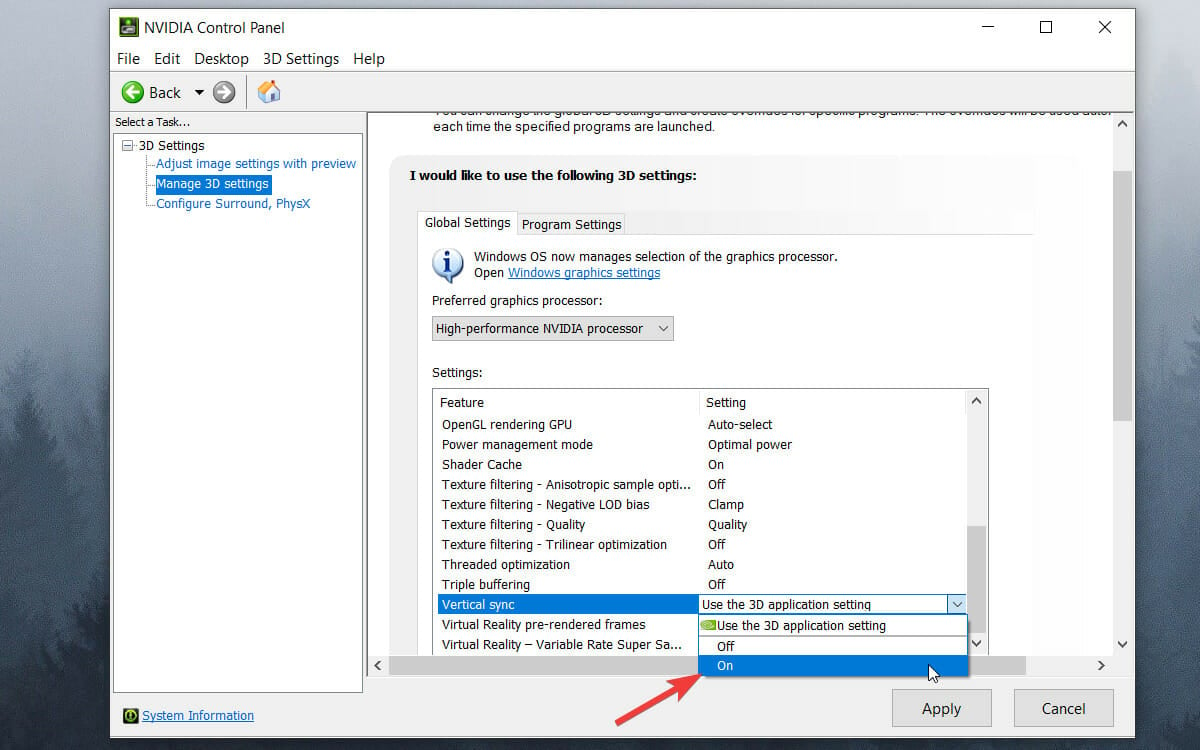
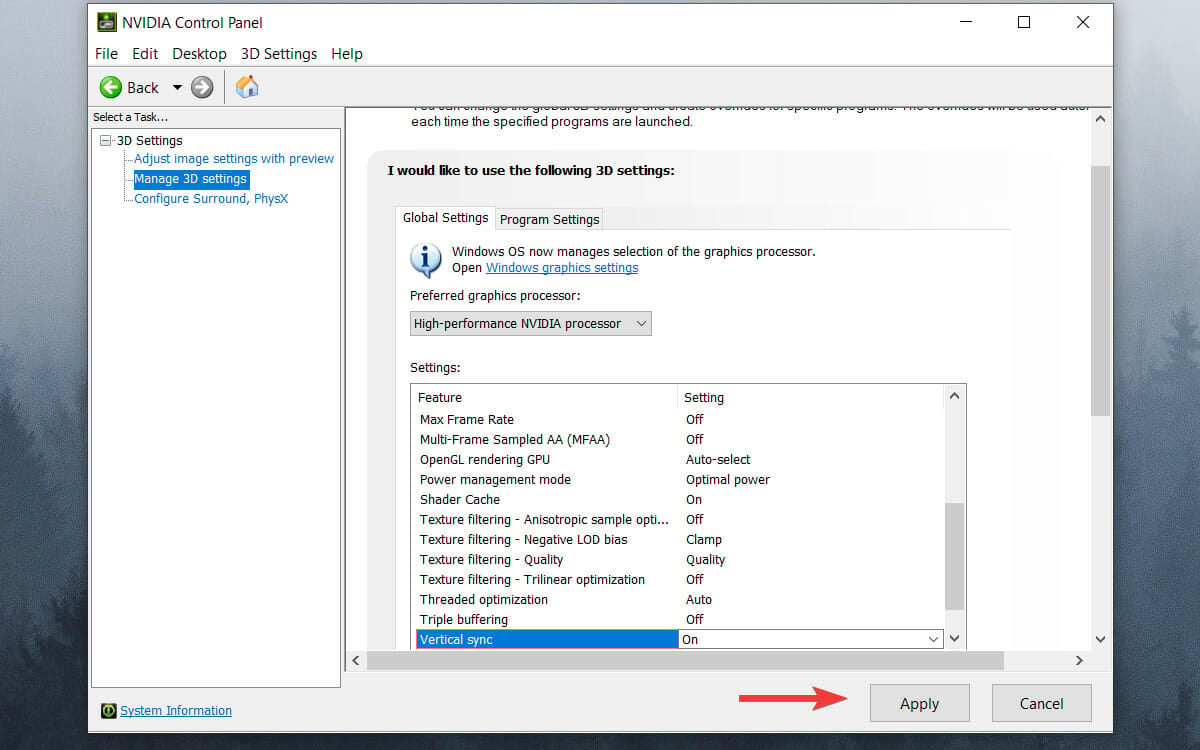
5. Enable V-Sync
5.1 Nvidia graphics
- Right-click the desktop and select NVIDIA Control Panel.

- Click 3D Settings and select Manage 3D Settings.
- Scroll down through the list, click on Vertical sync, and click the drop-down menu.
- Choose On from the drop-down menu.
- Press the Apply button.
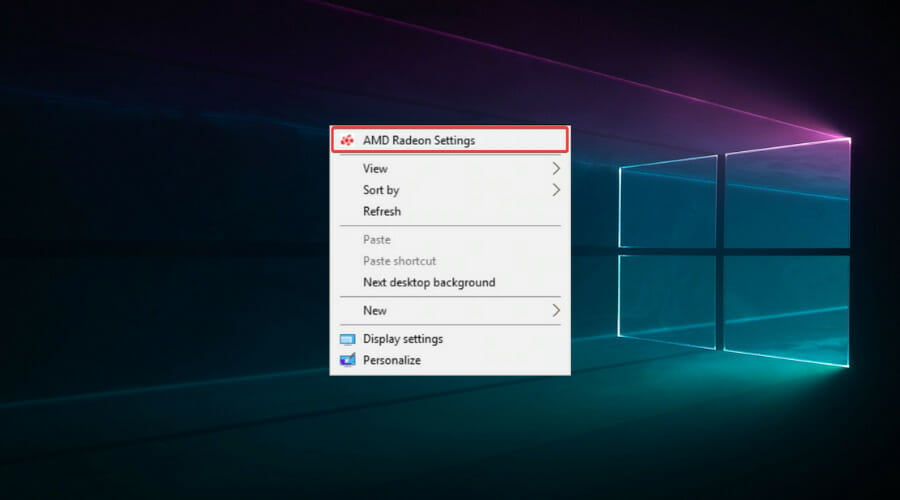
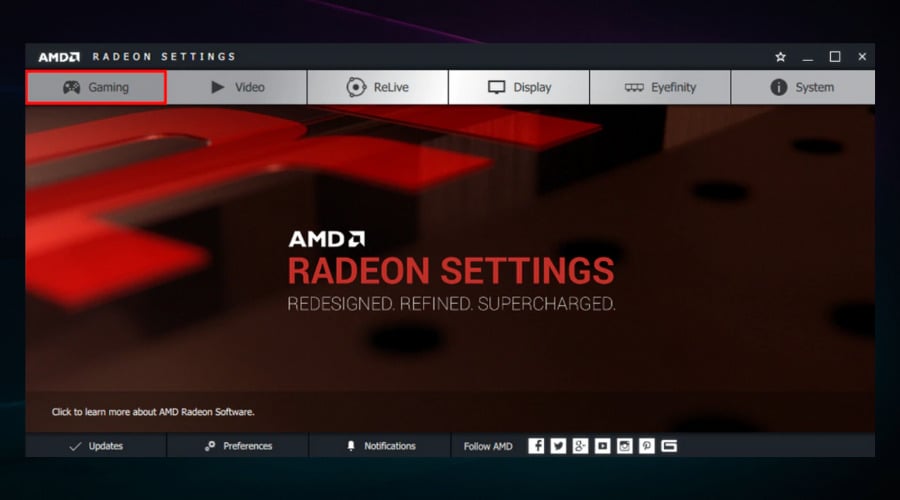
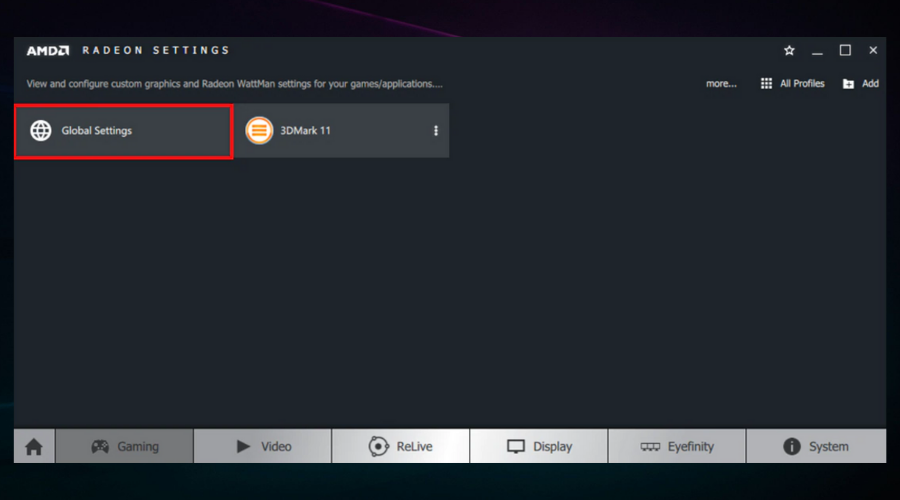
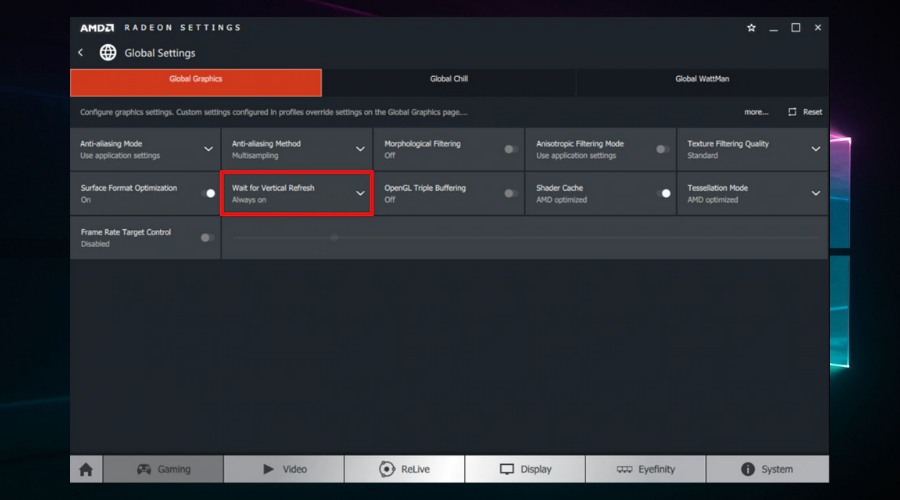
5.2 AMD graphics
- Right-click the desktop and select the AMD Radeon Settings option.
- Click the Gaming tab.
- Choose Global Settings.
- Click Wait for Vertical Refresh and select the Always on option.
2. System-related issues
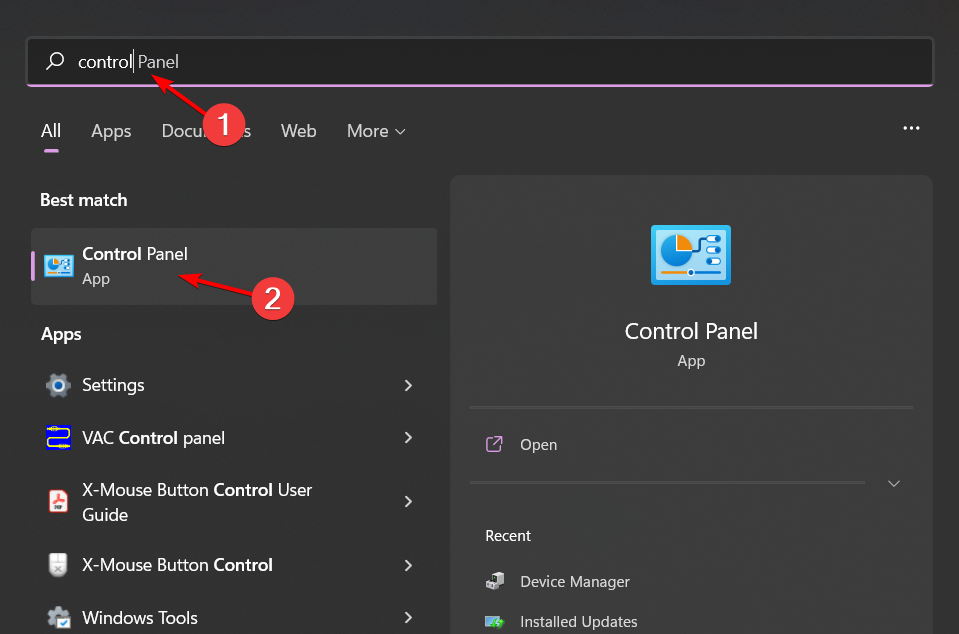
6. Adjust your power plan settings
- Hit the Start Menu icon, type Control Panel in the search bar, and click Open.

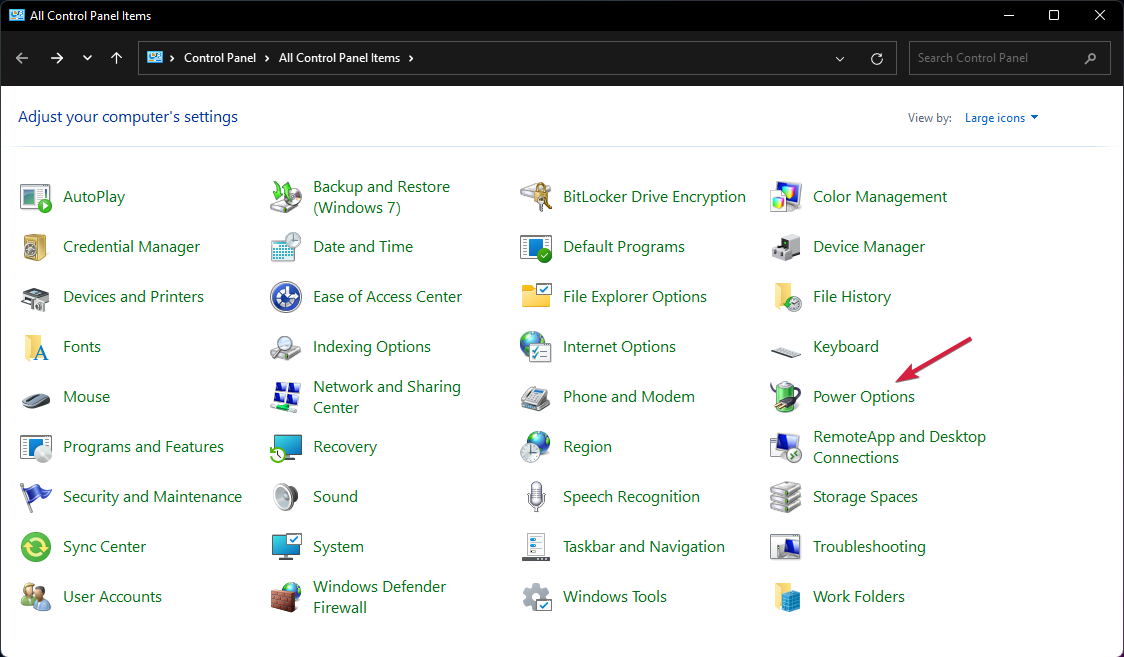
- Navigate to Power Options and click to Open.

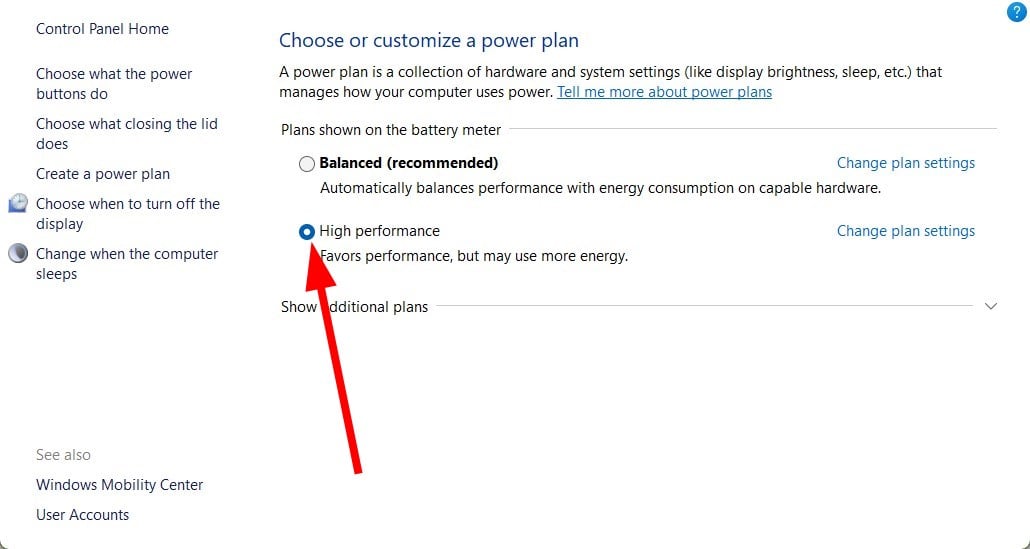
- Select the High Performance option as your new plan and check if there are any improvements.

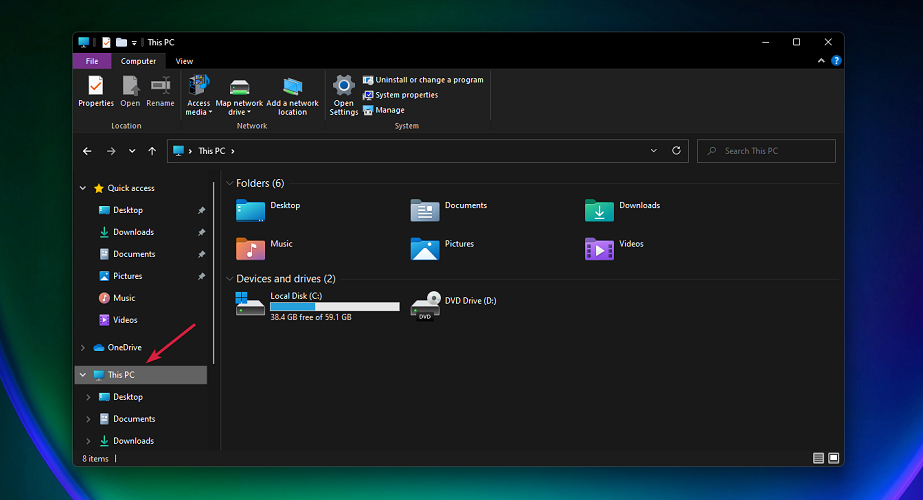
7. Run Disk Cleanup
- Press the Windows + E keys combination to start File Manager.
- Click on This PC.

- Now right-click the C: drive and select Properties from the drop-down menu.
- In the General tab, click on Disk Cleanup to start the app.

- Select the data you want to delete by clicking the corresponding boxes, then on OK.

8. Scan for HDD errors
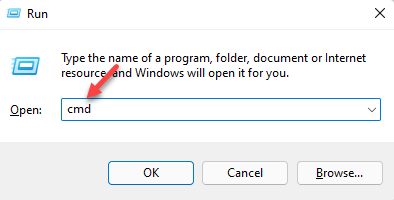
- Launch the Run console, by pressing the Win + R keys together.
- Type cmd in the search box and press the Ctrl + Shift + Enter keys simultaneously.

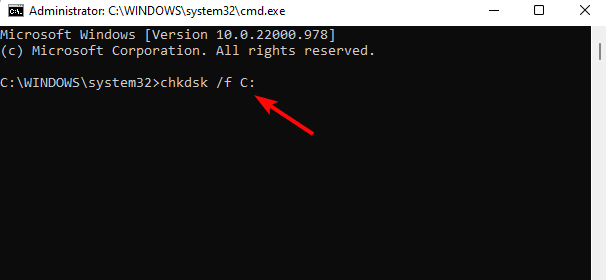
- In the elevated Command Prompt window that opens, run the following command and press Enter:
chkdsk /f C:
- Replace C: with the drive, you are using.
9. Scan for viruses
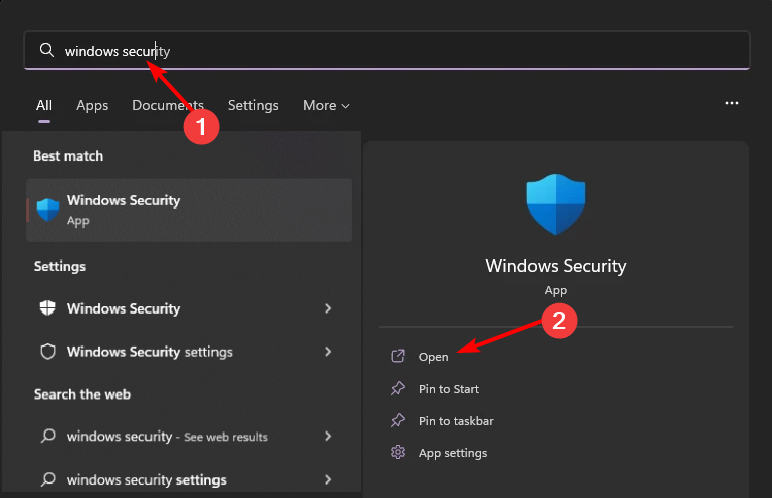
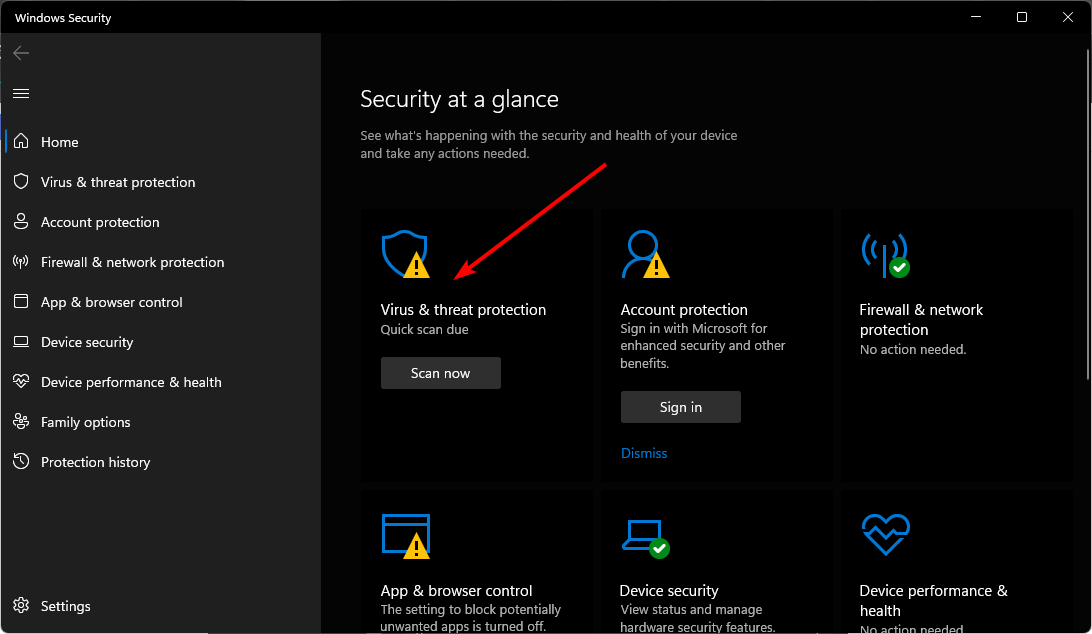
- Press the Windows key, search Windows Security, and click Open.

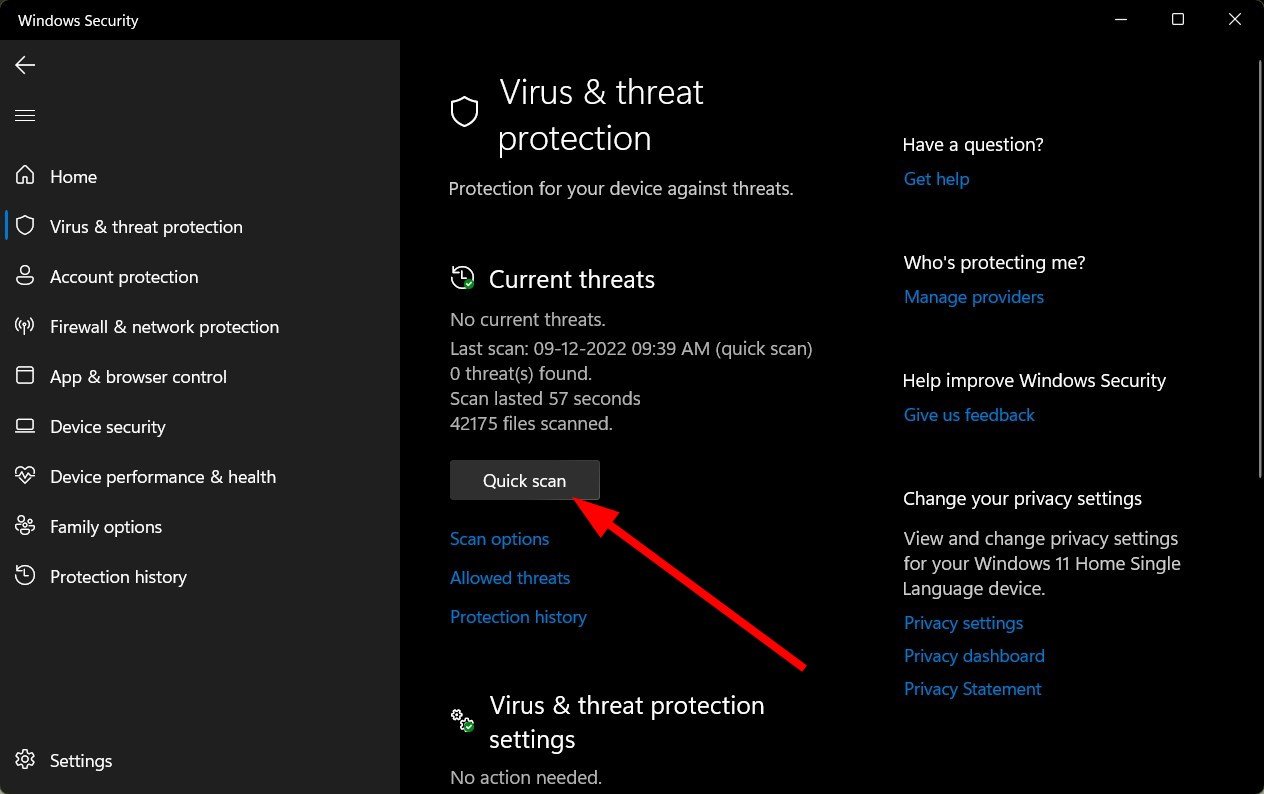
- Select Virus & threat protection.

- Next, press Quick scan under Current threats.

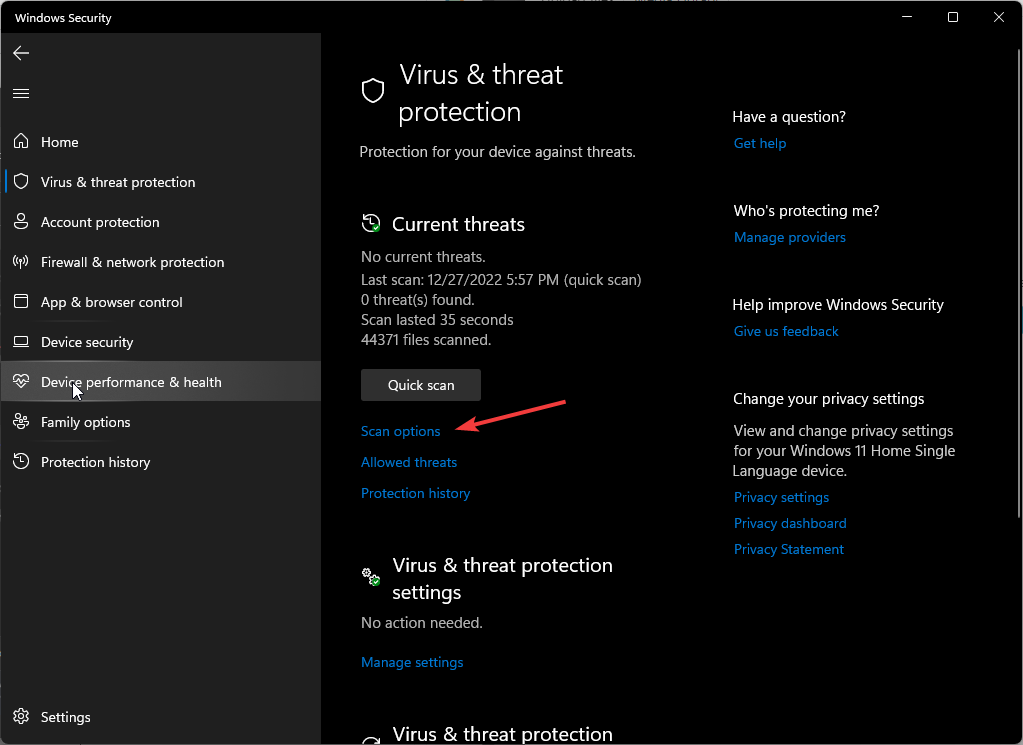
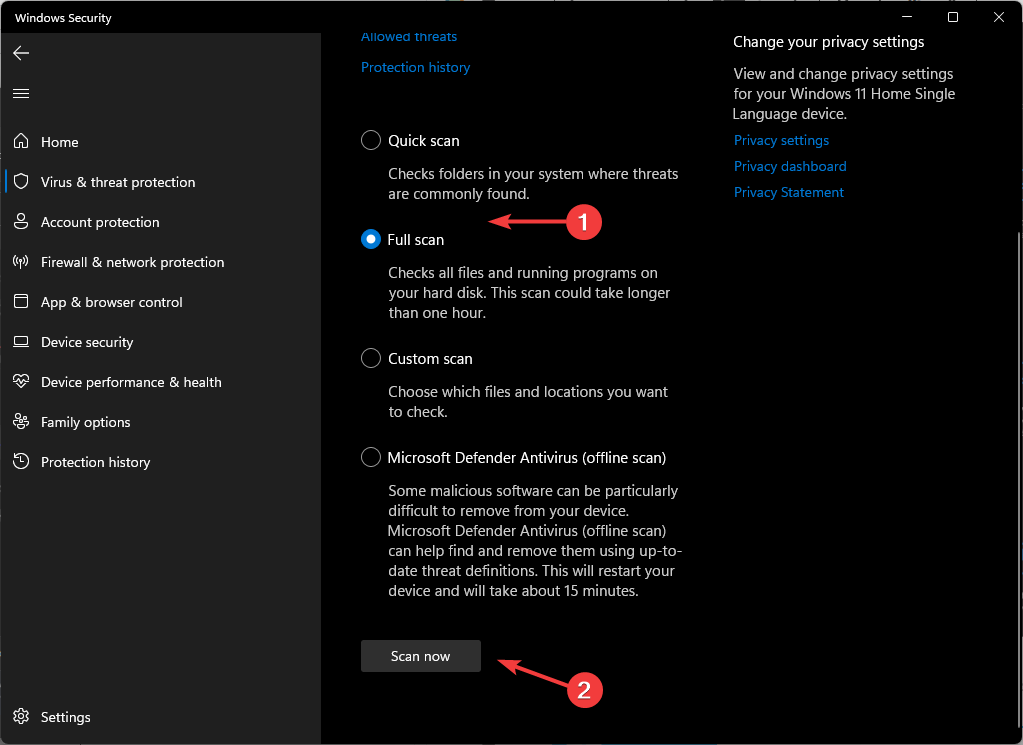
- If you don’t find any threats, proceed to perform a full scan by clicking on Scan options just below Quick scan.

- Click on Full scan, then Scan now to perform a deep scan of your PC.
- Wait for the process to finish and restart your system.
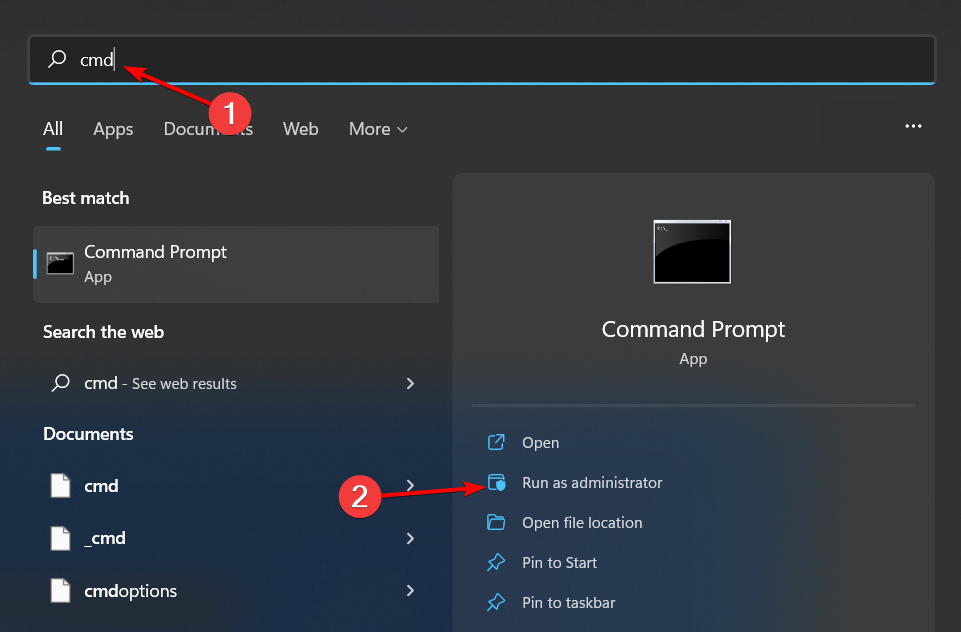
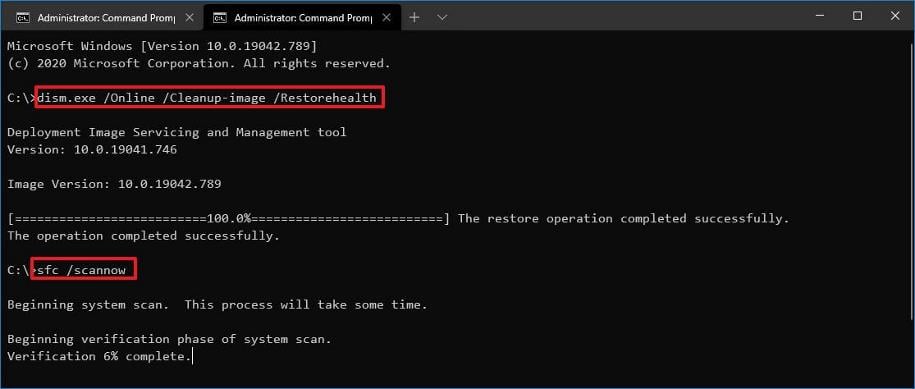
10. Scan for System File errors
- Hit the Start Menu icon, type cmd in the search bar, and click Run as administrator.

- Type the following commands and press Enter after each one:
DISM.exe /Online /Cleanup-Image /Restorehealthsfc /scannow
3. Game-related issues
11. Enable Game Mode
- Click Start from the taskbar.
- Choose Settings.
- Then select the Gaming tab in Settings.

- Click Game Mode on the Gaming tab.

- Turn on the Game Mode option to enable it.


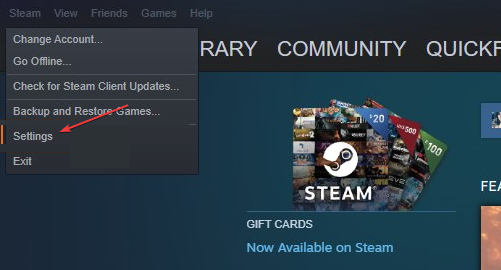
12. Enable the Steam Overlay
- Left-click the Start button, type Steam in the search bar, and launch it.
- Click the Steam tab and select Settings.

- Hit on In-Game, then check the box next to Enable the Steam Overlay while in-game.

- Click OK to save your changes.
- Restart the game client and check if the issue persists.

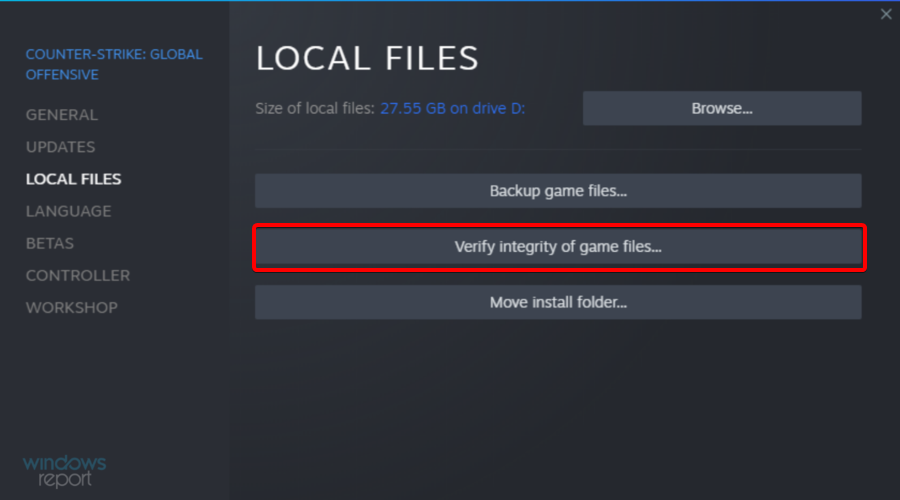
13. Verify the integrity of the game files
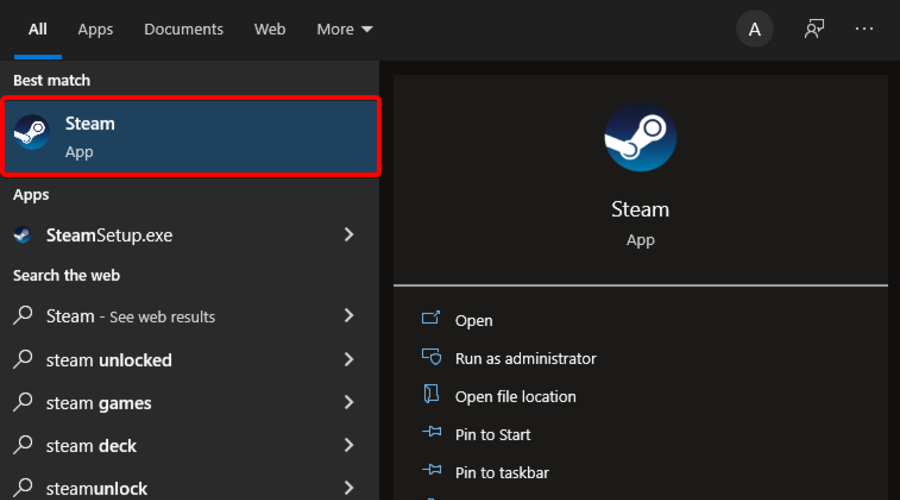
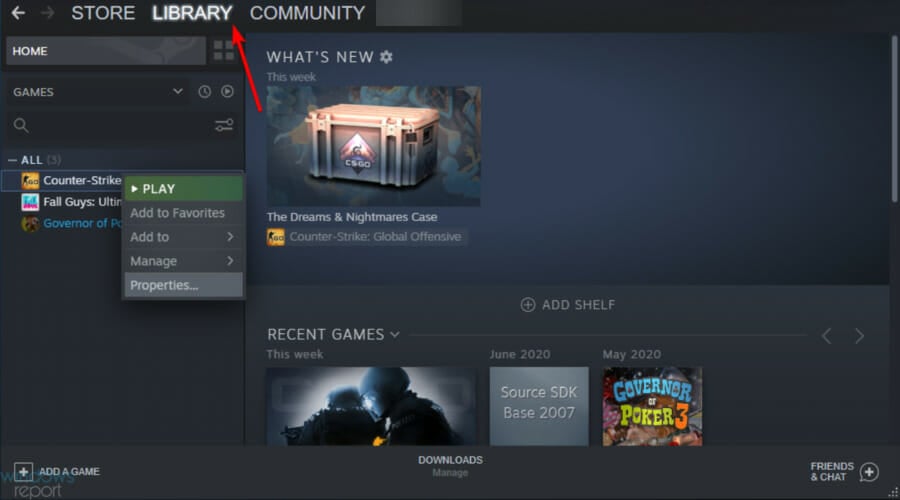
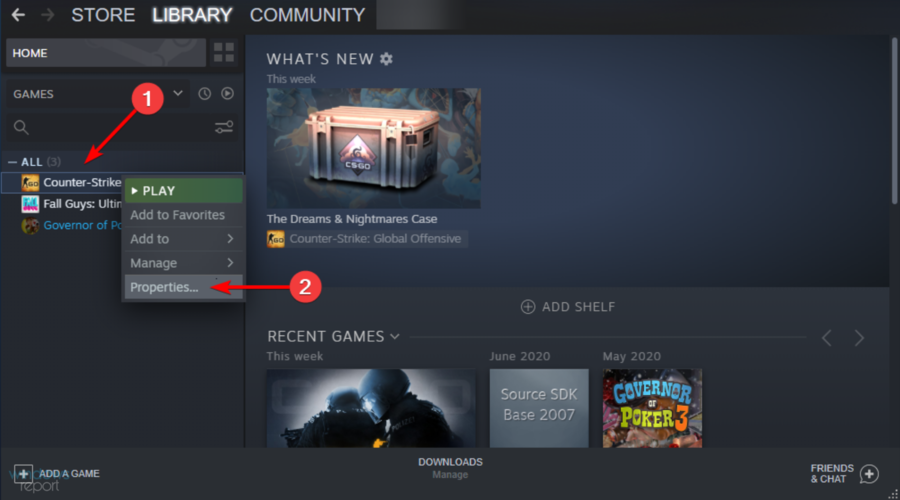
- Hit the Windows key, type Steam, then open the desktop client.
- Click on Library.
- Right-click on the problematic game and select Properties.
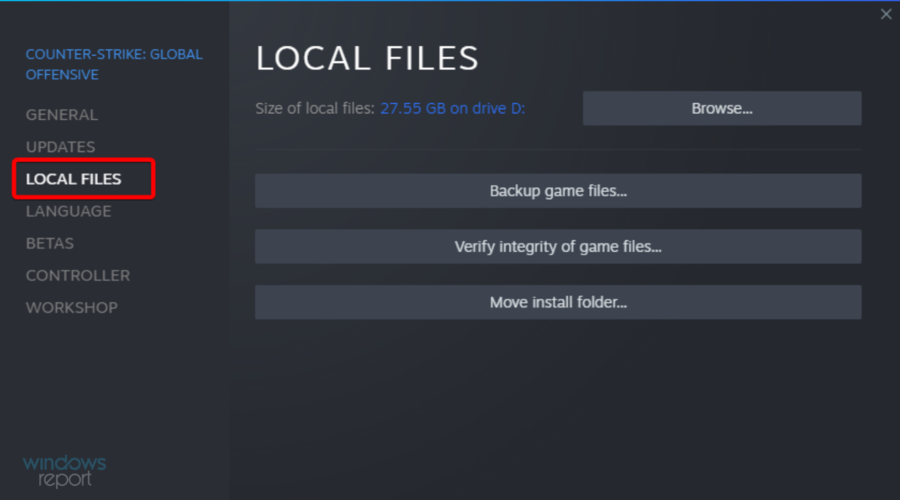
- Under Properties, click on the Local Files tab.
- Here, click on Verify integrity of game files.
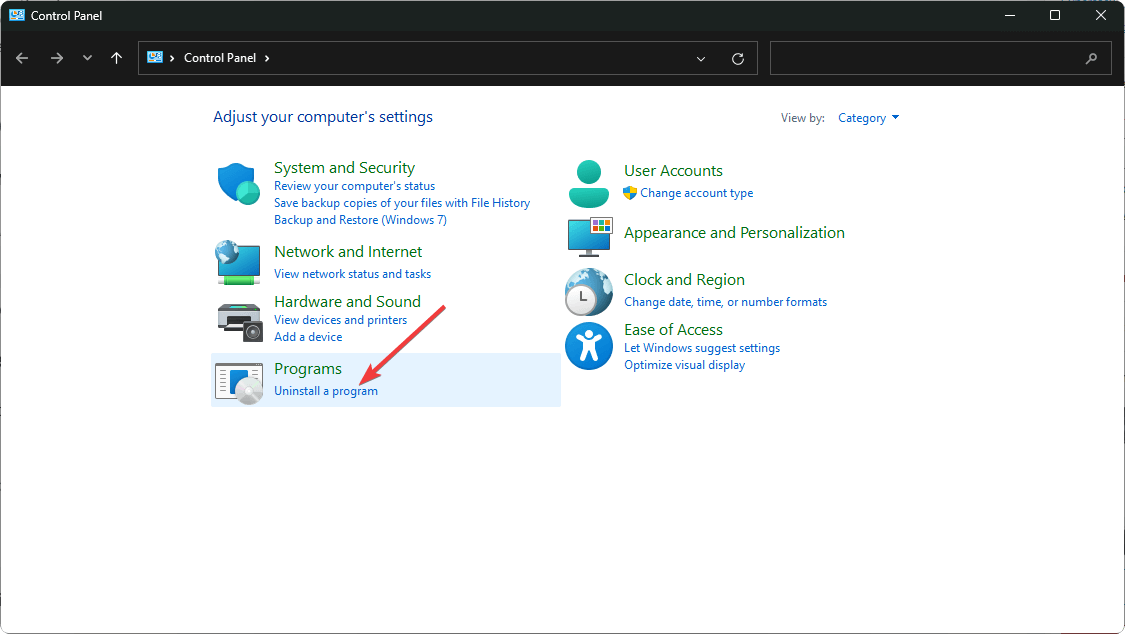
14. Reinstall the problematic game in compatibility mode
- Click on the Start Menu icon, type Control Panel on the search bar, and click Open.
- Select Uninstall a Program under Programs.

- Find the problematic app, click on it, and select Uninstall.
- Confirm uninstallation in the next pop-up.
- Install the app again from the official website.
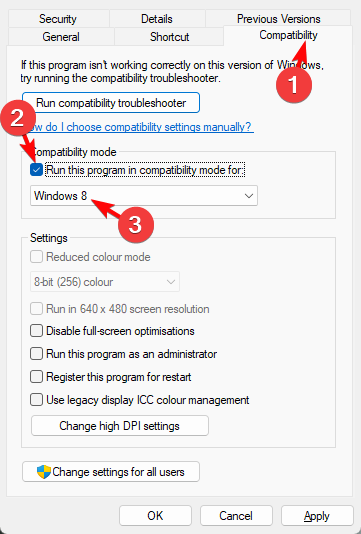
- Locate the .exe file of the problematic app usually in one of the following paths depending on your version of Windows:
C:\Program Files (x86)orC:\Program Files - Scroll down until you find the program you’re looking for.
- Right-click on the .exe file of the program and select Properties.
- Navigate to the Compatibility tab, check the Run this program in Compatibility mode option, and select Windows 8 from the drop-down menu.

- Allow the program to finish installing, then check whether the error persists.
Additional considerations to prevent stuttering
- Your connection to the internet matters so where possible, always use an Ethernet cable for a more stable connection and minimize network congestion.
- Always check that your game meets the system requirements and update it regularly. Also, update your OS to prevent compatibility issues.
- Consider cloud gaming to offload the strain on your graphics card. Your game has a better fighting chance when rendering is not in the hands of an integrated GPU.
- Incorporate gaming optimization software to stand in where your hardware won’t. Your games could use the extra push to perform better.
Ultimately, if you already have good hardware and the perfect OS for gaming, the rest is really up to you. All you have to do is play with some settings to optimize your PC for gaming.
For individual game-stuttering cases like CS:GO, check out our detailed article for quick fixes.
You may need to upgrade some components like your processor after some time especially if you want to maintain a good gaming speed. Still, as long as you’ve got a good gaming laptop, everything else usually falls into place.
Have you had the challenges of game stuttering on your high-end PC? What was the root cause of the issue and how did you handle it? We’d like to get your experience on this so leave your comments down below.