0x8007007 Error Code: What is it & How to Fix it
Windows 11 Installation Assistant Utility is the source of this error
Key notes
- 0x8007007 error appears when the system fails to run the Windows 11 Installation Assistant Utility.
- Because of this, your PC won't get upgraded to Windows 11.
- You can try running the Installation Assistant tool as an administrator to fix this error.

The 0x8007007 error code highlights that some third-party program is interfering with the Windows 11 Installation Assistant Utility.
If you are also facing the Windows 11 error code 0x8007007, then you are in the right place. Because in this guide, we have a bunch of solutions that will help you resolve the error on your PC.
What is error code 0x8007007?
Our readers come across the Windows 11 error code 0x8007007 when they are attempting to upgrade to the latest OS using the Installation Assistant Utility.
Besides, you will face the 0x8007007 error even though your PC meets the requirements to upgrade to Windows 11.
Microsoft hasn’t shared details on why this error pops up for users trying to upgrade their PCs. However, after going through multiple user reports, it is confirmed that this error is related to the Windows 11 Installation Assistant Utility.
If you are also facing the error 0x8007007, then you can apply the solutions mentioned below to resolve the problem.
How can I resolve Windows error 0x8007007?
1. Run the Installation Assistant as an admin
- Download the Windows 11 Installation Assistant Utility from the official website.

- Locate the file on your PC.
- Right-click on the Installation Assistant EXE file and select the Run as administrator option.

- In the UAC prompt that appears, select Yes.
- Follow the onscreen steps to upgrade your PC.
For certain programs, such as the Windows 11 Installation Assistant Utility, you need to have sufficient privileges in order to run it.
You can easily run the program with elevated permissions by following the above steps and hopefully resolve the error 0x8007007.
2. Temporarily disable your antivirus
- Press the Win key to open the Start menu.
- Type control panel and open the app from the results.

- Choose Windows Defender Firewall.
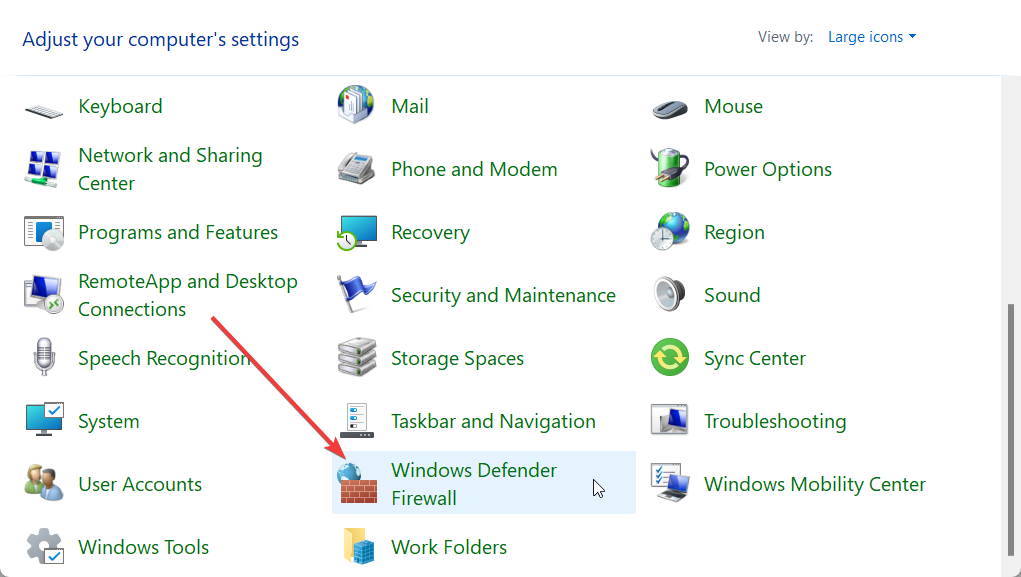
- Click on Turn Windows Defender Firewall on or off option from the left pane.

- Check the radio button Turn off Windows Defender Firewall (not recommended) for both Public and Private networks.

- Click OK.
- Run the Installation Assistant.
The above steps are shown for the Windows Defender Firewall, but it is to show you the idea that you can try disabling the antivirus on your PC that might be blocking the Installation Assistant.
However, in case this solution doesn’t work, you can check out our guide which has some of the best antivirus tools that can help protect your PC from viruses or malware.
3. Run a SFC scan
- Press the Win key to open the Start menu.
- Open the command prompt as an admin.

- Type the below command and press Enter.
sfc /scannow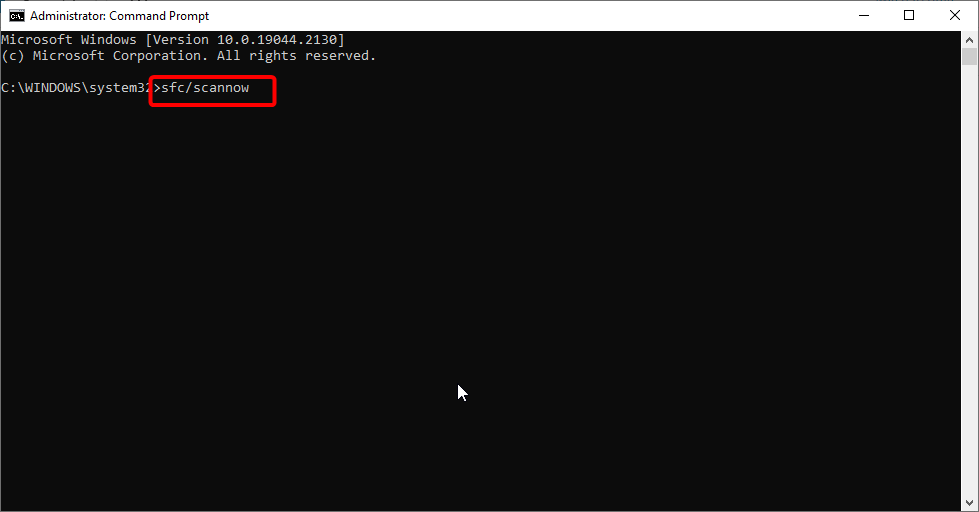
- Wait for the process to scan and fix corrupt system files.
- Restart your PC.
Corrupt system files can also collide with whatever the Installation Assistant is trying to do. In that case, you can try fixing the corrupt system files by running the SFC Scan command.
4. Perform a clean install
- Download the Windows 11 Installation Media from the official website.

- Run the downloaded EXE file.
- Follow the on-screen steps.
- Insert the USB drive and let it create a bootable USB.

- Restart your PC.
- Choose your bootable USB drive.
- Perform a clean Windows 11 install.
Some users have suggested that creating a bootable media and performing the clean install has helped them get rid of the error 0x8007007 on their PCs. You can also try this solution and resolve the problem at your end.
That is it from us in this guide. Before you upgrade to Windows 11 reading all the good things about the new OS, you can refer to our guide that lists some of the cons of Windows 11.
For users that are facing Windows 11 Installation Assistant not working problem, we would recommend you apply the fixes mentioned in our guide to fix the error.
Feel free to let us know in the comments below, which one of the above solutions resolved the problem of error 0x8007007.
Read our disclosure page to find out how can you help Windows Report sustain the editorial team. Read more


Improve this guide

User forum
0 messages