How to run 16-bit apps in Windows 10 64-bit [STEP-BY-STEP GUIDE]

Like the previous version of Windows OS, the Windows 10 also comes with support for running the older programs not compatible with the Windows 10 64bit edition. Since the Windows 64-bit system lacks the 16-bit subsystem to run 16-bit apps, we need to try a workaround.
To install 16-bit apps in Windows 10 64-bit we need to install a Virtual Machine first and then install an older version of Windows OS like XP onto it. After that, you can install most of the 16-bit apps in Windows 10 via Virtual Machine.
Can I run 16 bit programs on a 64 bit computer?
Install and configure VirtualBox
- Start with downloading Oracle VirtualBox that you can download for free from the official page. Make sure you download the right version for your Windows (Virtualbox 5.1.4 for Windows hosts).
- Run the installer after the download is complete.
- Once you have installed the Oracle Virtual Box successfully, you need to create a new virtual machine for your legacy application.
- Since you want to run a 16-bit app in Windows 10 64-bit system, it is recommended that you use Windows XP to create a new virtual machine.
- Make sure you have downloaded the Windows XP ISO onto your computer. You can find the Windows XP ISO with a simple Google search. Proceed with creating new Virtual Machine, after you have the Windows XP ISO ready.
- Launch Virtual Box, click on Machine and select New.

- Here you need to enter a name for the VM. Enter Windows XP. Most likely Oracle Box will automatically fill the OS version to Windows XP 32-bit.

- If not click on the drop-down menu for version and select “Windows XP (32-bit).
- Next, you need to set the memory size. If you have 8 GB of RAM then I would recommend setting the size to 1GB and for 4GB set it to 512 MB.
- Under “Hard Disk” section, select “Create a virtual hard disk now” option. This partition will store the operating system.
- Click the Create button.
- In the “Create a Virtual Hard Disk” window, leave the File Location as it is.

- Go to Hard Disk file type and select VDI (VirtualBox Disk Image).
- For “Storage on Physical hard disk” select “Dynamically allocated” option.
- Click on the Create button again.
- OracleBox will now start creating your Hard Disk. It may take a while so, wait for till it completes.
Do you want to use Windows XP forever? We’ve got your back.
Install the Windows XP OS
- To install the OS you need the Windows XP ISO Image. If you have it downloaded, proceed with the next steps.
- In the Virtual Box, select Windows XP and click on the Start button.

- Since this is the first time you are installing Windows OS, it will ask you to select a Startup Disk.

- Click on the Browse icon and navigate to where your Windows ISO Image is located. Select the ISO Image and click on Start.
- Now follow the on-screen instructions to install the OS.
Install Guest Additions
- To move between the virtual machine and the host easily, you need to install Guest Additions.
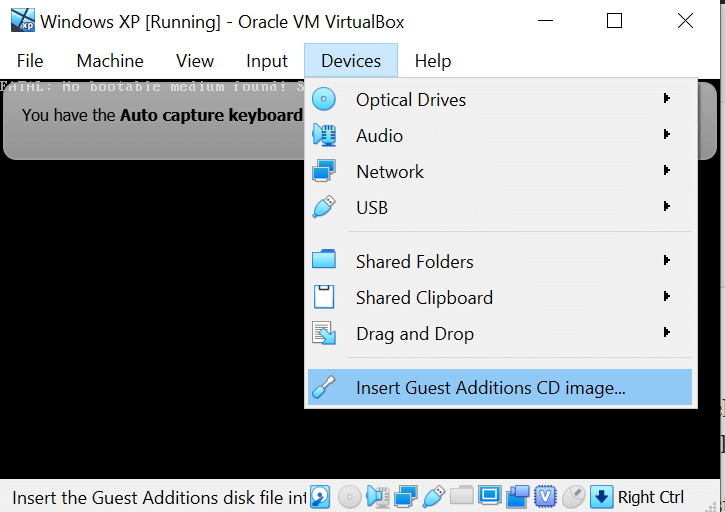
- In your Virtual Machine, click on Devices and click on Insert Guest Additions CD Image. Click Next.
RELATED STORIES YOU MAY LIKE:
Readers help support Windows Report. We may get a commission if you buy through our links.

Read our disclosure page to find out how can you help Windows Report sustain the editorial team. Read more


Improve this guide


User forum
0 messages