How to Recover Data From RAID 1 Disk Safely
When one drive fails, you still have the data on the other
![]() 4 min. read
4 min. read
![]() Published on
Published on
Share this article
Improve this guide
Read our disclosure page to find out how can you help Windows Report sustain the editorial team. Read more
Recovering data from RAID 1 sounds complicated but it’s really not. The whole point of a RAID configuration is that two disk drives work in tandem to store the same data. If one of them fails, you still have the other one with the information intact. So, you only need to treat them as individual drives and identify the working one. With the right tools and methods, you can make the process much more manageable.
How do I recover data from a RAID 1 disk pair?
1. Clone the drives
- Disconnect both RAID drives from the NAS or server carefully.
- Connect one of the RAID drives to a computer using a SATA-to-USB adapter.
- Download and install a cloning tool on your computer. We have a list of the best cloning software so you’re covered.
- Use the app to clone the RAID drive to a new, empty drive to ensure the original data remains untouched.
- Connect the cloned drive to a computer running Windows.
- Check the cloned drive in Disk Management for any partitions and assign drive letters if needed.
- Use Windows File Explorer to see if the files are accessible.
- If so, create another RAID 1 configuration with the existing data or with a new disk pair.
Cloning the drives ensures that you do not accidentally damage the original data. By working on the cloned drives, you mitigate the risk of data loss from any errors during the recovery process.
2. Use a Linux Live CD
- Burn a Linux Live CD (like Ubuntu or Linux Mint) onto a USB drive.
- Boot the computer from the USB drive into the live Linux environment.
- Connect one of the RAID drives to the computer.
- Open the Terminal and install necessary tools by running the following commands:
sudo apt updateandsudo apt install gparted gpart - Mount the RAID drive:
- First, identify the drive using the lsblk command.
- Then, create a mount point by running
sudo mkdir /mnt/raid - Mount the drive with the following command (replace sdX1 with your actual device identifier)
sudo mount /dev/sdX1 /mnt/raid
- Use File Manager to browse and copy files from the mounted RAID drive to another storage.
Using a Linux Live CD can help access file systems like EXT4 or Btrfs that Windows cannot read natively. This method is invaluable if the RAID was initially set up using a Linux-based NAS.
3. Try data recovery software
Professional data recovery software can bypass various software-level issues preventing access to your data. These tools are designed specifically to handle RAID configurations.
Luckily, we prepared a list of the best data recovery software that can make this process as easy as making a few clicks.
If you’d like to get straight to it, we advise using Stellar Data Recovery. This software is very easy to use and it is quite renowned for its capabilities.
4. Use Disk2VHD for Virtual Backup
- Download Disk2VHD from Microsoft’s website.
- Connect the RAID drive to your computer.
- Launch Disk2VHD and create a virtual hard drive (VHD) file from the RAID drive.

- Once the VHD file is created, mount it on any Windows 10 or Windows Server system by double-clicking the VHD file.
- Access and recover files from the mounted virtual hard drive.
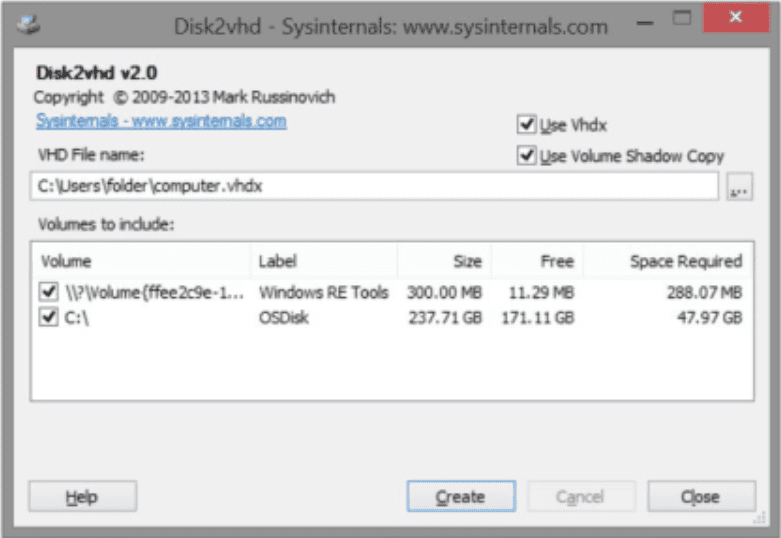
Creating a virtual hard drive enables you to work with a full backup copy of your RAID data in a controlled environment, reducing any risks associated with direct recovery attempts.
5. Seek professional data recovery services
- If the data is extremely valuable and DIY methods do not yield results, consider sending the RAID drives to a professional data recovery service.
- Secure the drives in anti-static bags and use appropriate packaging to prevent physical damage during transit.
- Consult with the data recovery service for a free evaluation.
Professional services have specialized tools and experience to recover data from even the most challenging RAID failures. This should be considered if all other methods fail or if you are not comfortable executing advanced recovery techniques yourself.
By following these methods, you can cover various angles and approaches to recover data from broken RAID 1 arrays efficiently and safely. Always remember to back up your data regularly to prevent future data loss.
We have a complete guide on how to set up RAID 1 on Windows 11 that may help you after you recover the data. If you want more information, also check our guide on how to set RAID on external drives.
We recommend using the comments section below if you have any additional questions about this matter.
User forum
0 messages