Windows 11 Asking for Bluetooth Password: How to Bypass it
Use generic passwords or bypass via the Control Panel
5 min. read
Updated on
Read our disclosure page to find out how can you help Windows Report sustain the editorial team. Read more

Ideally, when you add a new Bluetooth device to your Windows 11 PC, you should be able to connect automatically but if it asks for a password, you must enter a PIN or bypass this restriction.
A Bluetooth password is a security measure to ensure both devices are authorized to communicate with each other. However, some devices don’t need a password to connect so if Windows 11 asks for a Bluetooth password, check your device’s documentation for any passwords.
The default 1234 or 0000 passwords should also suffice but if these don’t go through, here’s how you can connect seamlessly.
How do I find my Windows 11 Bluetooth password?
1. Run the Bluetooth troubleshooter
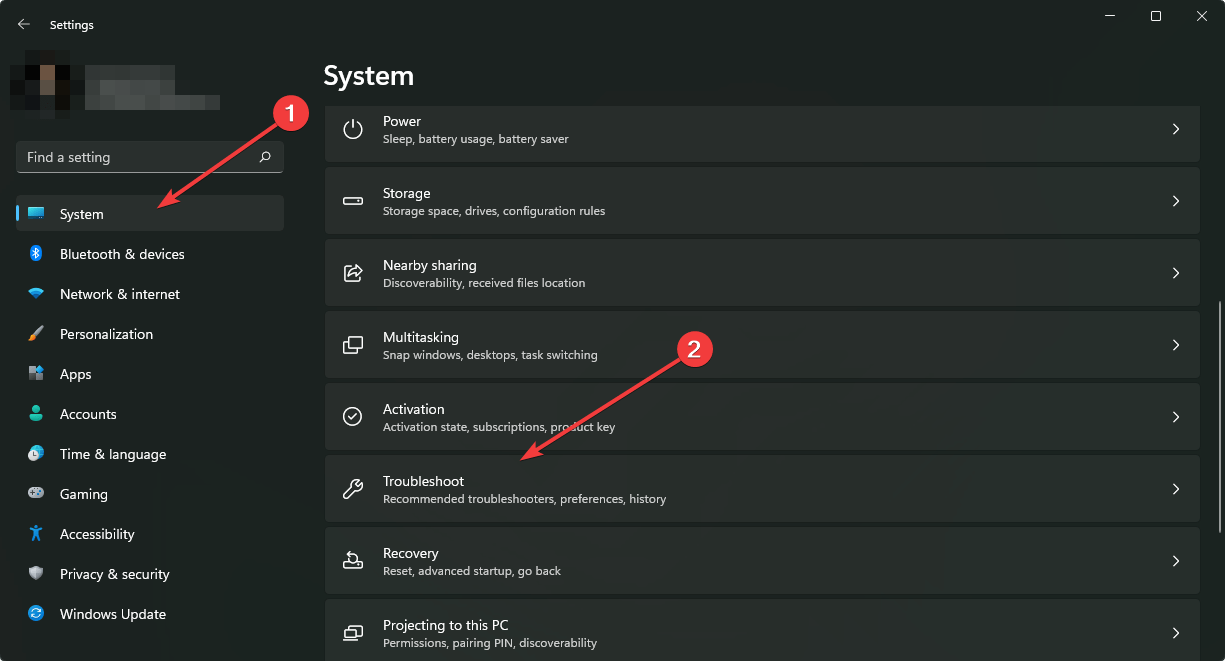
- Press the Windows key and select Settings.
- Click on System on the left pane, then Troubleshoot on the right pane.
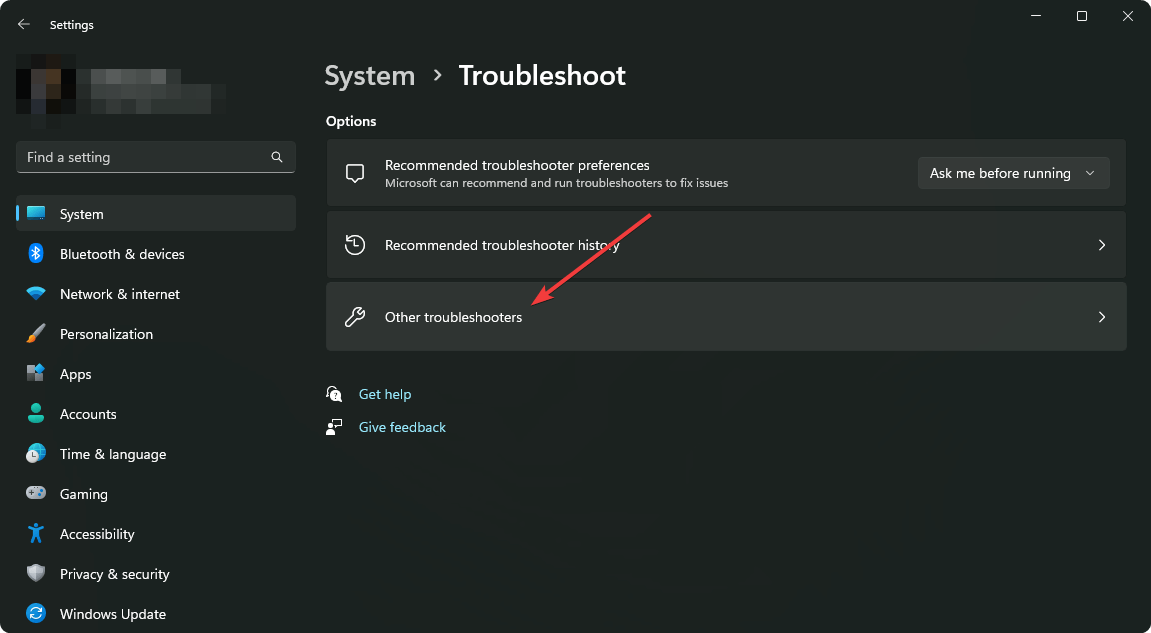
- Select Other troubleshooters.
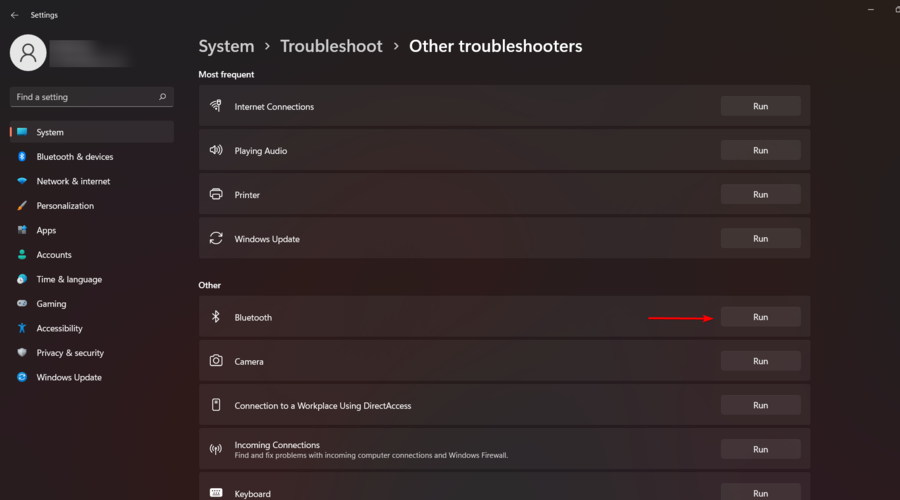
- Locate the Bluetooth troubleshooter, and click on the Run button next to it.
2. Update your Bluetooth drivers
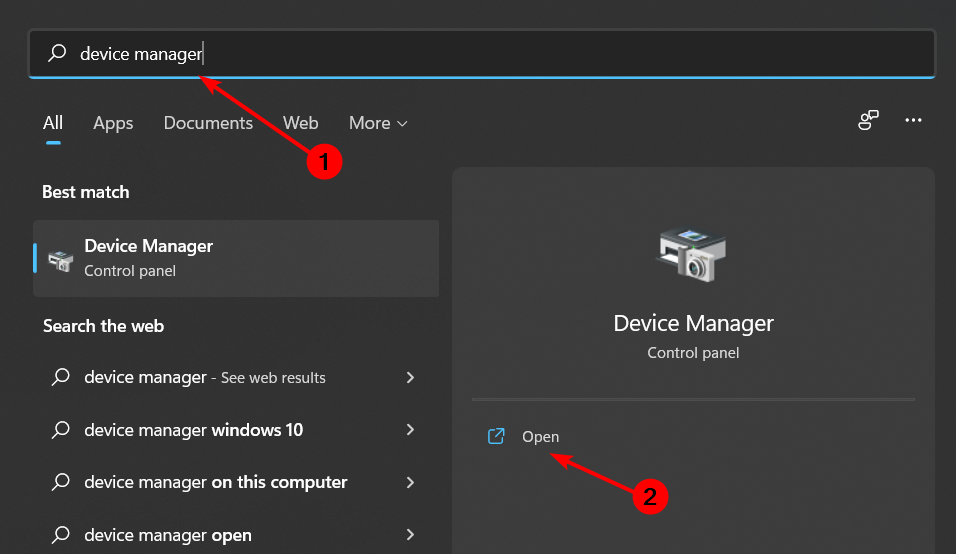
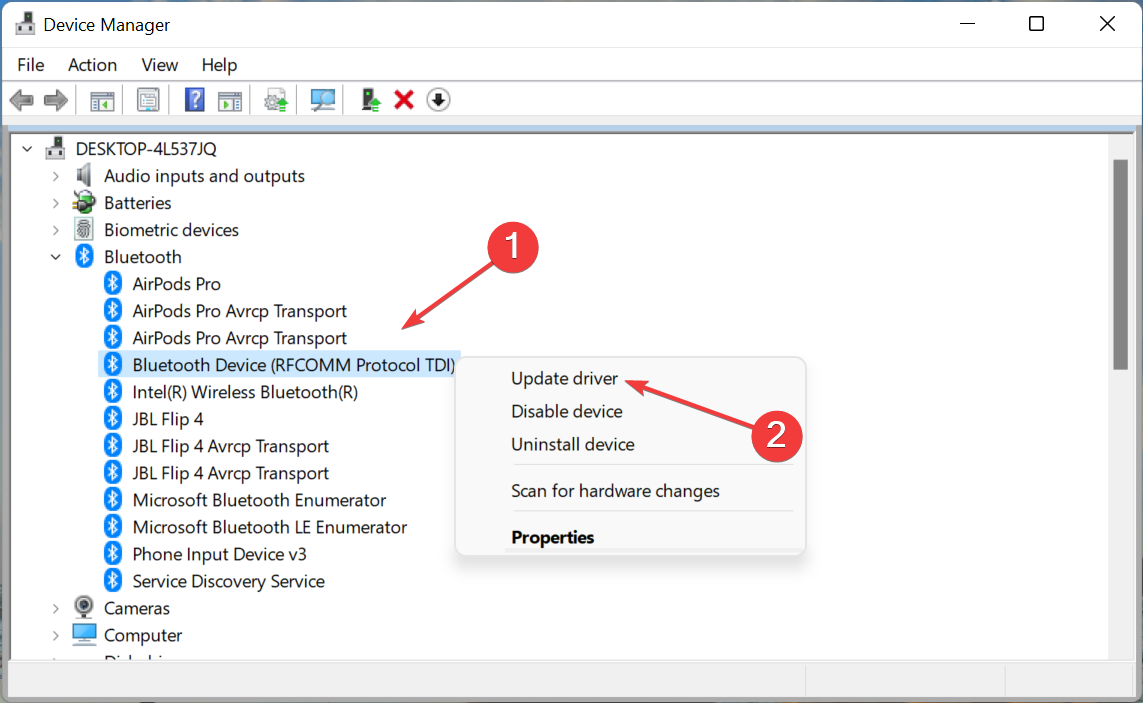
- Hit the Windows key, type Device Manager in the search bar, and click Open.
- Find your Bluetooth device, right-click and select Update driver.
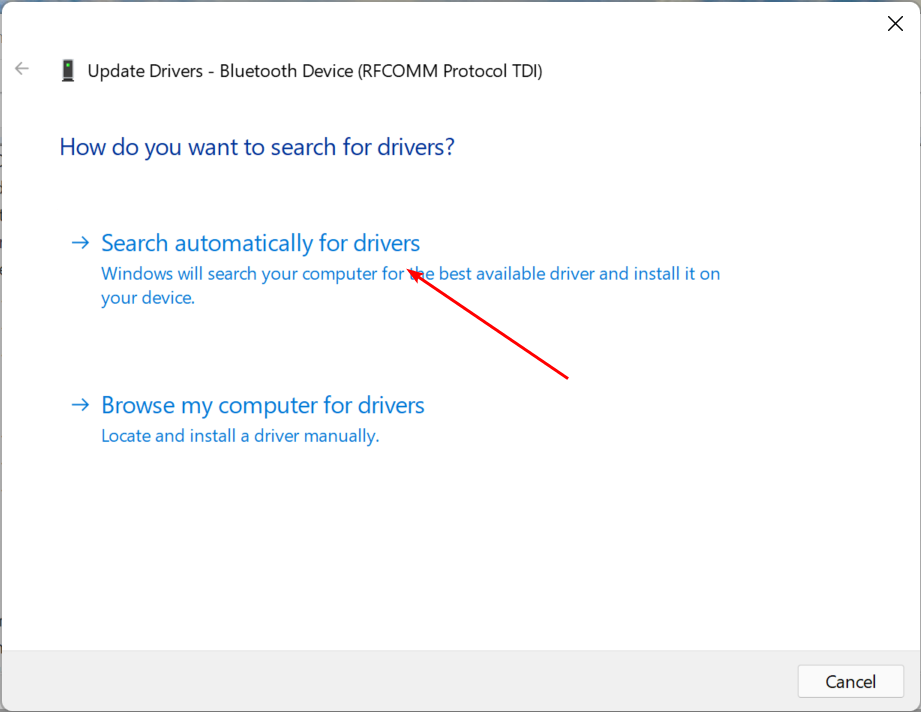
- Select Search automatically for drivers.
- Restart your PC and try reconnecting.
3. Roll back to previous drivers
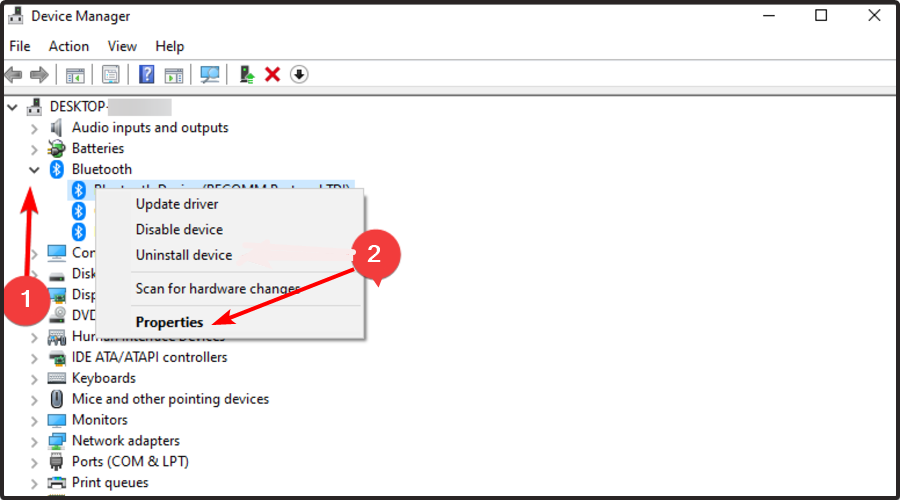
- Press the Windows key, type Device Manager, and click Open.
- Right-click on your Bluetooth device under Bluetooth and select Properties.
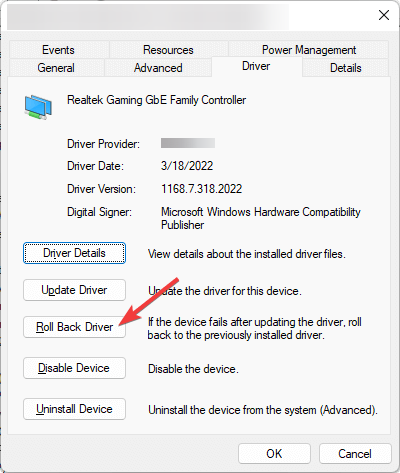
- Navigate to the Driver tab, then click the Roll Back Driver button.
- Select a reason for rolling back the driver.
- Restart your PC
4. Add the Bluetooth device via Control Panel again
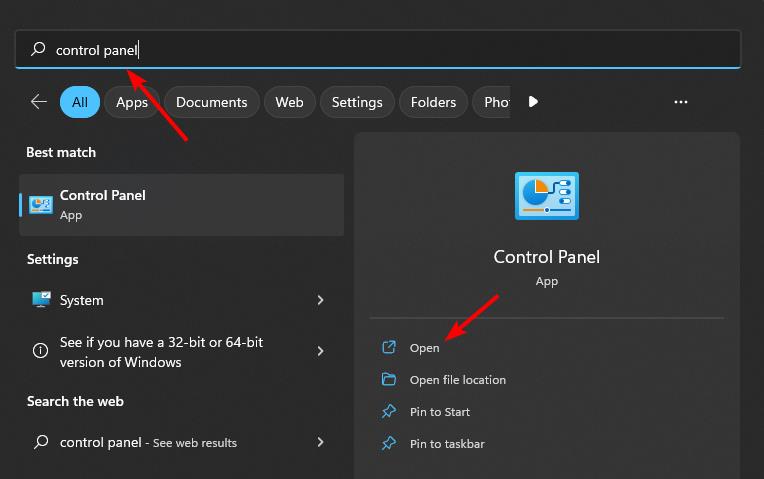
- Hit the Windows key, type Control Panel, then open the app.
- Click on Hardware and Sound.
- Now, click on Devices and Printers.
- Choose the Add a device option at the top-left corner.
- Select the device, and follow the on-screen instructions to complete the process.
For newer versions of Windows 11, the option for Devices and Printers may redirect you back to the Settings app so if it does, try the next method to add your Bluetooth device and see if you’ll bypass the password request.
5. Add the device via Network Connection Properties
- Press Windows + R to open Run, type ncpa.cpl, and then click OK.
- Right-click on the Bluetooth Network Connection adapter, and choose Properties.
- Head to the Bluetooth tab, and click on Bluetooth settings.
- Tick the checkbox for Allow Bluetooth devices to find this PC, and click on OK to save the changes.
- Now, click on Manage Bluetooth Personal Area Network Devices.
- Turn on the device that you want to connect to the PC.
- Click on Add a device button near the top-left.
- Immediately turn on the pairing mode on the device, select it when listed on the PC, and follow the on-screen instructions to connect.
6. Reset your Bluetooth connection
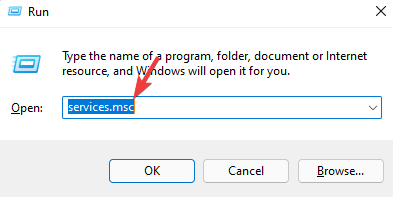
- Press the Windows + R keys simultaneously to open the Run window.
- Type services.msc in the Run dialog box.
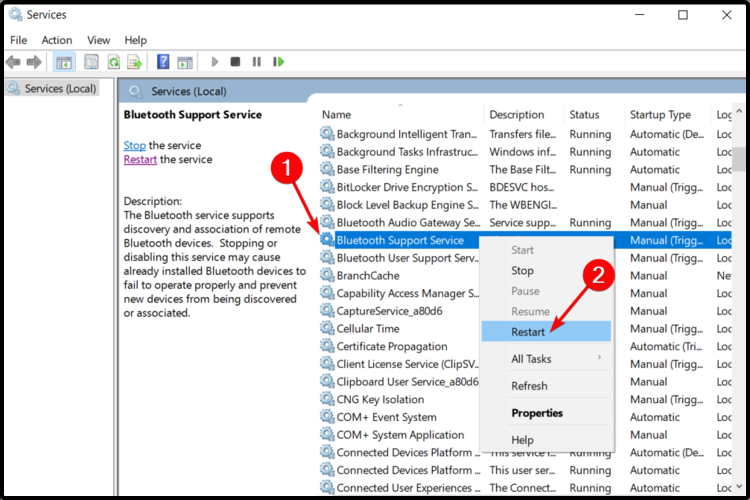
- Find the Bluetooth Support Service, right-click and select Restart.
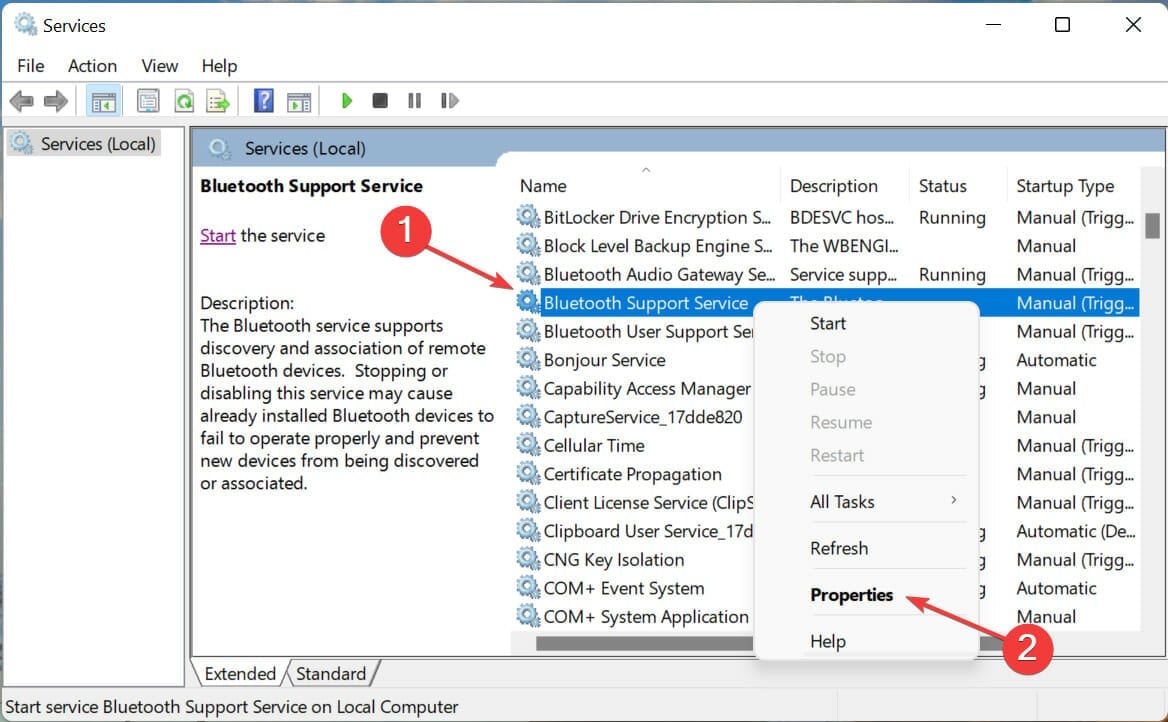
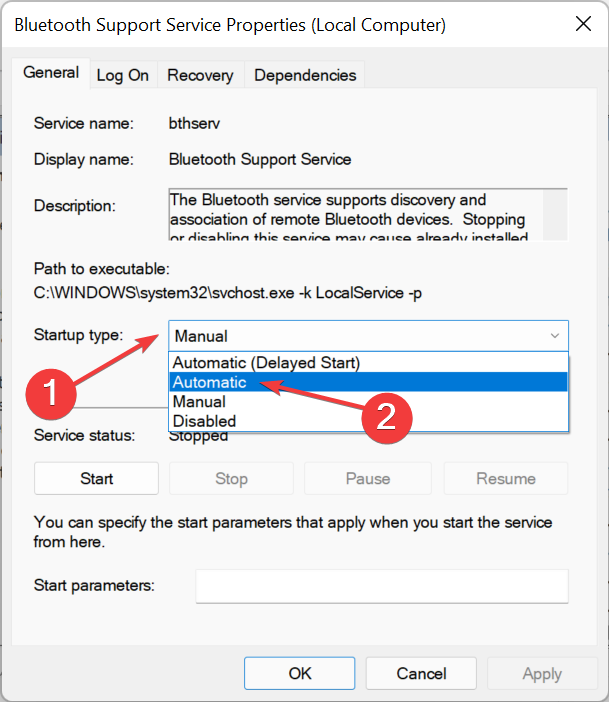
- Right-click again and select Properties.
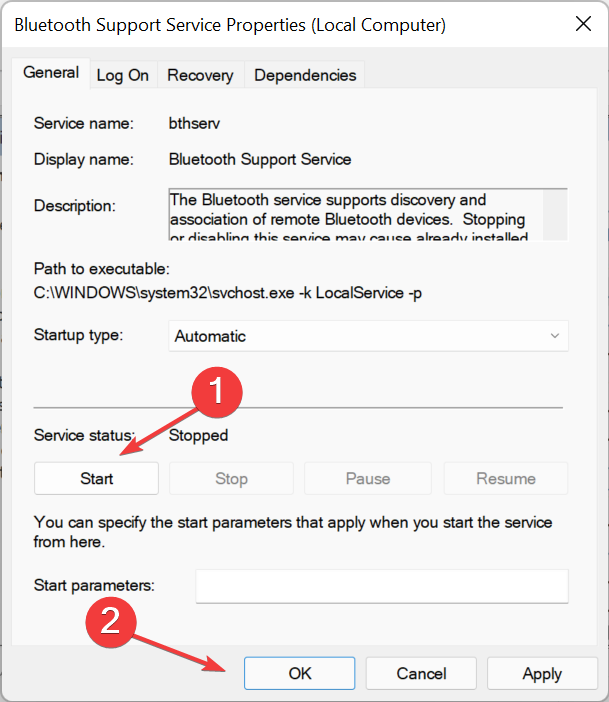
- Under the General tab, select Automatic as the Startup type then click OK.
- Under Service status, click the Start button then hit OK to save.
7. Remove and reset the device
7.1 Remove the Bluetooth device
- Press the Windows button to open the Start Menu.
- Search for the Control Panel and open it.
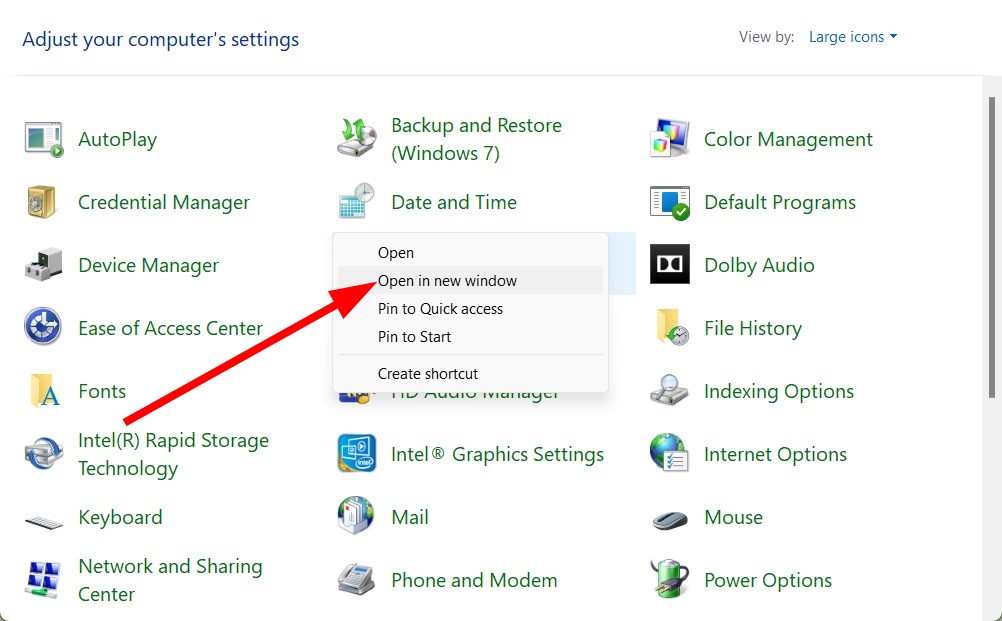
- Change the View by option to Large or Small icons.
- Right-click on Devices and Printers and select Open in a new window option from the context menu.
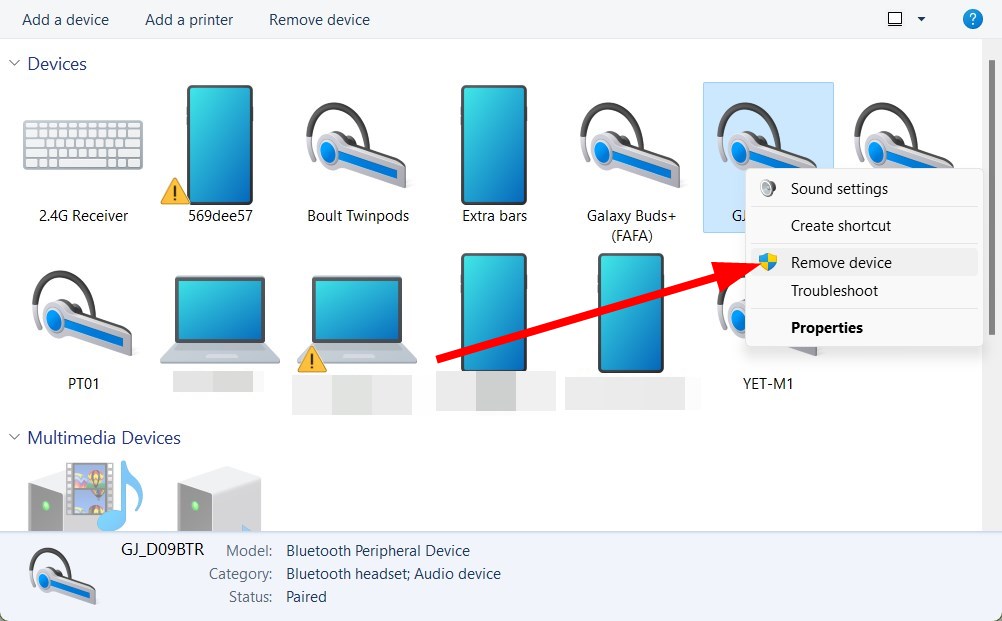
- Right-click on the device your wish to remove and select the Remove device option.
- Next, right-click on the Start menu and select Device Manager.
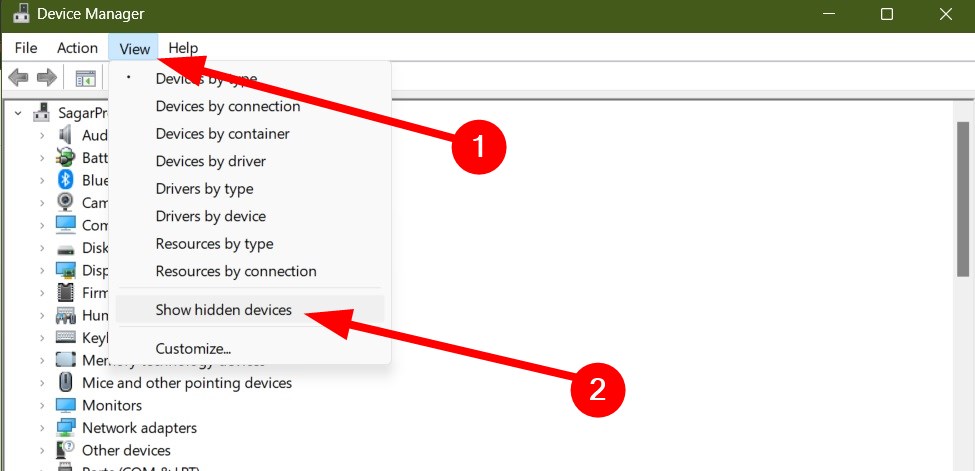
- Click on View on the top menu bar and select Show hidden devices.
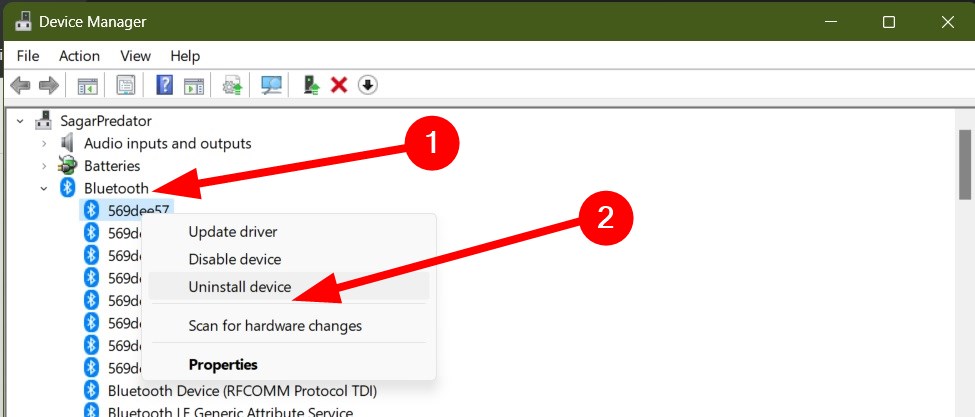
- Expand the Bluetooth section, right-click on the Bluetooth device that you wish to remove, and select Uninstall device.
- Hit Uninstall again when prompted.
7.2 Reset the Bluetooth device
- Press Windows + S to open the Search menu, enter Sound Settings in the text field (This depends on your Bluetooth device. In this case, headphones), and click on the relevant search result.
- Scroll down and click on More sound settings.
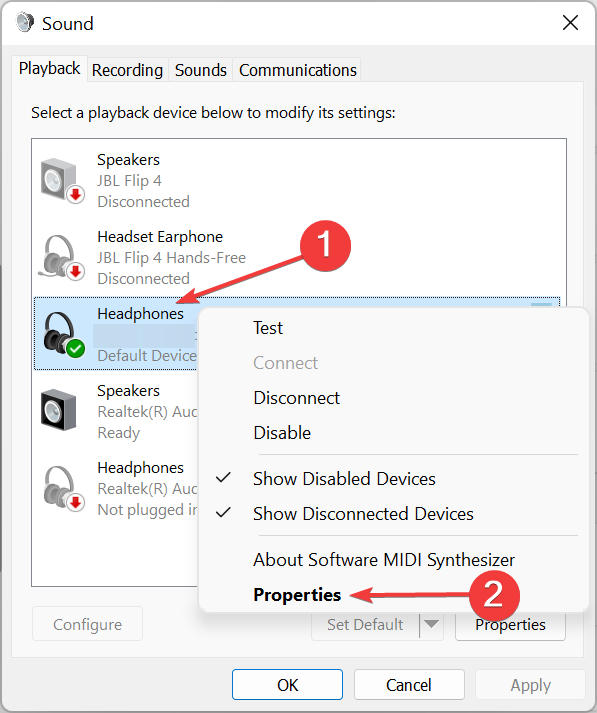
- Right-click on your Bluetooth headphones you want to reset, and select Properties.
- Navigate to the Enhancements tab, and click on the Restore Defaults button.
- Similarly, head to the other tabs with the Restore Defaults button and click on it to reset the headphones.
7.3 Perform a System Restore
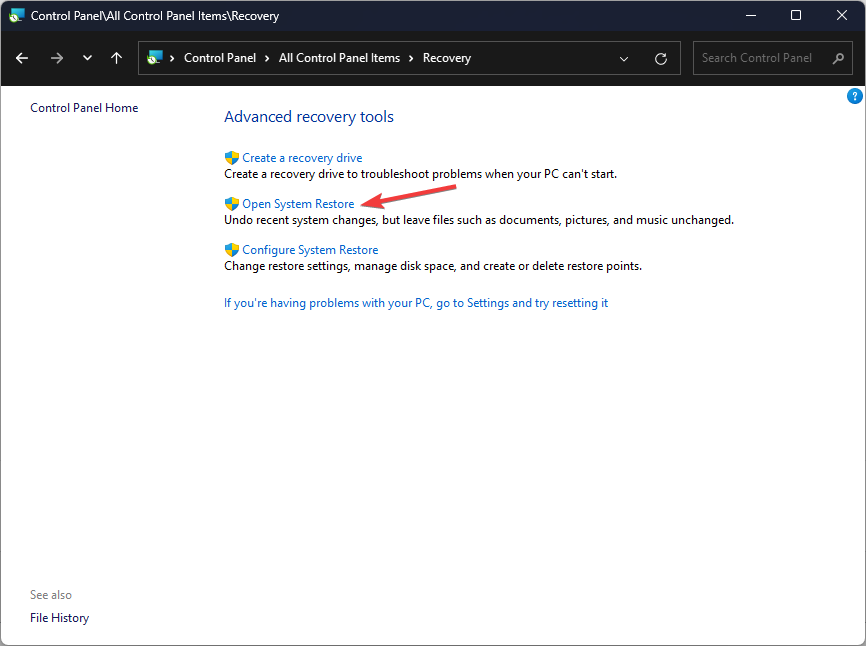
- Press the Windows key, type Control Panel, and click Open.
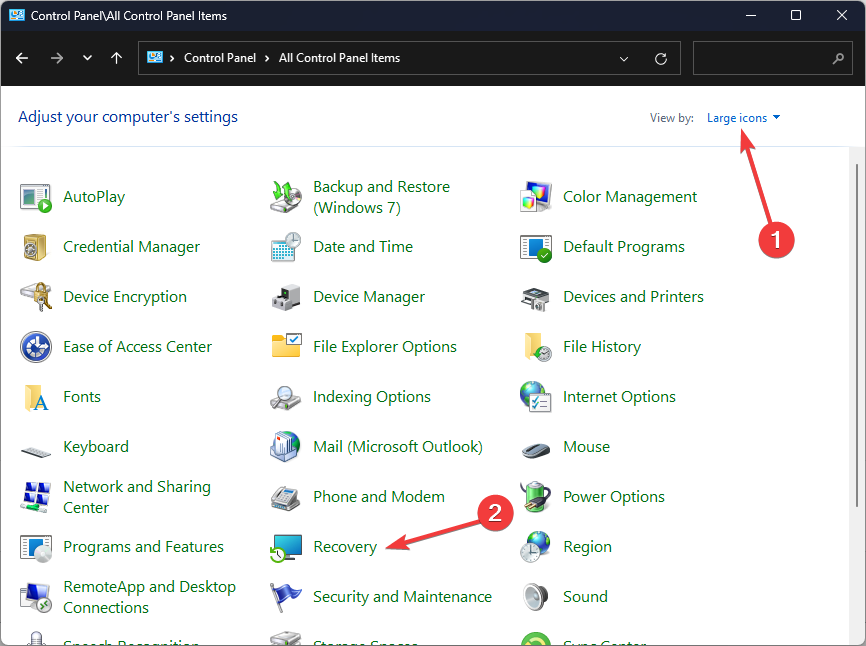
- Select Large icons as View by and click Recovery.
- Click Open System Restore.
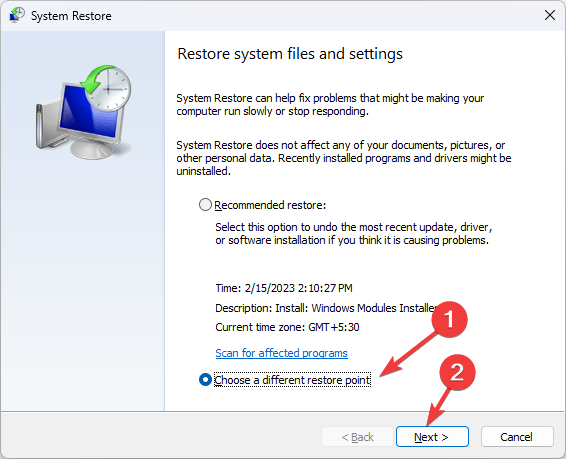
- Select Choose a different restore point and click Next.
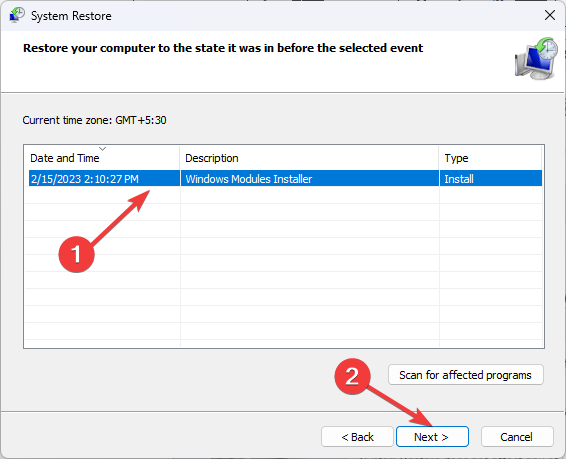
- Now select the restore point and click Next.
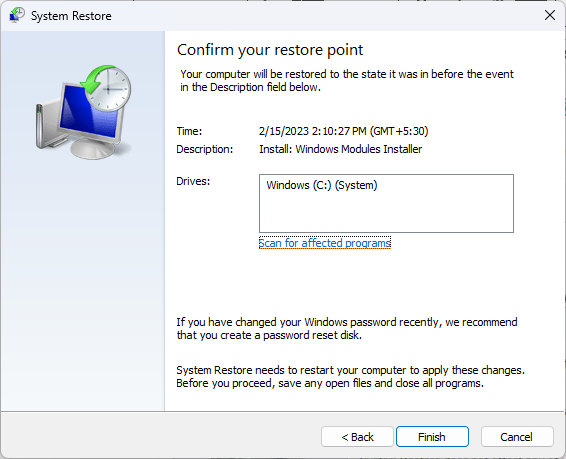
- Click Finish to restore the previous settings, and Windows will restart.
To prevent a reoccurrence of Windows 11 Bluetooth password prompts whenever you’re connecting a device, we recommend turning on Bluetooth auto-connect. And if your Bluetooth device keeps disconnecting, we know just the fix for it.
In some instances, you may enter the correct password but Bluetooth will have an error establishing a connection. If so, we’ve already discussed how to bypass this error.
Have you managed to bypass the Windows 11 Bluetooth password prompt with any of the above solutions? Let us know in the comment section below.













User forum
0 messages