6 Easy Ways to Fix Razer Cortex High CPU Usage
Limit CPU resources for a CPU-hogging program

Razer Cortex can be great for boosting your games but if it comes at the cost of high CPU usage, it’s probably not worth it.
Any resource-intensive program will obviously consume system resources. The issue with Razer Cortex is that it is surpassing normal levels even when the app is not running. If its background processes consume 20-30% of your CPU, there could be an issue.
Most users who had this problem reported that updating the app led to this high consumption. Worse still, FPS levels dropped significantly and affected the overall gaming experience.
How can I fix Razer Cortex’s high CPU usage?
1. End the Razer Cortex process and restart related services
1.1 End process
- Right-click the Windows icon on the desktop and choose Task Manager from the quick links menu.
- Switch to the Process tab and look for Razer Cortex in the list of background services.
- Right-click the process and select End task from the context menu.

- Exit the Task Manager window and reboot your computer.
1.2 Restart Razer Cortex-related services
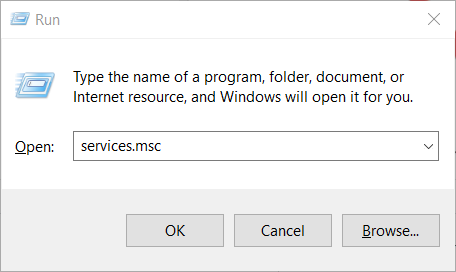
- Hit the Windows + R keys to open the Run command.
- Type services.msc in the dialog box and hit Enter.
- Locate Razor Cortex Game Scanner, right-click on it, and select Properties.

- Go to Startup type, and in the drop-down menu, select Automatic, then click Start.
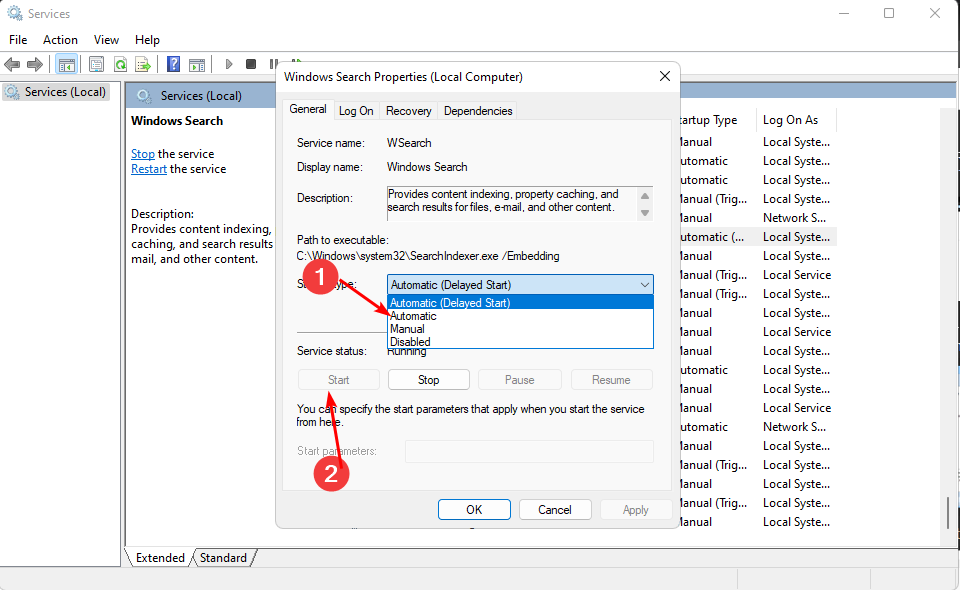
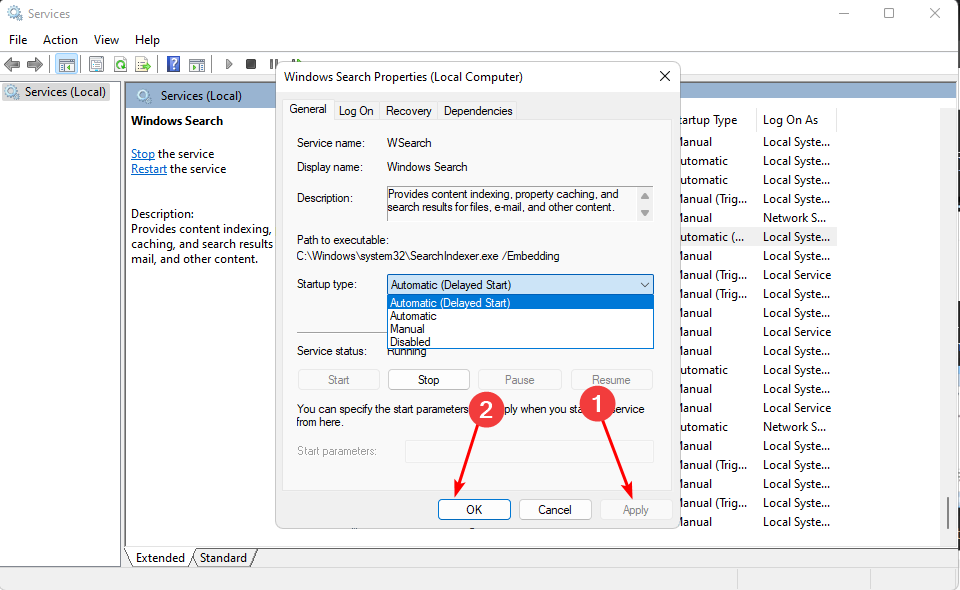
- Click Apply, then OK to save changes.
- Repeat these steps for Razer Game Manager Service and any other related services.
- Restart your PC and see if the issue persists.
2. Disable boosting features
- Open the software.
- Go to Game Booster and select Boost.
- Next, disable the Auto-boost feature.

- Optionally, disable Enable CPU Core. You can find this feature in the Boost > Specials section.

- You can also disable System Booster and check if that helps.
If you’re not using this feature, it is best to disable it as it consumes a lot of resources and could contribute to the high CPU usage.
3. Remove Razer Cortex from Startup apps
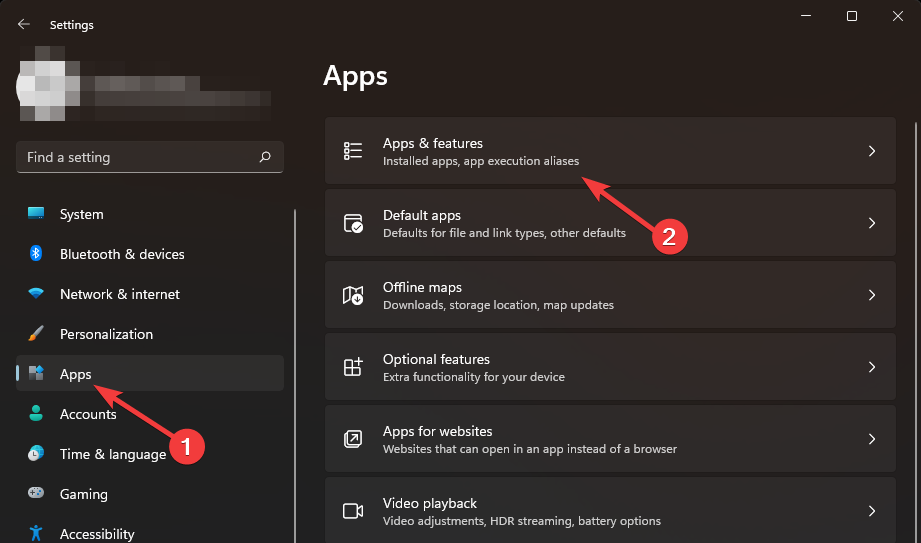
- Hit the Windows key and click on Settings.

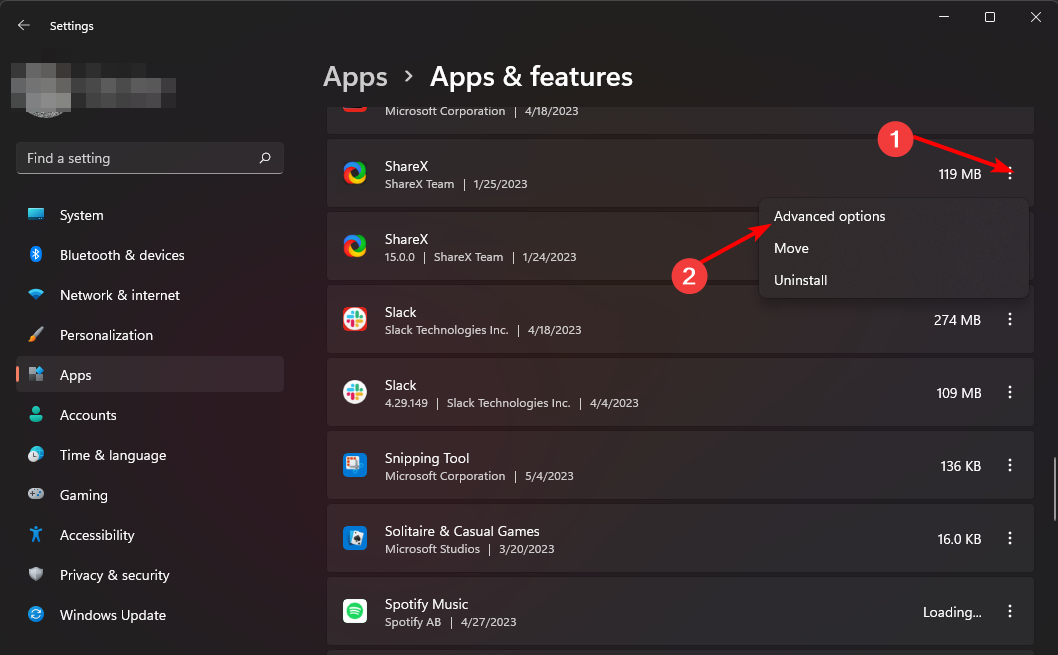
- Click on Apps on the left pane then select Apps & features.
- Search for Razer Cortex from the list, click on the three ellipses of the select app and hit Advanced options.
- Under Runs at log-in option, toggle the Off button to disable and back on to enable.
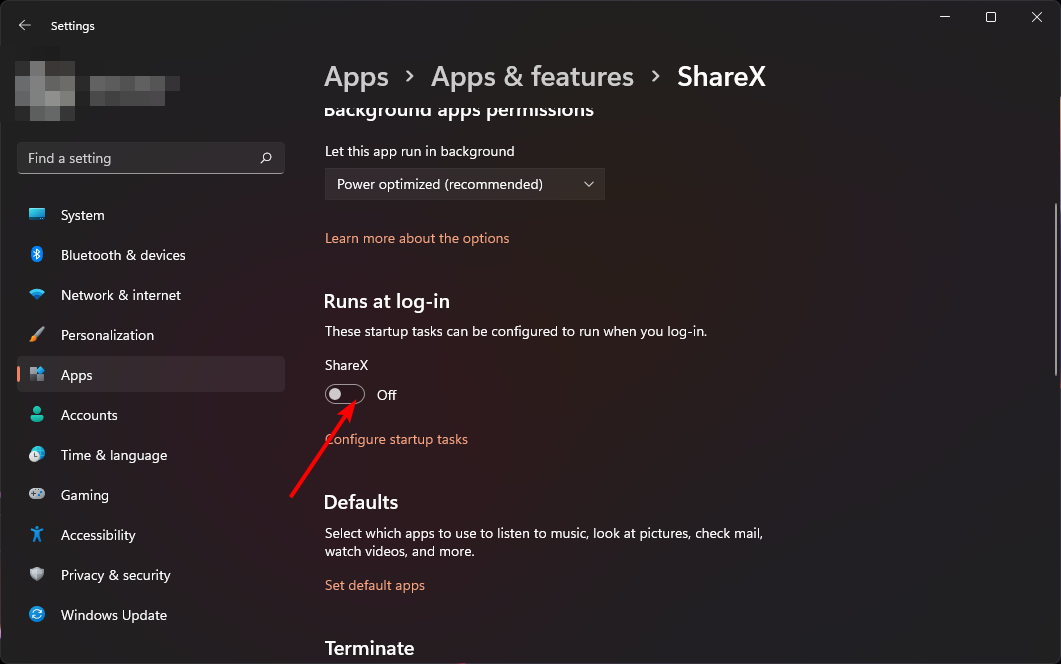
If Razer Cortex is set to run on startup, your CPU usage will be through the roof because it uses a lot of system resources to launch.
4. Re-allocate CPU resources
4.1 Allocate more CPU resources
- Right-click on the Start button and select Task Manager.
- Navigate to the Details Tab.
- Right-click on the program you wish to allocate more CPU. Next, click on the Set Affinity option from the pop-up menu.

- Then, select the cores you want to assign to Razer Cortex from the options listed as CPU0, CPU1, CPU2, and CPU3 (for quad-core chipsets).

- Lastly, click on OK to apply the changes.
4.2 Set Razer Cortex as a high-priority process
- Press the Ctrl+Shift+Esc key combination to open Task Manager directly.
- Navigate to the Details Tab.
- Right-click on the Razer Cortex and choose the Set Priority option from the pop-up menu to see the current priority setting (Normal).

- Now set it to either Above Normal, High, or Realtime (do not prioritize a lot of processes to Realtime at the same time as it can lead to system instabilities).
- Click on the Change priority option to confirm the changes.
These two steps should be applied if Razer Cortex is a high-priority app and you can justify its need for high CPU usage. If not, you can limit its usage.
4.3 Limit CPU usage
- Press Ctrl + Shift + Esc. The Task Manager window will now appear.
- Navigate to the Details tab.

- Locate the Razer Cortex app and right-click it.
- Navigate to Set priority and set it to Below normal or Low.

5. Reinstall the software
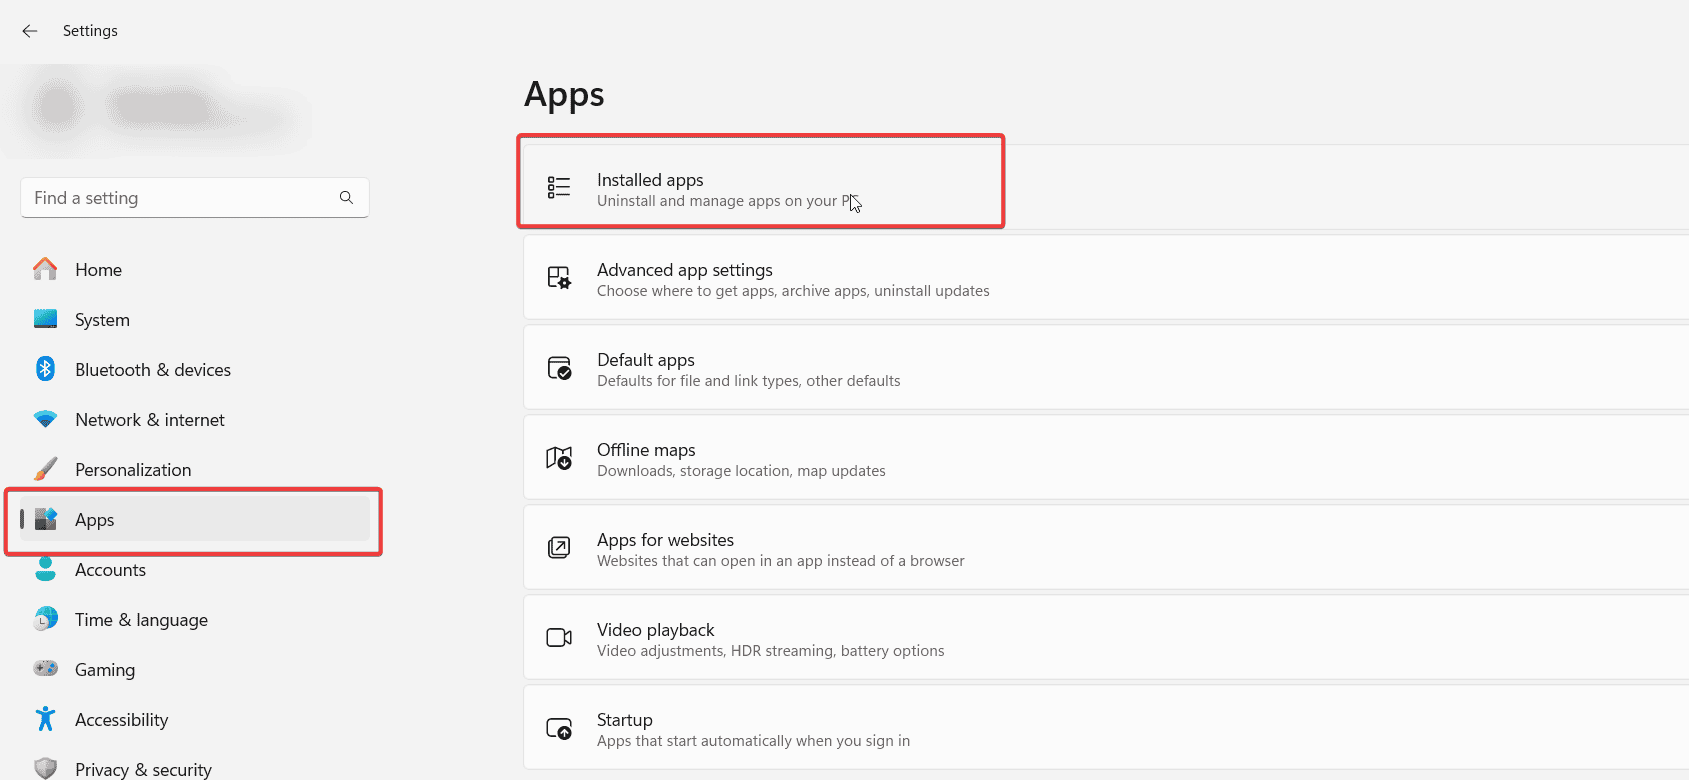
- Click on the Start button and choose Settings.

- Navigate to Apps and select Installed apps.
- Locate Razer Cortex, click the three dots next to it, and choose Uninstall.
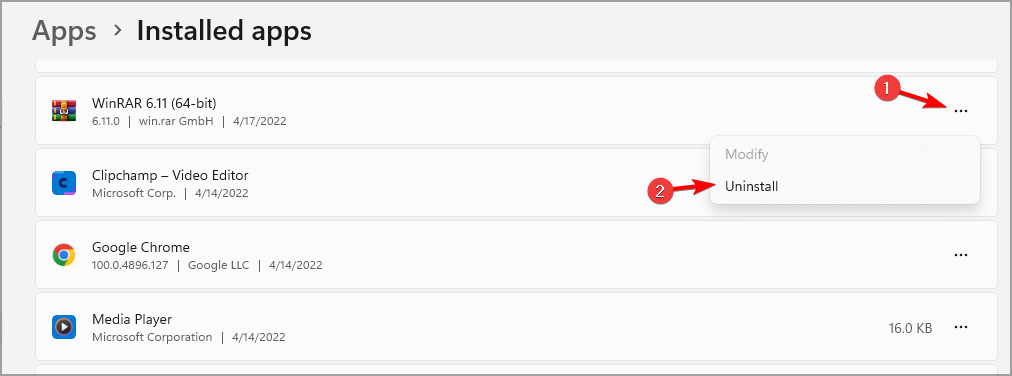
- Follow the instructions on the screen to complete the process.
- Next, navigate to your web browser and go to the official Razer Cortex website.
- Click the Download Now button and indicate a location on your PC.

- Double-click the RazerCortexInstaller.exe file you downloaded and in a few seconds, the Razer Gaming Software will be installed.
- Now, open the app and click on Install for Razer Cortex.

If Razer Cortex won’t uninstall, we have a guide to completely remove it.
6. Install an older app version
 NOTE
NOTE
- Uninstall your Razer Cortex app and remove any software leftovers.
- Launch your web browser and navigate to the Uptodown site.
- Scroll down and click on Older versions.
- Search for a specific version number you may have noted down using the CTRL + F combination then paste it to locate it faster. If you don’t have a specific version, simply pick the second one from the top.

- Wait for the download to complete then follow the on-screen prompts to install Razer Cortex.
If Razer Cortex is not responding as you would like, you can try other Razer Cortex alternatives and see if you get better performance from them. Issues like Razer Cortex crashing your PC can cause system instabilities so you’re better off with an alternative.
However, if you manage to solve the high CPU usage, there are other features like the handheld mode that may interest you so don’t hesitate to check out in our detailed article.
We also have a guide on what to do if Razer Cortex is not working, so don’t miss it.
That’s all we had for this article but if you have any other solutions that worked for you, leave a comment down below.
Read our disclosure page to find out how can you help Windows Report sustain the editorial team. Read more


Improve this guide


User forum
0 messages