FIX: Cannot connect external monitor to Surface Pro 3 laptop
4 min. read
Updated on
Read our disclosure page to find out how can you help Windows Report sustain the editorial team. Read more

How can I do if my external monitor won’t connect to Surface Pro 3?
- Update your OS
- Uninstall display drivers
- Run the display driver in compatibility mode
- Run the built-in troubleshooter
- Check your VGA/ HDMI cord
Have you tried connecting an external display on your Surface Pro 3 device using Windows 10? Well, if you have issues connecting it, read the tutorial below to learn what you can do to fix this issue and get your Surface Pro 3 with Windows 10 running in just five minutes of your time.

What to do if Surface Pro 3 won’t connect to external display
1. Update your OS
- Check the Windows Update feature of your Windows 10 computer to see if there are any available updates that need to be installed.
- If there are any, please start the update process by following the on-screen instructions and reboot your Windows 10 system after they have installed correctly.
2. Uninstall display drivers
Note: You will need to have the setup file of your display driver in order to proceed with this step below.
- Press and hold the button “Windows” and the button “R”.
- You now have the “Run” window in front of you.
- In the run box write the following: “devmgmt.msc” without the quotes.
- Press the “Enter” button on the keyboard or just left click or tap on the “OK” button.
- You now have the “Device manager” window in front of you.
- On the left side panel in Device Manager, left click to expand the “Display Adapter” topic.
- Right click on the display driver you are using.
- Left click or tap on the “Uninstall” feature.
- After the driver has uninstalled, please reboot your Windows 10 operating system.
3. Run the display driver in compatibility mode
- When the Windows 10 OS has started again, please go to the directory where you have the display adapter setup file > right click on it.
- From the menu that pops up, you will need to left click or tap on the “Properties” feature.
- Left click or tap on the “Compatibility” tab situated in the upper side of the Properties window.
- From there you will need to select the operating system on which the external display worked for you (perhaps Windows 8.1 or Windows 10).
- Left click or tap on the “Apply” button after you chose the operating system.
- Left click or tap on the “OK” button to close this window.
- Follow the instructions on the screen to finish the installation process.
- After you successfully installed the driver please reboot your Windows 10 operating system.
- When the device starts check to see if the external display is working on your Surface Pro 3 device.
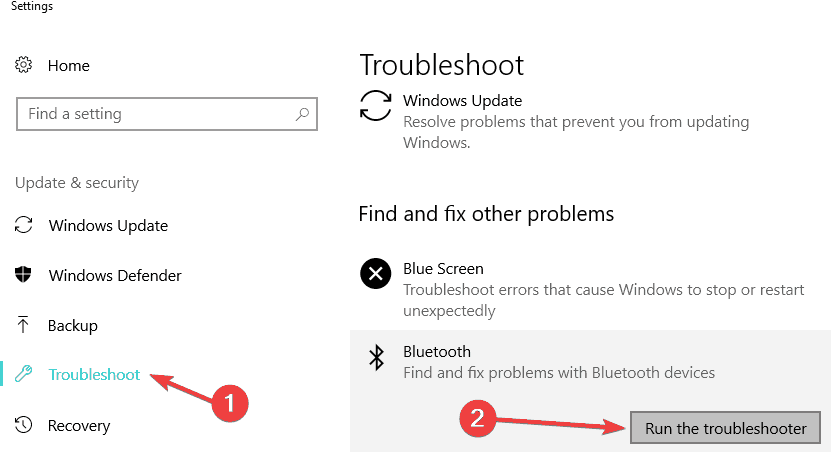
4. Run the built-in troubleshooter
If you use a Bluetooth connection to connect your external display to your computer, you can run the Bluetooth Troubleshooter. If the issue persists, you can also run the Hardware and Devices troubleshooter as well.
5. Check your VGA/ HDMI cord
If you use a cable to connect your external display to your computer, make sure that the respective cable is not faulty. You can replace with a different cable to check if the problem persists.
There you go, these are a few easy steps to get your external display up and running on your Windows 10 computer. If you have any other questions regarding this article, you can write us in the comment section below and we will help you further as soon as possible.
RELATED STORIES TO CHECK OUT:
- Here are the best G-Sync monitors for Windows 10
- 3 best wireless charging PC monitors to use in 2018
- The best PC monitors for 2018 that are really worth the money


User forum
0 messages