FIX: An error occurred while Internet connection sharing was being enabled
3 min. read
Updated on
Read our disclosure page to find out how can you help Windows Report sustain the editorial team. Read more
Key notes
- Even if your Internet connectivity is stable, you may want to check out these methods and see what you can do to improve it.
- Sharing your Internet connection with the wrong people can be risky, so always remember to have a good VPN at hand.
- Did you know you can combine multiple Internet connections into one in Windows 10? Well, it is possible.
- For a full list of articles that cover Internet connectivity issues check out this page.

Internet Connection Sharing (ICS) enables Windows users to share a connection on a single PC with other devices on local area networks. However, this doesn’t always work as it should as some users have had ICS errors. A Network Connections window opens stating, An error occurred while internet connection sharing was being enabled.
So are you getting that error? If so, these are a few fixes for it.
How do I fix the Internet connection sharing issue?
1. Check the Internet Connection Sharing Setting and Service
There is an Internet Connection Sharing setting that must be selected. If that option isn’t selected, ICS isn’t going to work. You can check that option as follows.
- Press the Win key + R hotkey to open Run.
- Enter ncpa.cpl in the text box and press OK to open the Network Connections tab directly below.
- Now you can right-click your connection and select Properties.
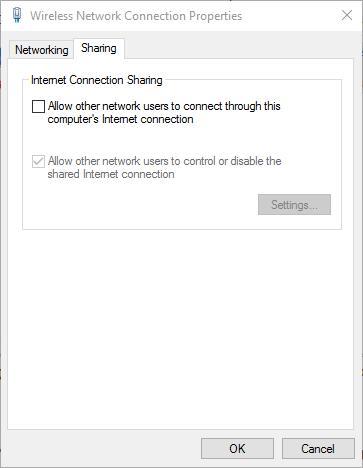
- Click Sharing to open the tab in the snapshot below.
- That tab includes an Allow other network users to connect through this computer’s Internet connection option.
- Click that setting’s check box if it’s not already selected.
- Press the OK button to close the window.
- There’s also an ICS service that might be switched off.
- You can check that by pressing the Win key + R hotkey to open Run.
- Enter services.msc in the Run text box and press the OK button to open the window below.
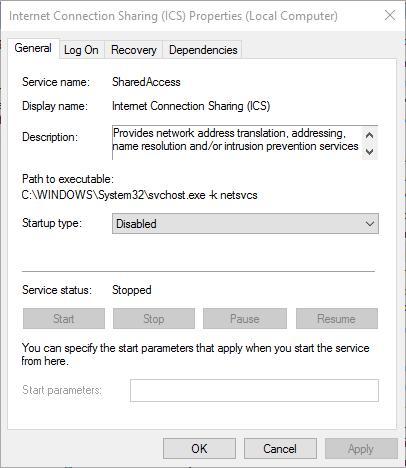
- Now double-click the Internet Connection Sharing (ICS) service.
- Select Automatic (Delayed Start) from the Startup type drop-down menu.
- Press the Apply button and click OK.
2. Check that all required services for Internet Connection Sharing are enabled
Now you’ve opened the Services window, check that a few other services are enabled. In fact, there are nine services required for ICS to work. These are the services that should be switched on:
- Plug And Play
- Application Layer Gateway Service
- Remote Procedure Call (RPC)
- Network Connections
- Network Location Awareness (NLA)
- Telephony
- Remote Access Connection Manager
- Remote Access Auto Connection Manager
- Windows Firewall
Once that is done, follow these steps:
- Double-click those features listed in the Services window.
- Switch their Startup type to Automatic if they’re configured to Disabled.
- Then restart Windows before you enable ICS again.
3. Close Anti-Virus Software
- Press the Win key + X hotkey and select Task Manager from the menu.
- You can also right-click the taskbar and select Task Manager.
- Then click the Processes tab, and select your anti-virus software.
- Press the End task button to close it.
- Alternatively, you can usually temporarily disable anti-virus software with its system tray context menu options.
- You can right-click the software’s system tray icon to open its context menu.
- Select a setting on the context menu that disables the anti-virus software.
Although Windows Firefox has to be running, other anti-virus software might be blocking the access point connection needed for ICS. Some anti-virus software, such as BitDefender, might even have a Block Internet Connection Sharing option.
By following these steps, you should be able to easily fix any Internet connection sharing errors that you might encounter in Windows 10.
Let us know which of these solutions fix your Internet connectivity issues by leaving us a message in the comments section below.
[wl_navigator]





User forum
0 messages