WindowsApps Folder: How to Find & Access It
Ensure to unhide all files when looking for the WindowsApp folder
4 min. read
Updated on
Read our disclosure page to find out how can you help Windows Report sustain the editorial team Read more
Key notes
- The WindowsApps folder is a repository that contains files of programs installed from Microsoft Store.
- Users can access the WindowsApps folder using File Explorer and a PowerShell command.
- WindowsApps folder can be moved to other desired locations using File Explorer.
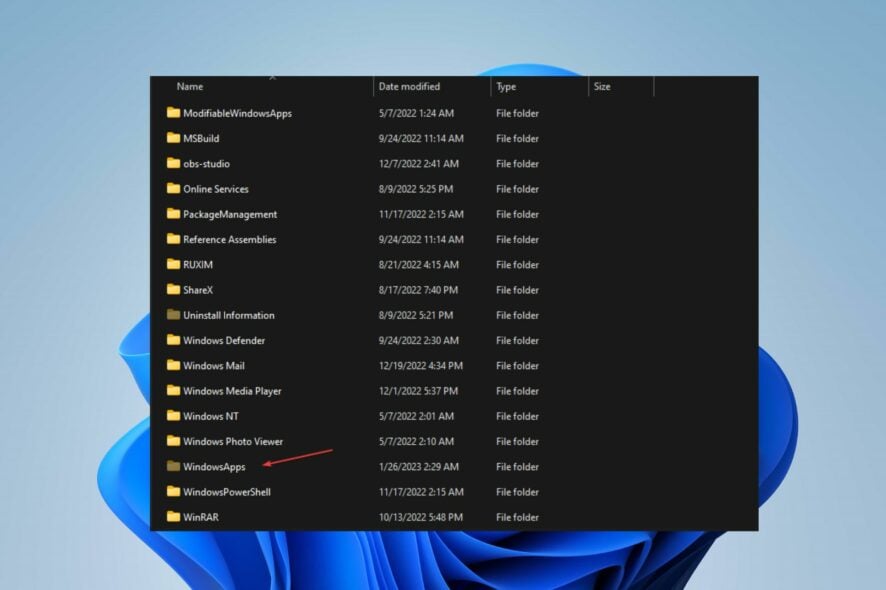
The WindowsApps folder is hidden in the C:\Program Files directory on Windows OS. It contains the installation files for apps installed from the Microsoft Store.
However, users encounter issues finding the WindowsApps folder. This article will show you how to access the WindowsApps folder on Windows 11.
How do I find and access the WindowsApps folder?
1. Access the WindowsApps folder via File Explorer
- Press the Windows + E key to open File Explorer.
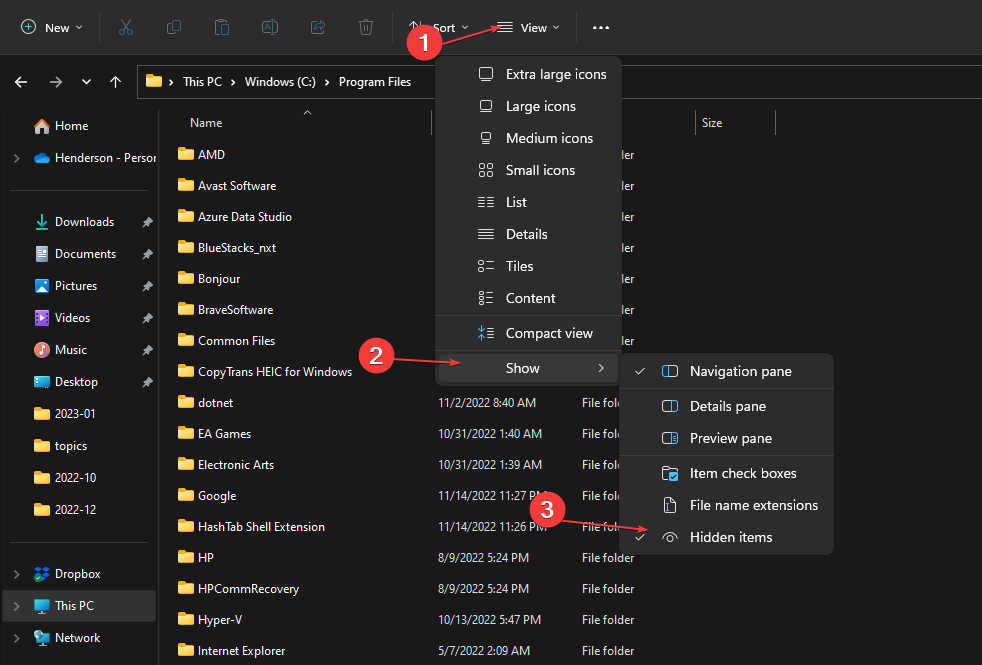
- Go to the C:\Program Files directory and click the View tab on the File Explorer ribbon.
- Navigate to the Show/hide section, and click on the box in front of the Hidden items to show hidden folders.
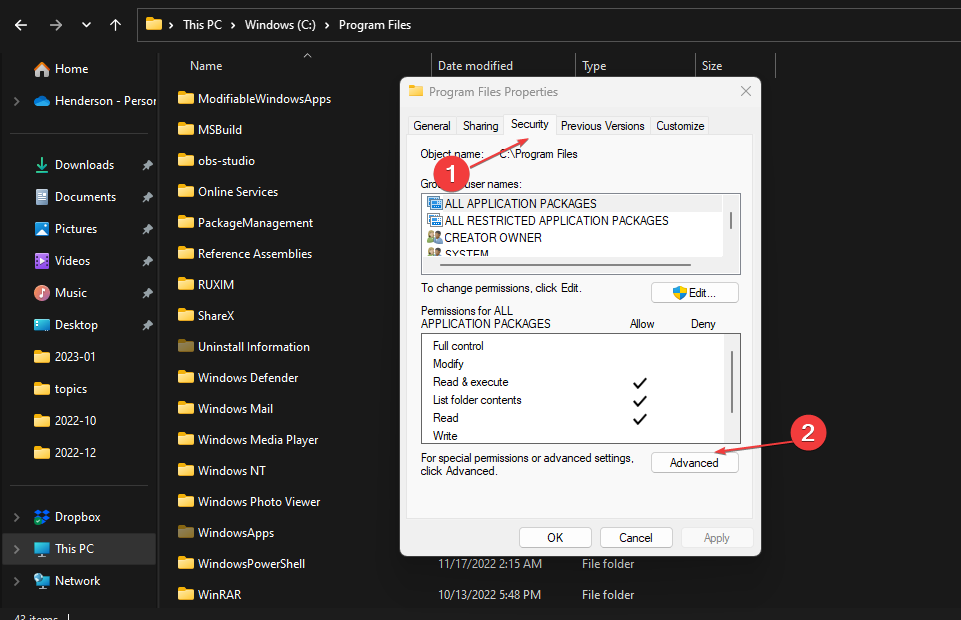
- Navigate to the WindowsApps folder, right-click on the folder, and select Properties from the drop-down.
- Click on the Security tab at the top of the newly opened window. Tap on the Advanced button in the bottom right corner of the window.
- Select the Change option on the Advanced Security Setting for WindowsApps.
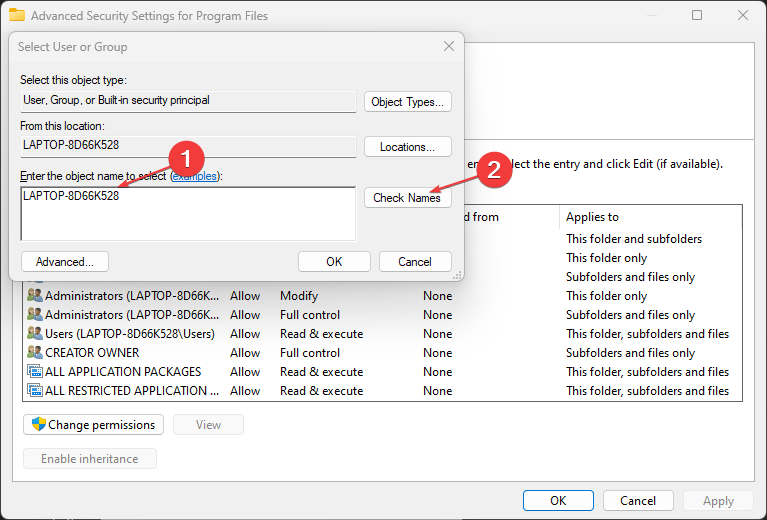
- Click on the Enter Name to select bar, type in your Windows Username, select the Check Name button, and then click OK.
- Your username will appear next to the Owner. Check the box next to Replace owner sub-containers and object, then click OK to apply the changes.
- Now you will have permission to open and edit the WindowsApps folder.
Using the above-stated steps will require the use of a Microsoft account to be able to change the folder ownership.
You can check our guide on why Windows File Explorer keeps crashing and how to fix it if it occurs on your PC.
2. Access the WindowsApps folder via a PowerShell Command
- Left-click the Start button, type powershell, and click Run as administrator.
- Click Yes on the User Account Control prompt.
- Copy and paste the following lines and press Enter:
takeown /f “C:\Program Files\WindowsApps” /r
The PowerShell command to find and access the WindowsApps folder is direct, advanced, and useful when other methods fail. This will provide Windows apps folder permissions.
However, if you experience issues using PowerShell, read on how to fix PowerShell not opening on your PC.
3. Access the WindowsApps folder via Registry
- Download the Take ownership registry file from Revo.
- Unzip the File and open the Add Take Ownership to Context menu registry file.
- On the following page, select Yes to add it to the registry.
- Click OK to close the popup and go to the C:\Program Files directory.
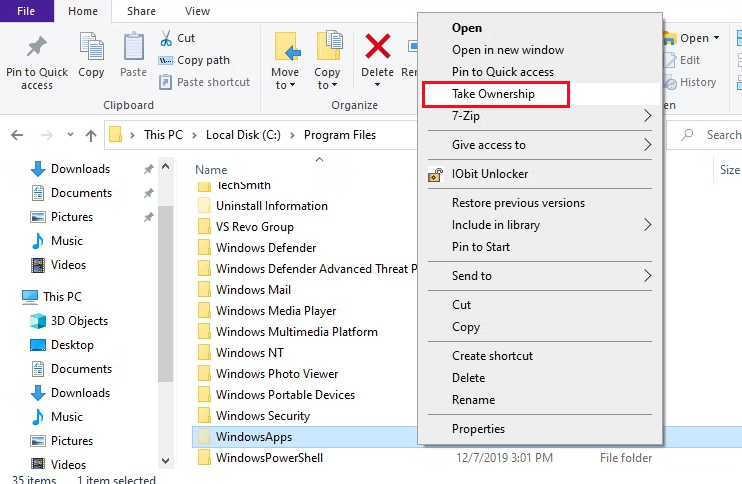
- Right-click on the WindowsApps folder and click on Take Ownership from the drop-down menu.
- You must give Account Control Administrator permission for the Registry file to work.
After trying the above steps, utilizing the Registry Hack may be the last resort. You can also learn how to use the Registry Hack to customize your Windows OS.
You should know that this guide will also help you access the WindowsApps folder on Windows 10 as well because the methods are identical.
Can I move the WindowsApps folder to another drive?
You can move the WindowsApps folder to another drive using File Explorer. Just cut and paste it to the desired drive on the other drive.
Ensure you have permission to move the folder and that you are not moving it to a read-only location.
Remember that if the folder contains any applications or programs, those applications or programs may no longer function once you move the WindowsApps folder to a new drive.
Alternatively, you can read about how to perform a Windows app cleanup to create more space on your device.
Also, you may our guide on ways to get back the missing WindowsApps folder on Windows 11 for more information.
Use the comments section below if you have any questions or other solutions to this problem.

