Autoplay Not Working on Windows 11? 7 Ways to Fix it
Key notes
- If Autoplay isn’t working on Windows 11, it might be because the feature is disabled.
- Modifying your AutoPlay settings is the best way to fix this issue on your computer.
- Restarting the necessary services will help you solve this problem if you encounter it.

Autoplay not working in Windows 11 is a common problem that you may have encountered. This can be caused by a number of problems, such as a bad internet connection or incorrect settings.
When you insert a CD or DVD into your computer the AutoPlay feature will kick in and ask you what to do with it.
It is a feature that detects when you insert different types of media into your PC, such as an audio CD or a memory card, and then automatically takes some kind of action based on the type of media detected.
We have a detailed guide on what to do if AutoPlay is not working on Windows 10 if you face a similar problem on the previous version. If any of the above reasons are the cause of the problem, proceed to try one or more of the solutions below.
Why is Autoplay not working on Windows 11?
Some of the reasons why Autoplay is not working in Windows 11 include:
- Autoplay is disabled by default – The Autoplay feature enables a user to insert a CD, DVD, or other removable media in the drive and have it begin playing automatically. Check from Settings to see if it is disabled and enable it.
- The external device is corrupted – The device inserted may be corrupted preventing your system from detecting it. Try using a different device and see if the problem persists.
- Virus or malware in your system – There’s also a chance that your operating system has been corrupted by a virus or malware and therefore you can no longer use the functionality of certain programs. If this is the case, try running a full scan of your system using your Windows 11 antivirus software.

- Interference from third-party programs – Check if any third-party programs could be interfering with them. If you have recently installed a program, try to uninstall it and see if Autoplay works.
What can I do if Autoplay is not working on Windows 11?
1. Turn Autoplay off and on
- Press the Windows + I keys simultaneously to open Settings.

- Select Bluetooth & devices on the left pane then Autoplay on the right pane.

- Toggle Use Autoplay for all media and devices button off and on again.

For a full step by step walkthrough on setting up this feature, see our guide on how to enable Autoplay in Windows 11 so Windows can react automatically when you plug in a drive or insert a disc.
2. Reset Autoplay settings
- Hit the Windows key, type Control Panel in the search bar, and click Open.
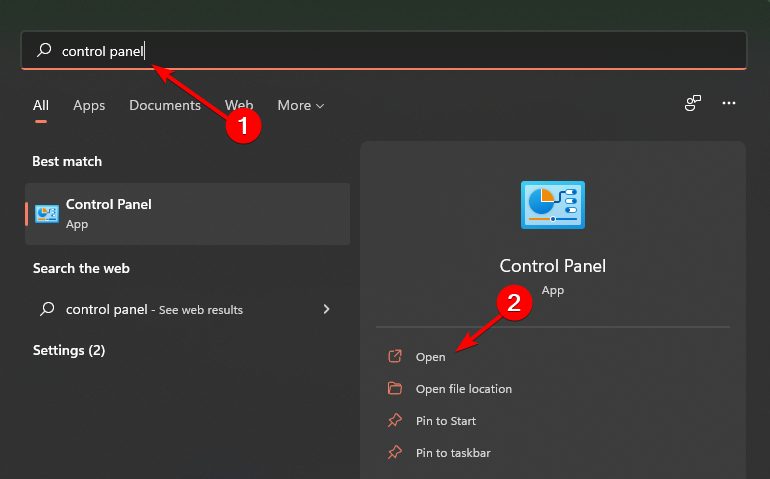
- Search for Autoplay on the Control Panel search bar and click on it.

- Scroll down and select Reset all defaults then click Save.

You can also try this solution if iPhone AutoPlay is not working on Windows 10 or 11 since the process is the same for both versions.
3. Change Autoplay notification settings
- Press the Windows + I keys simultaneously to open Settings.
- Select System on the left pane then Notifications on the right pane.

- Navigate to Autoplay and toggle it on.

4. Enable Shell Hardware detection
- Press the Windows + R keys simultaneously to open the Run window.
- Type services.msc in the dialog box and press OK.

- Find Shell Hardware Detection, right-click on it and select Restart.

Restarting this service can help if USB AutoPlay not working on Windows 10 or 11, since both operating systems use it.
5. Set Startup to automatic
- Press the Windows + R keys simultaneously to open the Run window.
- Type services.msc in the dialog box and press OK.

- Find Shell Hardware detection, right-click on it and select Properties.

- Locate the Startup type and change it to Automatic.

6. Run a command
- Press the Windows key, type cmd, and click Run as administrator.

- Type in the following command and press Enter:
net start shellhwdetection
7. Check for updates
- Hit the Windows key, type Check for updates in the search bar then click Open.

- If available, download then restart your PC.

- Once the updates are installed, Autoplay is still not working on Windows 11.
Can I set Autoplay for all devices?
The AutoPlay dialog box displays a list of actions that are available for each type of media or device.
For example, if you connect a new digital camera to your computer, the actions might include importing pictures from the camera to your computer or opening a photo-editing program so that you can work with your pictures.
You can configure AutoPlay for each type of media or device that you connect to your computer or set Autoplay defaults to all devices so that anytime you connect a device to your PC, the Autoplay dialog box appears. Remember, the Autoplay settings only apply to removable media.
To set Autoplay for all devices, follow the steps below:
- Hit the Windows key, type Control Panel in the search bar, and click Open.
- Search for Autoplay on the Control Panel search bar and click on it.

- Check the box for Use Autoplay for all media and devices then scroll down and Save.

By enabling this feature, you’ll fix the Autoplay dialog box not showing in Windows 10 or 11, so be sure to try it.
If you find yourself annoyed with the Autoplay not working on Windows 11, no need to be frustrated, you only have to apply one or more of the solutions and you are good to go.
We also have specific fixes for Autoplay not working on CDs and DVDs so be sure to check our article on the same.
You can explore all available configuration options in this guide on Autoplay default settings, which explains how Windows assigns actions for each device type you connect.
You can also enable Autoplay for Youtube embedded videos from our expert guide. You can learn more about how the feature behaves in this in depth guide to Autoplay in Windows, which explains the main options and common use cases.
Should you experience any additional problems relating to this issue, don’t hesitate to leave us a comment down below.
Read our disclosure page to find out how can you help Windows Report sustain the editorial team. Read more


Improve this guide

User forum
0 messages