IPv4 No Internet Access Error [SOLVED]
Learn to restore your internet connection to normal

One of the most annoying Windows 11 problems must be the IPv4 no internet access issue. From outdated, corrupt or incompatible network drivers to third party app conflicts and misconfigured settings, a lot of underlying issues could cause it.
But don’t worry. We’ll explain all you need to know to get it fixed ASAP. Let’s get started.
How can I fix the IPv4 No Internet Access issue?
1. Install the latest network drivers
- Open Device Manager.
- Go to the Network Adapter section.
- Locate the network driver you’re currently using, right-click on it, and select Update driver.

- Confirm your choice and wait for the process to complete.
Alternatively, you can easily do this with a third-party driver updater. Simply download it, run it, and let it automatically scan for any missing, broken, or outdated drivers. You will then get to choose what to do with each and every one of them.
2. Modify the HT Mode settings
- Press Windows + R to open Run, type ncpa.cpl in the text field, and hit Enter.

- Right-click on the active network adapter, and choose Properties.

- Click on Configure.

- Navigate to the Advanced tab, select HT Mode under Property, then choose HT Mode 20|40 under the Value dropdown menu, and click on OK to save the changes.

- Once done, restart the computer for the changes to come into effect.
3. Renew the IP address
- Press Windows + S to open the Search menu, type cmd, right-click on the relevant search result, and select Run as administrator.

- Click Yes in the UAC prompt.
- Now, paste the following two commands one at a time and hit Enter after each:
ipconfig /releaseipconfig /renew
Finally, restart the computer and verify whether the No Internet access error on IPv4 is resolved. If not, head to the next solution.
4. Reset Winsock (Windows Socket API)
- Press Windows + R to open Run, type cmd, and hit Ctrl + Shift + Enter.

- Click Yes in the UAC prompt that appears.
- Now, execute the following two commands one after the other:
netsh winsock resetnetsh int ip reset
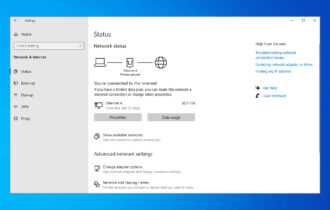
5. Check your IP settings
Here’s how to enable IPv4 and IPv6 protocols:
- Go to Search, type network and open Network and Sharing Center.
- Go to Change adapter settings from the left pan.
- Right click on your connection device (in most cases it’s called just Ethernet) and go to Properties.
- Under This connection uses the following items: check Internet Protocol Version 4 (TCP/IPv4) and Internet Protocol Version 6 (TCP/IPv6).
- Click OK and restart your computer.
When you turn your computer back on, you should be able to connect to internet without any problems.
There’s a chance that Windows 10 turned off your IPv4 and IPv6 protocols after the installation, this doesn’t happen very often, but it could happen. So logically, all you need to do to get your internet connection back is to turn on these protocols again.
Sometimes, your IPV6 may be enabled but not working. Re-enabling it should fix this issue. However if you are still can’t access the internet on IPv6, we suggest you check out this guide.
6. Change the channel width
- Navigate to Network and Sharing Center from the list of results
- Go to Change adapter settings

- Select your wireless adapter by right-clicking it > go to Properties > Go to Configure

- Select the Advanced tab > select the 802.11 channel width and change the value. Keep using a different value until you’ve established a stable internet connection.

- Save your new settings.
This step applies to wireless networks. By changing the bandwidth settings, you allow your computer to use other wireless frequencies and expand its reach.
7. Disable Internet Protocol Version 6 (IPv6)
- Press Windows + S to open the Search menu, type View network connections, and click on the relevant search result.

- Right-click on the current adapter, and choose Properties.

- Now, uncheck the option for Internet Protocol Version 6 (TCP/IPv6), and click on OK to save the changes.

- Finally, restart the computer.
If nothing else worked, the last solution is to disable IPv6 and force the computer to use IPv4 instead. This solution did the trick for many and should help get things up and running
If you encounter this issue related to IPv6, then you can safely use the previously mentioned solutions to fix it. They work for both IPv4 and IPv6 connectivity issues.
If you have any other Windows 10-related issues you can check for the solution in our Windows 10 Fix section.
We hope you managed to fix your IPv4 no internet access issue. Lets us know in the comments section below which solution worked for you.
Read our disclosure page to find out how can you help Windows Report sustain the editorial team. Read more


Improve this guide


User forum
2 messages