How to Change DNS Settings on Windows 11
Changing the DNS on Windows 11 can fix the Internet connection
Key notes
- You can change the DNS Settings on your Windows 11 PC and manually choose your preferred DNS servers for browsing.
- Choosing DNS servers manually ensures better privacy and security than the default DNS provided by your ISP.
- Using Control Panel and the Settings app are the most efficient ways to change DNS Settings on Windows 11.

Your ISP configuration provides a default Domain Name System (DNS) when setting up your internet connection. This poses all sorts of security threats and slows the internet speed making it necessary to manually assign the DNS servers.
Go through this detailed guide to learn how to change DNS settings on Windows 11 computers and secure your online presence.
How can I change the DNS settings on Windows 11?
1. Use the Settings app
- Head over to the Settings app using the Windows + I shortcut.
- Select Network & internet from the left sidebar and choose Wi-Fi or Ethernet from the right section, depending on your internet connection.

- Scroll down and select Hardware properties.

- Locate the DNS server assignment setting and click the Edit button next to it.

- This will open the Edit DNS settings popup. Here, expand the drop-down on the top and choose Manual instead of Automatic (DHCP).
- Next, enable the toggle for either IPv4 or IPv6, based on the IP connection type.

- Now provide the primary DNS server address in the Preferred DNS field followed by a secondary DNS server address in the Alternate DNS field. (For instance, 8.8.8.8 is the preferred DNS address, and 8.8.4.4 alternative DNS address for Google’s DNS server)

- If you wish to enable the DNS over HTTPS feature to encrypt DNS requests, choose Encrypted only (DNS over HTTPS) for both Preferred DNS Encryption and Alternate DNS Encryption dropdowns.

- Press the Save button once you are done with the changes.
You can easily change DNS settings on Windows 11 via the Settings app to speed up the browsing and avoid security issues. Enabling Encryption and defining the DNS with IPv4 and IPv6 protocols ensures that the network communication is much more secure.
You can improve both speed and security by switching to a trusted resolver, and OpenDNS is a reliable option for safer browsing. Learn more in this guide on OpenDNS free DNS.
 NOTE
NOTE
2. Use Control Panel
- Use the Windows + R shortcut to launch the Run command window, type the following command and press OK. This will directly open the Network Connections in Control Panel.
ncpa.cpl
- Right-click the Wi-Fi or Ethernet connection, depending on your connection type, and choose Properties from the context menu.

- This will open the Wi-Fi Properties window. Double-click the Internet Protocol Version 4 (TCP/IPv4) located under the This connection uses the following items section.

- On the new popup, enable Use the following DNS server addresses option and provide the Preferred DNS server and Alternative DNS server addresses in their respective fields. (For instance, to use Cloudflare DNS servers, assign 1.1.1.1 as Preferred DNS and 1.0.0.1 as Alternative DNS).

- Press the OK button to save the changes.
Many of our readers prefer Control Panel to change the DNS settings of their Windows 11 PC. Though it is one of the oldest ways to configure DNS settings, it does not allow you to enable DNS encryption for the servers.
3. Use Command Prompt
- Press the Windows key, type cmd in the search bar, and choose Run as administrator, located on the right pane.

- Click the Yes button on the User Access Control popup.
- In the Command Prompt window, type or copy-paste the following command and press the Enter key. Replace Preferred DNS with the primary DNS address of your preferred server.
netsh interface ipv4 set dnsservers Wi-Fi Static Preferred DNS primary
- Next, type or copy-paste the below command to assign an alternate DNS server and press the Enter key. Replace Alternate DNS with the secondary DNS server address.
netsh interface ipv4 add dnsservers Wi-Fi Alternate DNS index=2
- To reset the Manual DNS settings to Automatic (DHCP), type the following command and press the Enter key.
netsh interface ip set dns "Local Area Connection" dhcp
If you use a wired ethernet connection, replace Wi-Fi with Ethernet in the above commands.
We also recommend reading our guide to diagnose & fix the most common DNS issues hogging your Windows computer.
4. Use Windows PowerShell
- Press the Windows key, type powershell, and select Run as administrator from the right section.
- Type and copy-paste the following command and press the Enter key to find out the InterfaceIndex of your current network configuration.
Get-NetAdapter | Select-Object InterfaceAlias , InterfaceIndex
- Now, type or copy-paste the following command and hit Enter to assign the Primary DNS server address. Replace N with InterfaceIndex of your current network:
Set-DnsClientServerAddress -InterfaceIndex N -ServerAddresses 8.8.8.8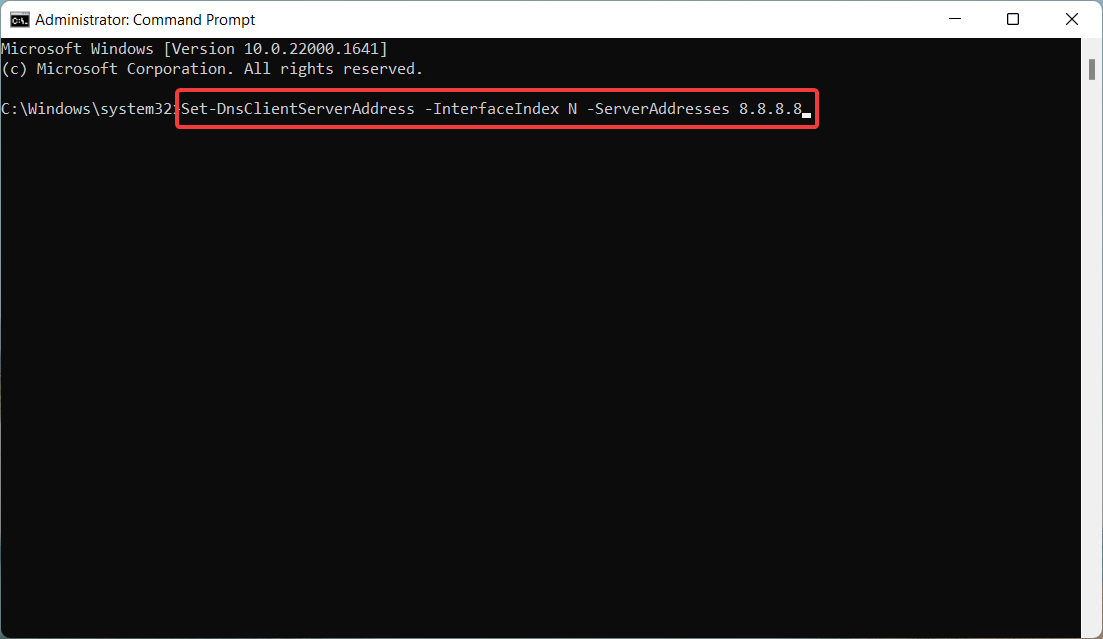
- If you also want to assign an Alternate DNS address, you need type the address after adding a comma:
Set-DnsClientServerAddress -InterfaceIndex N -ServerAddresses 8.8.8.8, 8.8.4.4
The NetTCPIP module allows you to change the DNS server settings using Windows PowerShell on Windows 11.
So, these are all the possible ways to modify DNS settings on your Windows 11 system.
You may also be looking for ways to resolve the can’t connect to this network error if it frequents your Windows PC.
Now that you know how to change the DNS, be sure to check our guide on how to find the fastest DNS servers near you.
If you face any issues when changing the DNS settings, contact us in the comments section for guidance.
Read our disclosure page to find out how can you help Windows Report sustain the editorial team. Read more


Improve this guide


User forum
0 messages