5 Ways to Change the Screen Timeout in Windows 11
Here's what to do if your PC goes to sleep too fast
Key notes
- You can change the screen timeout settings in Windows 11 to make your screen stay awake a little longer.
- There are several methods to do that, but using the Settings app is the easiest one.
- You may also edit the registry to unlock the lock screen timeout option in Windows 11.
Does your Windows 11 system screen times out very quickly as you leave it idle? If so, it is possible to increase the screen timeout duration of your PC and get rid of the inconvenience. This guide explains the different ways to change the screen timeout in Windows 11.
Why does my screen turn off so quickly in Windows 11?
The most prominent reason why your Windows 11 computer screen turns off quickly is that a short duration is assigned to the screen timeout settings. Apart from this, other reasons can be:
- The Dynamic Lock feature is turned on – The Dynamic Lock feature, when enabled, automatically locks your device whenever you are away.
- A blank screensaver is enabled – If you have chosen a blank screensaver, the screen will appear inactive whenever the screensaver is activated.
- The sleep timeout setting is set to a lower value – If you assign a short duration here, your PC will be put into Sleep mode quickly after it is left unattended.
Now that we know how this can happen, let’s see how to extend the screen timeout.
How can I change the screen timeout settings in Windows 11?
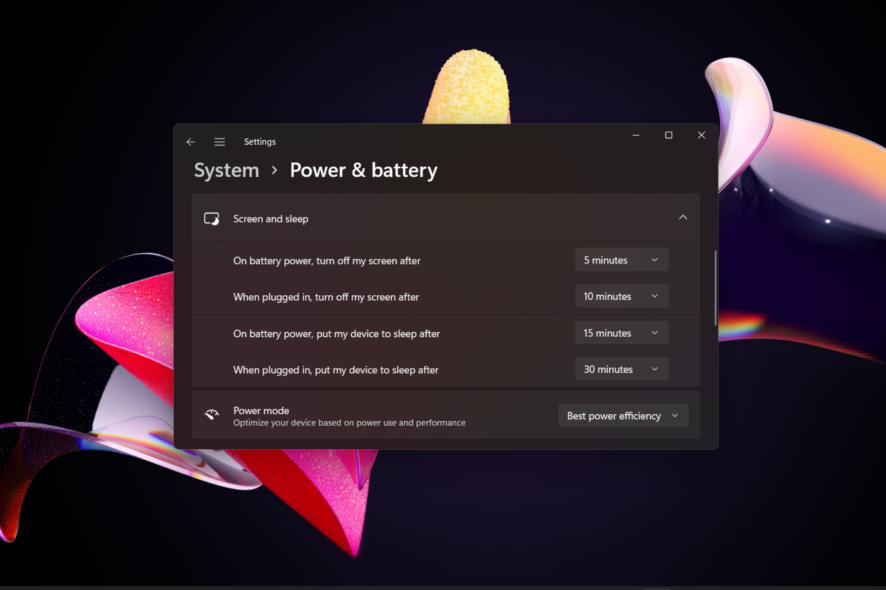
1. Use the Settings app
- Right-click the Windows icon and click Settings from the Quick Links menu.

- From the System settings, choose Power & battery from the right section.

- Click to expand the Screen and sleep option located under the Power section.
- Assign a time duration for When plugged in, turn off my screen after option. Likewise, if you own a laptop, assign a suitable duration for On battery power, turn off my screen after as well.

You can also use the ms-settings:powersleep command in the Run window to access the Screen and sleep settings directly.
2. Use the Control Panel
- Press the Windows key to launch the Start menu, type control panel in the search bar and select the relevant result.

- Set View by as Category and choose Hardware and Sound.

- Next, select Power Options to access related settings.
- From the Choose or customize a power plan window, click the Change plan settings option for the current power plan.

- Assign the time duration for the Turn off the display option for both On battery and Plugged in scenarios.
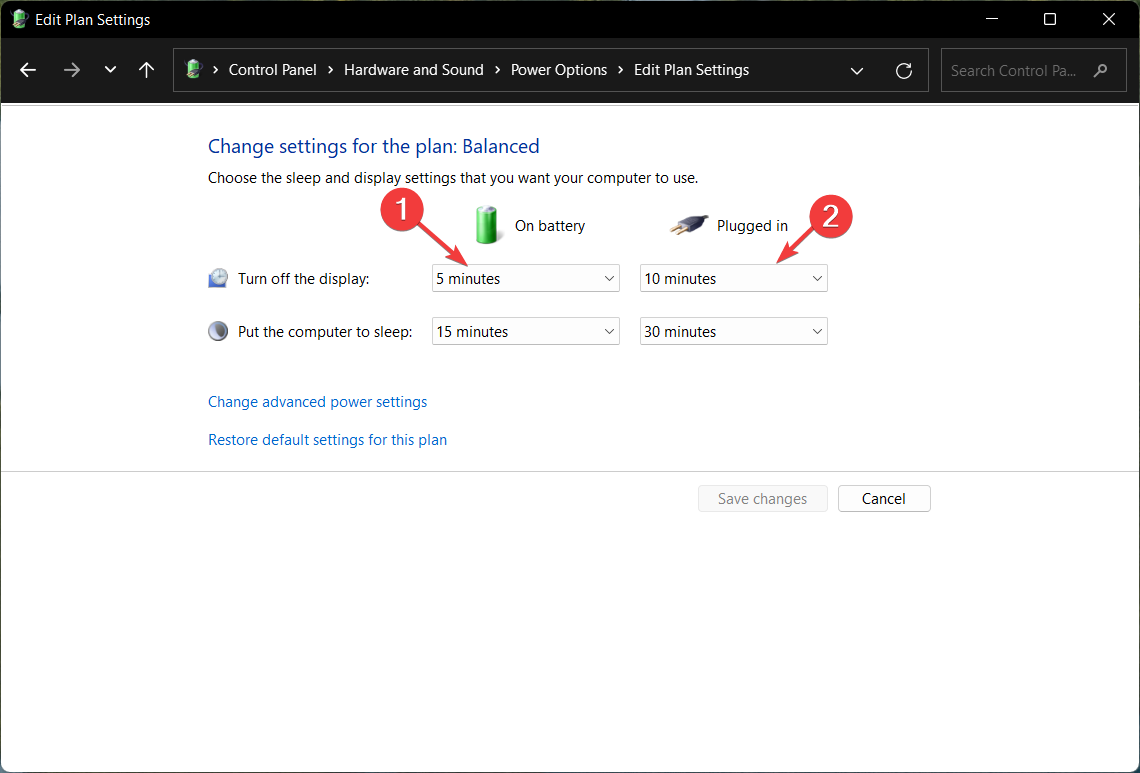
- After making the changes, press the Save changes button on the bottom right.
Using Control Panel is an old-school method to customize the power plan settings and change screen timeout settings in Windows 11. We also recommend that you go through our guide to check the battery health of Windows 11 laptops.
3. Use Advanced Power Options
- Use the Windows + R shortcut to launch the Run dialog box, type or copy-paste the following command and press OK to execute it.
control.exe powercfg.cpl,,3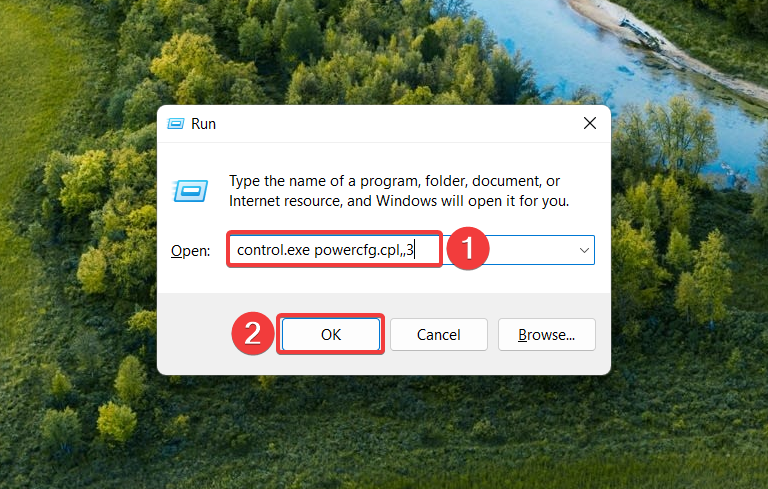
- This will directly take you to the Advanced Power Options settings. Expand the Display category and then the Turn off display after option.
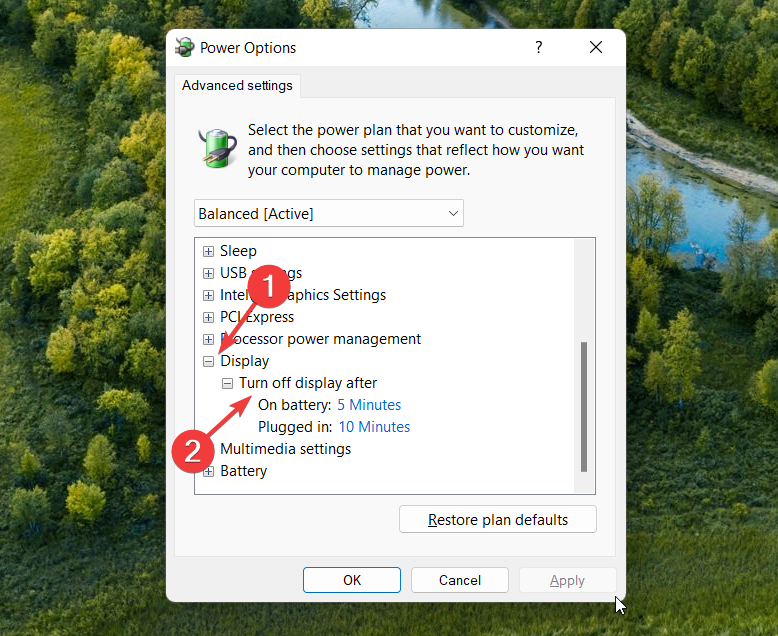
- Specify the time duration in minutes for the On battery and Plugged in fields and press the OK button to save the settings.
4. Use a Windows PowerShell command
- Press the Windows key, type powershell in the search bar, and select Run as Administrator from the search result.
- Click Yes on the User Action Control Popup.
- Type or copy-paste the following command and press Enter key to assign a screen timeout when the computer is plugged in. Replace duration with the time duration in seconds.
powercfg -change -monitor-timeout-ac 60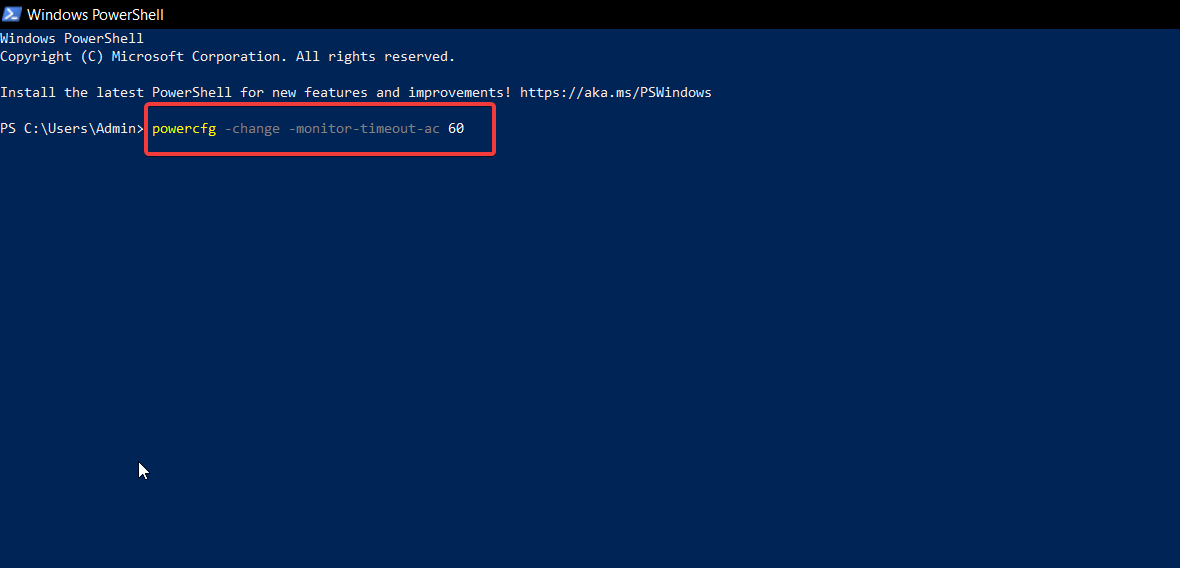
- To change the screen timeout duration when the computer is powered by a battery, execute the following command. Here, again replace duration with the time duration in seconds.
powercfg -change -monitor-timeout-dc 60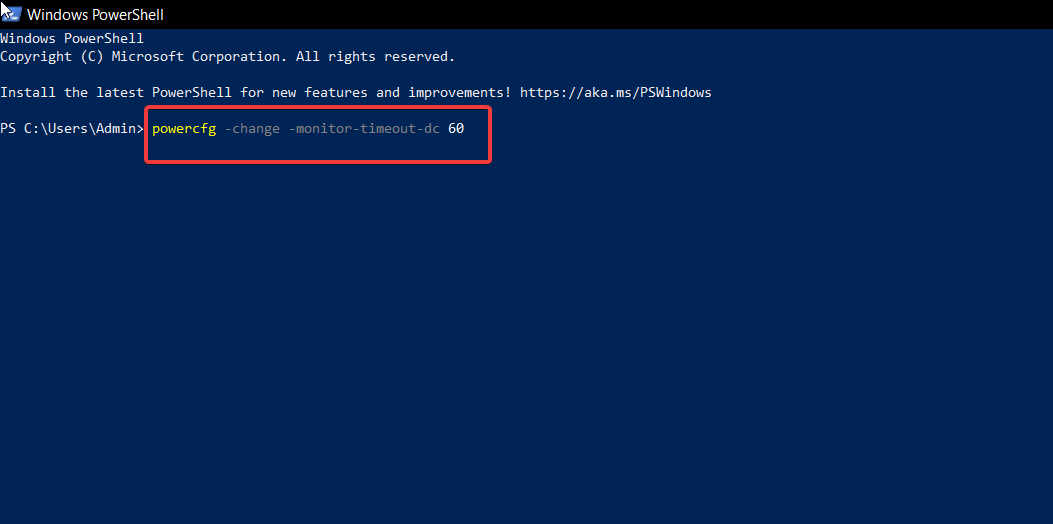
The Powercfg command allows you to change the timeout settings in Windows 11 and specify how long the system screen should be active. This command works in both Command Prompt and Windows PowerShell, so you can choose any of the two you are comfortable with.
5. Use Registry Editor
5.1 Modify the Registry
- Press the Windows key to launch the Start menu, type regedit and select Run as Administrator.

- Choose Yes on the User Action Control prompt.
- In the Registry Editor, navigate to the following location.
Computer\HKEY_LOCAL_MACHINE\SYSTEM\CurrentControlSet\Control\Power\PowerSettings\7516b95f-f776-4464-8c53-06167f40cc99\8EC4B3A5-6868-48c2-BE75-4F3044BE88A7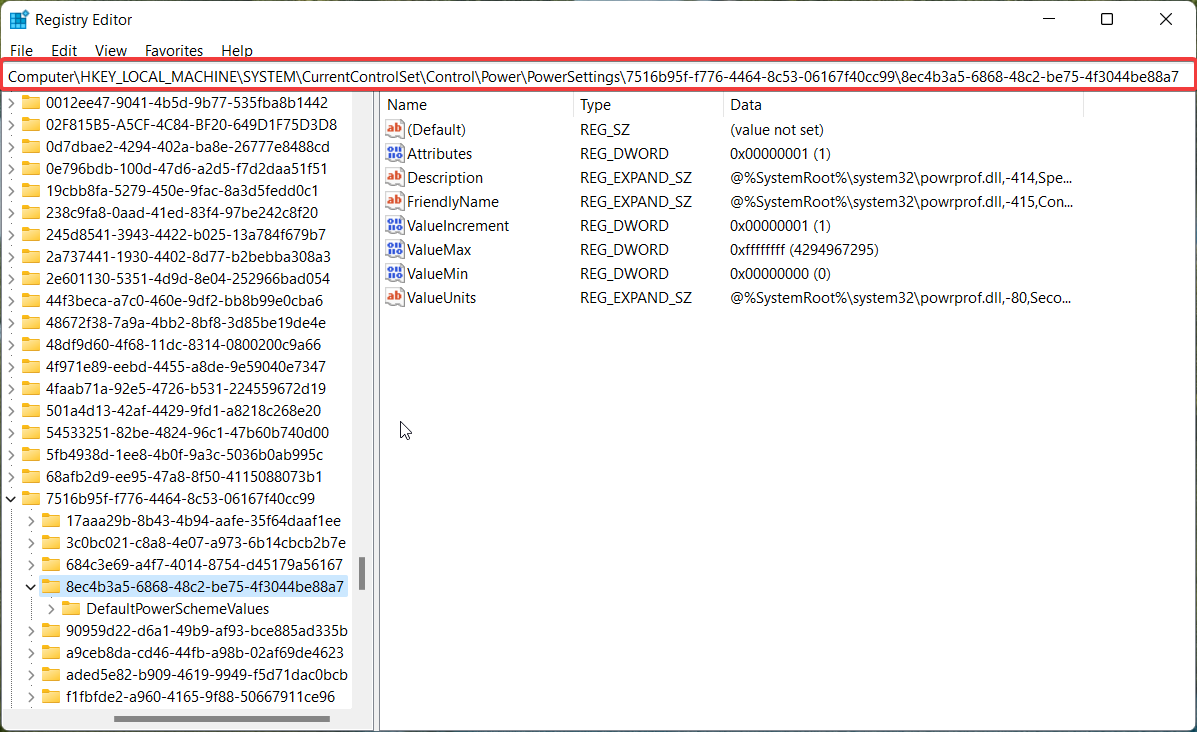
- Here, right-click the Attributes key and choose Modify from the context menu.
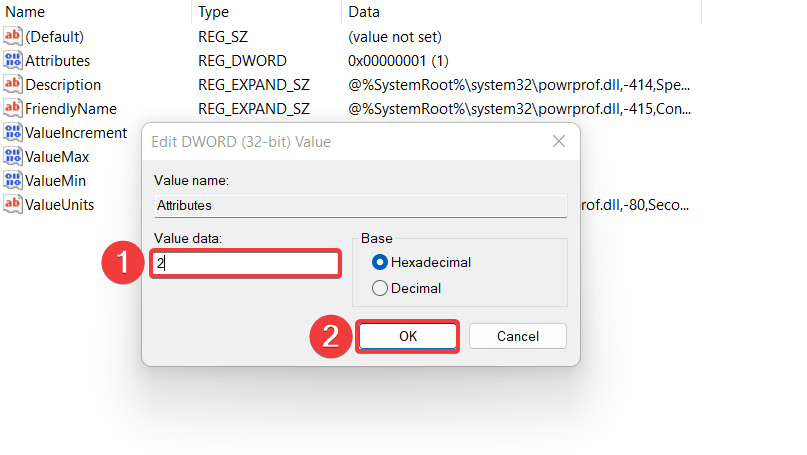
- Now, assign 2 in the Value data and press the OK button to save the changes.
5.2 Change Advanced Power Settings
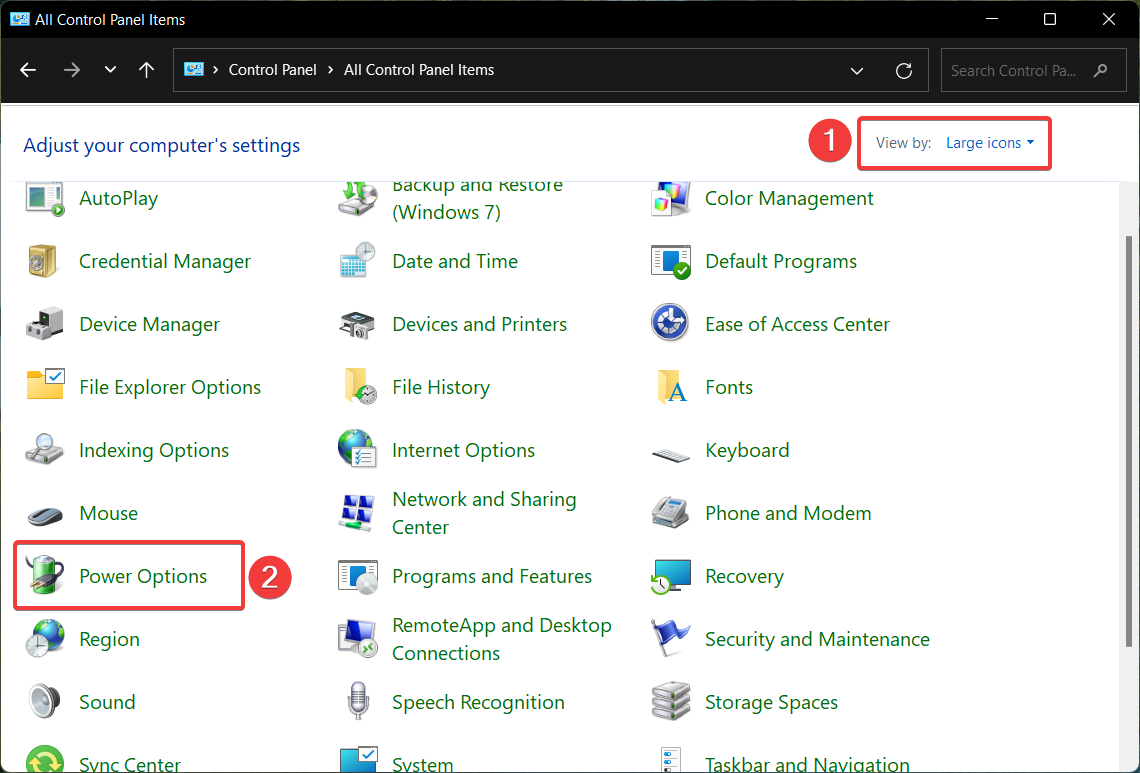
- Launch Control Panel once again, select Large icons in View by dropdown, and select Power Options.
- Next, select Change plan settings.
- Click the Change advanced power settings to excess the advanced settings property window.

- Expand the Display category and then the Console lock display off timeout option.
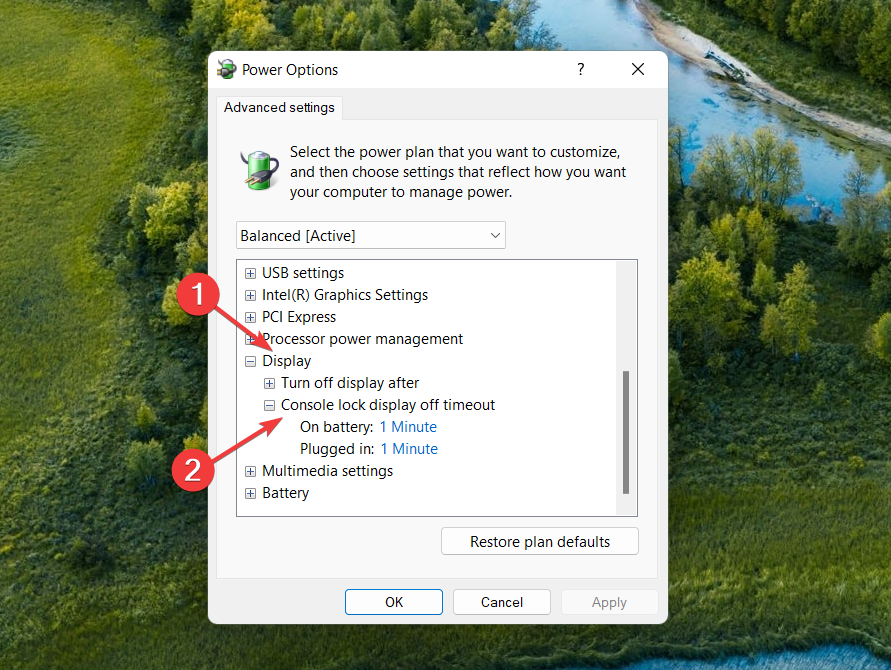
- Replace the default time with your preferred duration in minutes and press Apply button followed by OK.
Modifying the Windows Registry unlocks the Console lock display off timeout option in Windows 11, which can be configured from the Advanced Power Options settings window.
That’s it! These are all the possible ways to change screen timeout in Windows 11 and assign a duration to your preference. You can check out our guide to stop the power plan from changing automatically if it often happens on your Windows 11 PC. For further help or to share your experience, reach out to us in the comments section.
Read our disclosure page to find out how can you help Windows Report sustain the editorial team. Read more


Improve this guide


User forum
0 messages