FIX: Conexant HD audio microphone driver not working
Key notes
- Your microphone is an important peripheral, and an integral part of your ability to communicate with others.
- Many users have reported that their Conexant HD audio microphone driver is not working.
- To learn more about fixing Microphone issues, go to our Microphone Fix Hub.
- If other attached devices are giving you a hard time, we have an entire Peripherals Fix section.

Has your microphone stopped working after you installed the latest Windows 10 build? Well, I can tell you that you are not the only user who is having an issue with the audio drivers on Windows 10.
Follow the lines below and you will be able to fix your audio microphone driver and get going with your normal daily work.
Although your Microphone is showing as a normal default operational device in the Control Panel window, unfortunately, you cannot access Cortana.
The troubleshooting steps described involving using the built-in device troubleshooter to see if there is anything wrong with the device itself, uninstalling the driver and install it back in, and removing errors affecting the system.
The article below also covers the following topics:
- Conexant ISST audio microphone not working
- Conexant SmartAudio HD microphone not working
- Conexant microphone not working
How do I fix the Conexant HD audio microphone driver?
- Make sure that the microphone is enabled
- Download the latest audio drivers from your hardware manufacturer’s website
- Launch Windows Troubleshooter
- Change the default format of your microphone
- Run a full system scan
- Update your OS
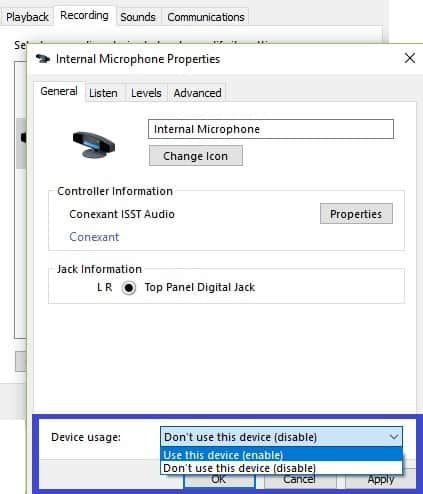
1. Make sure that the microphone is enabled
- Right-click on the speaker icon in the task tray > select Recording devices.
- Select your microphone > Properties.
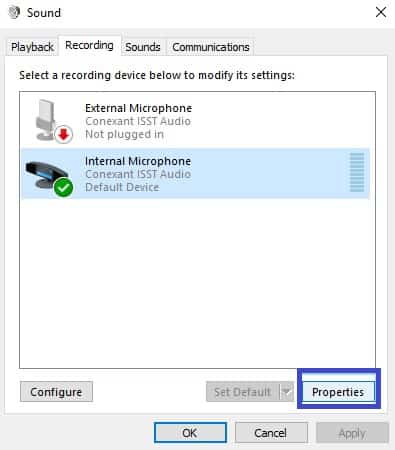
- Make sure that the microphone is enabled.
2. Download the latest audio drivers
Use the Device Manager
- Go to Start > type device manager > double click the first result to launch the Device Manager.
- Locate the audio device driver in the left-hand pane.
- Right-click on it > select Update Driver.

- After you successfully updated the driver, reboot your computer.
- Check again if your microphone is working correctly.
Update drivers manually
- If the update driver feature failed, to go on the manufacturer’s website and download the latest driver from there.
- After you successfully downloaded the driver, go to the directory where you saved it and right-click on it.
- From the menu that appears, select Run as Administrator
- Note: if you are asked for an administrator account and password please type it in.
- Run the installation process normally and reboot your operating system afterward.
- Check again if you still have issues with your microphone.
Update drivers automatically (suggested)
Downloading drivers manually is a process that carries the risk of getting the wrong driver installed, which may lead to serious malfunctions.
The safer and easier way to update drivers on a Windows computer is by using an automatic tool.
Not only does it spare you the hassle of having to visit each manufacturer’s website and manually downloading the drivers, but by using it you also know you have the latest version as well.
You can prevent these problems by using an automatic tool that will search and install the correct drivers on your computer with just a few clicks. That's why we recommend you use Outbyte Driver Updater. Here's how to do it:
- Download and install the Outbyte Driver Updater app.
- Launch the software.
- Wait for the app to detect all incompatible drivers.

- Afterward, it will show you a list of the drivers found to select the ones to Update or Ignore.
- Click on Update & Apply Selected to download and install the newest versions.
- Restart your PC to ensure the applied changes.

Outbyte Driver Updater
Use this software and solve all driver-related issues from your PC.3. Launch Windows Troubleshooter
- Go to search box and type troubleshoot > double click on the first result.
- Under Find and fix other problems, click on Hardware and Devices > launch the troubleshooter.

- Once the troubleshooting process completes, reboot your Windows 10 computer.
- Check again if your microphone is now working properly.
4. Change the default format of your microphone
- Right-click the Sound icon in the bottom right of your screen > Recording
- Double click on the microphone to open Properties > click on Advanced
- Under the Default Format, choose any of the 16-bit options.
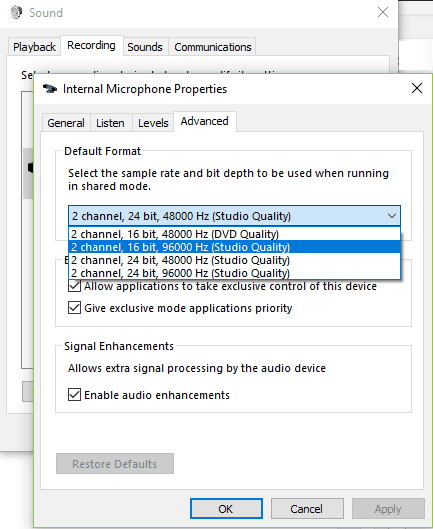
- Click Apply, then OK.
5. Run a full system scan
- Go to Start > type ‘defender’ > double click Windows Defender to launch the tool.
- In the left-hand pane, select the shield icon.
- In the new window, click the Advanced scan option.

- Check the full scan option to launch a full system malware scan.
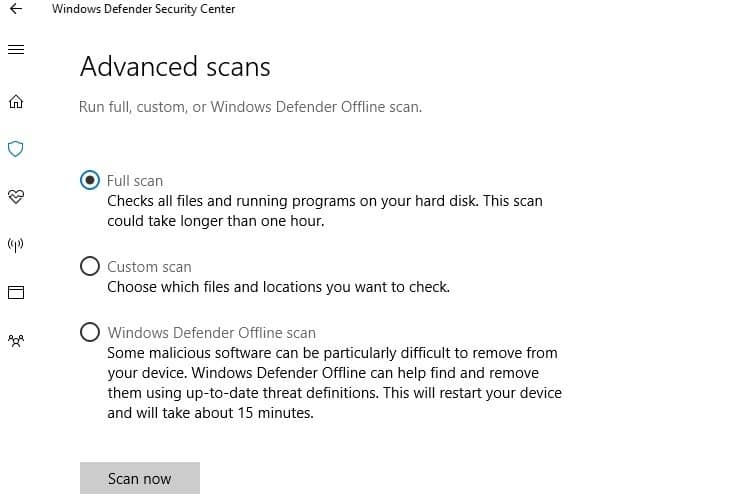
Malware may cause your microphone to stop working. Perform a full system scan in order to detect and remove any malware running on your computer. You can use Windows’ built-in antivirus, Windows Defender, or third-party antivirus solutions.
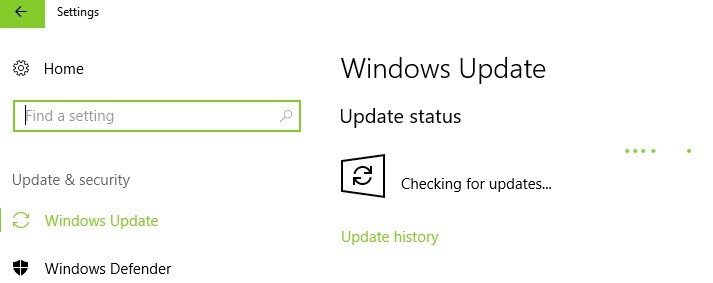
6. Update your OS
Make sure that you’re running the latest Windows OS updates on your machine. Microsoft constantly rolls out Windows updates in order to improve the system’s stability and fix various issues, including microphone bugs that may trigger Conexant HD Audio Microphone Driver issues.
To access the Windows Update section, you can simply type “update” in the search box. This method works on all Windows versions. Then go to Windows Update, check for updates and install the available updates.
And there it is, you now have above some easy methods that will get your Conexant HD audio microphone up and running in Windows 10.
Also, if you do run into any more issues along the way drop us a line in the comments section of the page situated below and I will help you further as soon as possible.
Read our disclosure page to find out how can you help Windows Report sustain the editorial team. Read more


Improve this guide


User forum
0 messages