We Could Not Complete the Install: How to Fix Update Service
Try these expert-recommended tricks to fix it
Key notes
- Getting this error means that your Windows computer won’t be able to get security/application updates.
- This guide will discuss the reasons and potential fixes to resolve the issue.
![[Fixed] We Could Not Complete The Install Because An Update Service Was Shutting Down](https://windowsreport.com/wp-content/uploads/2022/12/Fixed-We-Could-Not-Complete-The-Install-Because-An-Update-Service-Was-Shutting-Down-886x590.png)
Sometimes we get, We could not complete the install because an update service was shutting down the error when trying to update Windows. This means there is an issue with your Windows Update service. However, it can be fixed in no time.
This guide will discuss all the available fixes after discussing the reasons behind the issue. Let’s get started!
Why does the We could not complete the install because an update service was shutting down error appear?
There can be various reasons for this Windows update error to occur. We have mentioned all the popular ones here:
- Incorrect date & time – If your computer shows the incorrect time and date, this might cause the issue.
- Apps or settings – There could be an app or setting which is conflicting and not letting the Windows update. Look for any recent changes in settings or newly installed apps.
- Program records – If program records on your computer are corrupt, then they can alter the system files, hence causing the issue.
What can I do to fix We could not complete the install because an update service was shutting down?
Before working on detailed troubleshooting steps, let us first try these simple fixes to resolve the issue:
- Restart your computer.
- Uninstall third-party antivirus.
If these don’t work for you and you still can’t update Windows, try the methods mentioned below:
1. Restart the Windows Update service
- Press Windows + R to open the Run window.
- Type services.msc and press Enter to open the Services window.
- Locate and double-click on the Windows Update service.

- Change its Startup type to Automatic and change the Service status to Start.

- Click Apply and OK. Restart your computer.
2. Run the System File Checker & DISM command
- Press the Windows key, type CMD, and click Run as administrator.
- Type the following command and press Enter:
sfc/scannow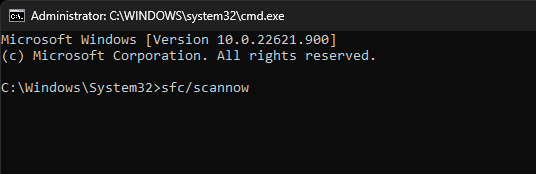
- Let the process complete, and restart your computer.
- If the issue persists, fire up Command Prompt again.
- Copy and paste the following commands and press Enter after each command.
DISM /Online /Cleanup-Image /CheckHealthDISM /Online /Cleanup-Image /ScanHealthDISM /Online /Cleanup-Image /RestoreHealth - Once the scan is complete, restart your PC.
As the manual steps can be challenging sometimes, you can easily try using a specialized repair program to scan your computer and automatically replace broken or missing files with brand-new files.
3. Rename Software distribution and Catroot2 folder
- Press the Windows key, type CMD, and click Run as administrator.
- Type the following commands to stop and restart Windows Update, BITS, Cryptographic, and Windows Installer services, and press Enter after each command:
net stop wuauservnet stop bitsnet stop cryptsvcnet stop msiserverRen C:\windows\softwaredistribution softwaredistribution.oldRen C:\windows\system32\catroot2 catroot2.oldnet start wuauservnet start bitsnet start cryptsvcnet start msiserverexit - Restart your PC.
4. Run Windows Update troubleshooter
- Press Windows + I to open Settings.
- Go to System, then click Troubleshooters.

- Click Other troubleshooters.
- Locate Windows Update and click Run.

- The troubleshooter will launch and try to find the problem. Then, follow the on-screen prompts to complete the process.

5. Perform in-place upgrade
 Tip
Tip
- Go to the Windows download website.
- Choose Windows 11 (multi-edition ISO) from the drop-down menu for Download Windows 11 Disk Image (ISO). Click Download.

- Select the product language, and click Confirm.

- Now click Download.
- Follow the on-screen instructions to complete the process.
So, these are methods that you need to follow to get rid of we could not complete the installation because an update service was shutting down error. So, try them and let us know which worked for you in the comments below.
Read our disclosure page to find out how can you help Windows Report sustain the editorial team. Read more


Improve this guide


User forum
0 messages