Fix: Windows Could Not Start Audio Service on Local Computer
Try giving full permission to Windows Audio service
Key notes
- Windows could not start the Windows Audio service on Local Computer error disables the sound in your PC.
- You won’t be able to hear any audio from your PC, hampering your entertainment.
- You can try running the audio troubleshooter or scan the PC for corrupt or missing system files.

Not getting sound out of your PC is one of the annoying issues that you would come across. Users have reported seeing a red cross mark on the Volume icon on the Taskbar, and an error message that reads Windows could not start the Windows Audio service on Local Computer Error 0x80070005. Access is denied.
Moreover, turning on the Windows Audio service also hasn’t helped users in fixing this problem. So, how can you fix this error? Well, that’s exactly what we are going to show you in this guide.
Why am I getting Windows could not start the Windows Audio service on Local Computer error?
Here are a few common reasons that could trigger the Windows Audio service on Local Computer Error 0x80070005. Access is denied problem:
- Windows Audio service is disabled: You should check if the Windows Audio service is disabled or not. If it is disabled then you will face this issue.
- Corrupt system files: If audio-related system files are missing or corrupt then you will come across this issue.
- Outdated drivers: Drivers are pretty important, and if any file is missing or the drive is outdated, then you will face different types of issues.
What to do if Windows could not start the Windows Audio service on the local computer?
Before going with the advanced solutions, you can check and apply the preliminary fixes mentioned below.
- Perform a simple restart and check if this fixes the sound issue on your PC. Here’s what to do if the computer remains stuck on restarting.
- Make sure that the audio driver is installed on your PC for your device. If it is missing then it could result in this error.
- Check the volume levels and see if your speakers aren’t set to mute.
Now that you have tried the above fixes and are still not able to resolve the problem, then you can jump to the below-advanced troubleshooting solutions.
1. Run the sound troubleshooter
- Press the Win + I buttons to open Settings.
- Click on Troubleshoot.

- Select Other troubleshooters.
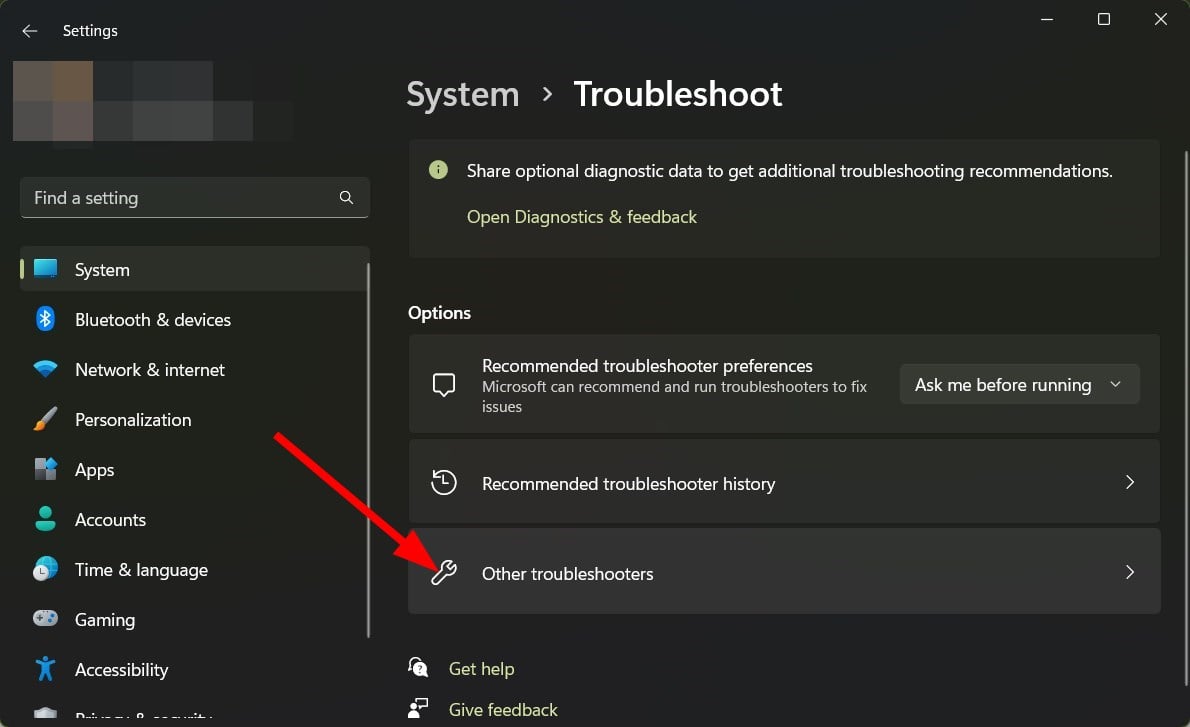
- Hit the Run button next to Playing Audio.

- Let the system detect any issues with your sound hardware.
- Follow the system prompts if it detects any issue and check if this fixes the problem or not.
2. Tweak Windows Audio service log-on settings
- Open the Start menu.
- Type services and open it.

- Locate Windows Audio.

- Double-click on the Windows Audio service.
- Switch to the Log on tab.

- Select the Local System account option and check the box for Allow service to interact with desktop option.

- Hit Apply and OK.
- Restart your PC and check if this resolves the issue or not.
When you perform the above steps, this ensures the system whose user account is to be used by the Windows Audio service when the system boots up.
3. Give complete permissions
- Open the File Explorer.
- Right-click on the problematic drive and select Properties.

- Switch to the Security tab.
- Click on Advanced.

- Click on Change in front of owner.

- Hit Advanced.

- Select Find now.

- Choose Everyone and click on OK.
- Under Permissions for Administrators check the Allow box for Full Control.
- Hit Apple, and OK.
- Restart your PC.
- Open the Start menu.
- Type services and open it.
- Locate Windows Audio.
- Double-click on the Windows Audio service.
- Start the service and check if this resolves the problem or not.
4. Run SFC and DISM scans
- Open the Start menu.
- Search for Command Prompt and run it as an administrator.

- Type the below command and press Enter.
sfc /scannow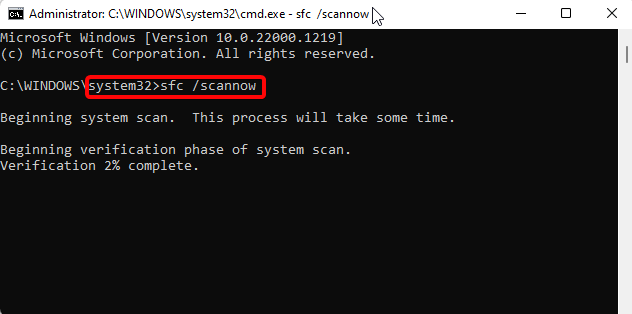
- After the scanning completes, enter the below command and press Enter after each one.
Dism /Online /Cleanup-Image /CheckHealthDism /Online /Cleanup-Image /ScanHealthDism /Online /Cleanup-Image /RestoreHealth
The issue can also pop up because of corrupt or missing system files. In such a case, you can make use of the built-in SFC Scan or DISM tool to resolve the issue.
5. Update the Audio driver
- Open the Start menu.
- Open Device Manager.

- Expand the Audio input and output option.
- Right-click on your audio device and select Update driver.

- Select Search automatically for drivers option.
- Restart your PC and check if this fixes the issue or not.
The above steps require you to manually update the driver software. And in case there are a bunch of driver updates, then it becomes a tedious task.
To automate the process of updating device drivers, we would suggest you make use of a recommended tool called PC HelpSoft Driver Updater.
As the name suggests, with the help of this tool, you can keep all the drivers of your PC up to date with just a few clicks. Apart from this, it also helps you to create driver backups in case things go south.
That is it from us in this guide. We have a guide that will help you resolve the audio issues with the Realtek sound driver.
Let us know in the comments below which one of the above solutions helped you resolve the audio issue on your Windows PC.
Read our disclosure page to find out how can you help Windows Report sustain the editorial team. Read more


Improve this guide


User forum
0 messages