How to create a Sway and share them with anyone
8 min. read
Published on
Read our disclosure page to find out how can you help Windows Report sustain the editorial team. Read more

Most technology companies have their season of popularity then they discover their true talent and fade from the mainstream into their niche. This process is not bad, in fact it proves the company understands what they do well and they simply focus on that. Microsoft seems to be trying very hard to buck this trend when it comes to their Office programs. For decades the Microsoft Office programs have reigned supreme over the competition, but when the shift away from, single files edited offline one at a time, to the modern cloud based simultaneous co-authoring workflow happened Microsoft was left behind.
It took several years but Microsoft finally has decent cloud based document authoring solutions, and Office 2016 was released under the ‘work better together’ mantra. However Microsoft did not stop at cloud-ifying Word, Excel, PowerPoint, and OneNote, instead they pressed on and built a new Office program which was born in the cloud called Sway.
Overview
Sway in many ways is the opposite of the traditional Microsoft Office programs, but that is a good thing. Instead of trying to hack Word or PowerPoint to provide a solution to customers Microsoft understood they need to start from the beginning and rethink what it means to share stories and communicate in today’s modern world. This how-to will briefly touch on what Sway aims to do, and also how to make your own Sways.
Telling stories is more than a photo slideshow, more than a collection of tweets, more than text, and more than videos. Sway aims to give users the tools to create an online story, built from text, photos, videos, tweets, and more, but instead of forcing users to download and re-upload all their content they can simply embed the photos from Flickr or OneDrive, the videos from YouTube or Facebook.

Share stories in a media rich format without needing the skills or time to build a website to host all the different content in a single place. With Sway users can simply drag and drop content from many different sources add text or not, and with very simple options, communicate a story. Being cloud based means Sways are easy to work with others on and share on social media or email. Since all the content is based online viewers are not required to download a big file or have special software to view the Sway.
Walkthrough
While traditional documents are built of self-contained text, photos, or videos; Sways are built of cards. These cards hold content in many different forms, such as text, pictures, videos, Tweets, or charts. Adding cards to a Sway is as easy as dragging them from the ‘cards pane’ which flys-out from the left when the clicking the word ‘Cards’ in the bar at the top. The layout of the cads can be changed easily by dragging the different cards to reorder them. Make cards bigger or smaller by selecting them and under the ‘options’ button select the level of emphasis.
Cards are dropped onto the Storyline which is the vertically scrolling order of cards in the Sway, and where all the editing occurs. Another way to add content would be from the ‘Insert pane’ which flys-out when the word ‘Insert’ on the top bar is clicked. Initially, the Insert pane is populated with content generated by Microsoft’s machine learning algorithms which suggest recommended content based upon the current content in the Sway. To see other sources of content, click the word ‘Suggested’ for a list of currently supported sources.

As of writing this, the sources list contains OneDrive, OneNote, Facebook, Flickr, Bing, PicHit, YouTube, Twitter, and Upload. If you happen to click ‘Add Source’ this will prompt you with a feedback form to suggest new sources to the Sway team. However if the content you want to add can be embedded then add the ‘Embed’ card from the Cards pane to add the content manually. When you find content you like, drag in to your Storyline or click to select several items then select add in the top right of the Insert pane. Cards do not have to be present to drag content from a source onto the Storyline.
Content can be added from public sources such as Bing and Twitter, but by default Sway has filtered the results to only include content which is public or in the creative commons. This filter can easily be turned off but doing so puts the creator of the Sway at risk of using content which they don’t have the rights to use. Microsoft seems to do a good job of setting the default in the most safe mode for their users but still gives them the options to disable this safety net.
The look of a Sway is intentionally basic because Sways were designed to adapt to any screen size or device type. To preview how your Sway looks, click in the space to the right of the Storyline, under the text ‘Preview.’ To return to the Storyline simply click on the edge of the Storyline pane which moved to the left side of the preview. While in Preview you can still make edits to the content by clicking on it and selecting the different options such as Focus Point, edit, delete, etc.

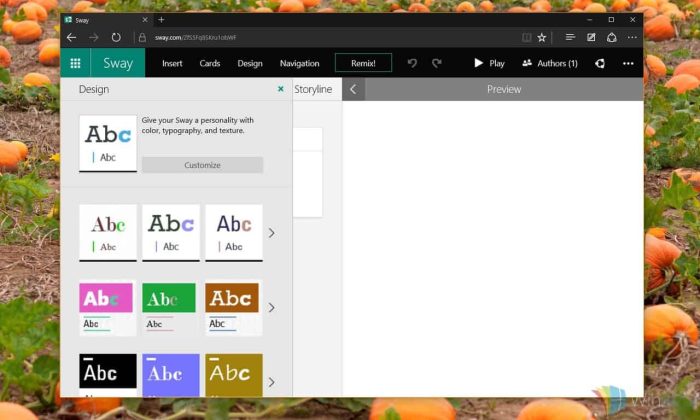
After most of the content has been added, Sway has more options to adjust the overall look and feel. Click ‘Design’ to open the Design Pane and go through the different templates then customize them by changing color, font, and animation emphasis. When the design has been picked, choose how the Sway should navigate by clicking the word ‘Navigation’ next to ‘Design.’ There are only three options for navigation: slide vertically, slide horizontally, or the more traditional slideshow look of one card at a time.
There are not many tools for customizing the fine details of a Sway because the point should be showcasing media. A good workflow while building Sways would be, getting the content into the Storyline, then arranging it and small edits like captions, then try grouping photos. Finally tweak the design options or navigation scheme to complete the Sway. To view the Sway in a more refined form click ‘Play’ and scroll through to see how family, friends, coworkers, or strangers will see your work.
Since Sway is hosted in the cloud adding additional authors is easy. Simply click on the word ‘Authors’ and send the link to people who you want to edit with. When multiple authors are added they can each draw from their own sources and add them to complete the Sway. More than one author can be making changes on a single Sway at a time, which makes document creation easy and more efficient.

When mostly all is said and done share the Sway via email, social media, or with the world on Docs.com. People from any device and view your Sway which should look good on any screen size. No need to login, no need to download extra software, no need to sign up for anything. Sway is the closest thing to creating a custom website for a story, without doing any of the heaving lifting involved.
Summary

Sway represents the current atmosphere at Microsoft, where the old traditional Office remains the center focus but new tools which solve different problems emerge. Instead of adapting other products or diluting a brand, Microsoft has chosen to create a new product for the new era of productivity. Gone are the days when people only needed to be productive at work. Now sharing photos and videos from a recent trip needs to be easy and functional.
Much like Microsoft, Sways are never complete and can be updated, changed, and transformed at any moment. Add authors late or duplicate a Sway your friend started and continue working on a new path. Sways are the vehicle to carry the story of a long project, or a big plan, or a collection of memories. For inspiration and examples go to Docs.com; Microsoft also has links to tutorials at the Sway homepage.
Here is a link to one of my favorite Sways I have seen so far; it is about a custom PC in Minecraft style.
Check it out for yourself and let us know what you think of Sway in the comments below!


User forum
0 messages