Data error: Cyclic redundancy check - We have the fix
Key notes
- System Errors are not at all fun to deal with because they cause the operating system to no longer work as intended. Last, but not least, they are generally fatal.
- A particularly common system error is Cyclic redundancy check which occurs when Windows fails to recognize the drives connected to your PC.
- The odds may not seem favourable, but rest assured that there are a few things you can try if you are stuck on this issue. Make sure to check out the guide below and explore our solutions.
- Eager to know more about Windows 10 errors and how to solve them? Find out everything there is to know in our dedicated section.

If you’re getting the ERROR_CRC error code with the Data error (cyclic redundancy check) description, follow the troubleshooting steps listed in this article to fix it.
ERROR_CRC: What it is and why it occurs?
A cyclic redundancy check is an error code that occurs when your system has detected accidental changes to raw data. It is used in digital networks and storage devices, and it often occurs when Windows detects major drive changes and fails to recognize the drives connected to your computer.
This error sometimes occurs in Outlook as well, after the tool downloads emails to your computer, preventing you from viewing the messages that you downloaded. This issue may occur if your personal folder file is corrupted.
How to fix Data error Cyclic redundancy check
1) Check your disk for errors
On Windows 10, you can run a disk check using Command Prompt.
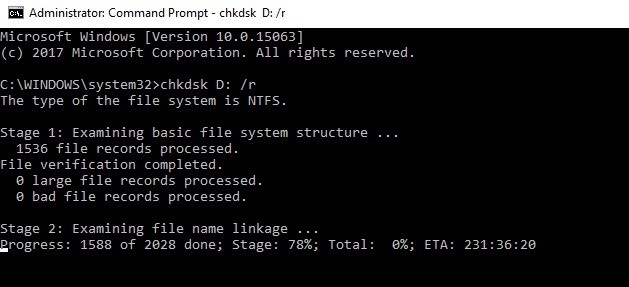
Start Command Prompt as administrator and type the chkdsk C: /f command followed by Enter. Replace C with the letter of your hard drive partition.
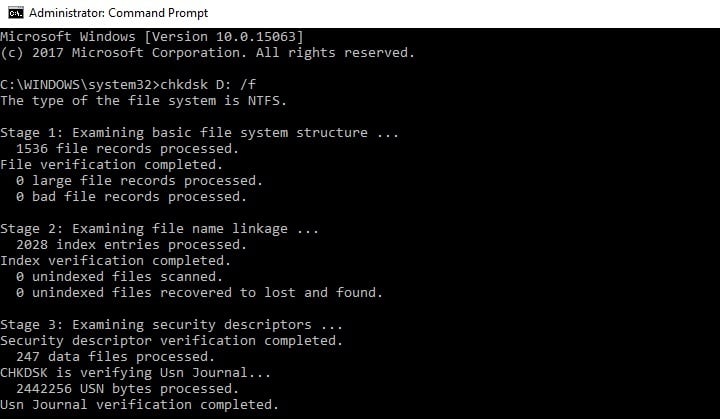
As a quick reminder, if you do not use the /f parameter, chkdsk displays a message that the file needs to be fixed, but it does not fix any errors. The chkdsk D: /f command detects and repairs logical issues affecting your drive. To repair physical issues, run the /r parameter as well.
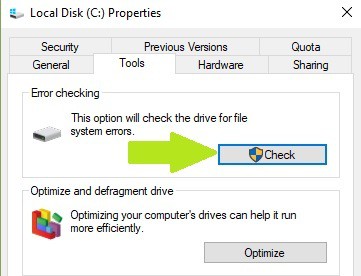
On Windows 7, go to hard drives > right-click the drive that you want to check > select Properties > Tool. Under the ‘Error checking’ section, click Check and check the ‘Automatically fix system file errors’ option.
2) Format your hard drive
If the solution above didn’t work, try formatting the problematic drive. Formatting and restoring the default drive settings should fix this error. Keep in mind that formatting your drive means deleting all the files and folders stored on that drive.
You can format your drive using Command Prompt:
1. Go to Start > type cmd > right-click the cmd search result > select Run as administrator
2. Type format C: /FS:exFAT > hit Enter to begin formatting the C drive as exFAT. Replace C: with the letter of the problematic drive.

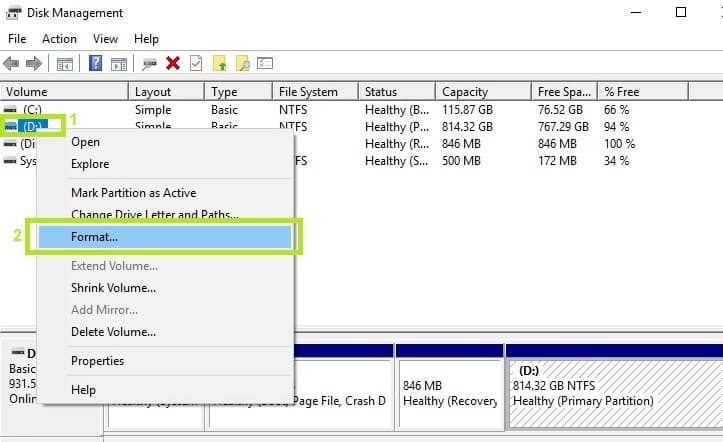
You can also format your drive using the Disk Management utility:
1. Go to Start > type disk management > select the Disk Management utility
2. Right-click the drive that you want to format > select the Format option
3. Follow the on-screen instructions to further customize the format process > click OK on the warning window.
4. Once the format process finishes, you can use your drive. Try to install the updates again to see if this action fixed the problem.
3) Clean your temporary files and folders
The simplest and quickest manner to delete your temporary files and folders is to use Disk Cleanup. As you use your computer or browse the Internet, your PC accumulates various unnecessary files.
These so called junk files may affect your computer’s performance and also trigger various error codes, including the ERROR_CRC error code. Clean your temporary files and then try to use your drive again.
Here’s how to use Disk Cleanup on Windows 10:
1. Go to Start > type Disk Cleanup > launch the tool
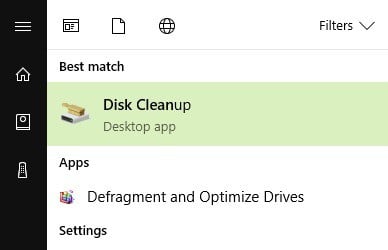
2. Select the disk that you want to clean > the tool will them tell you how much space you can free up
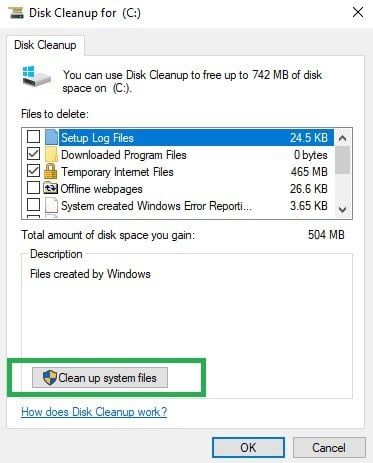
3. Select Clean up system files.
Here’s how to use Disk Cleanup on Windows 7:
- Go to Start > type Disk Cleanup > open Disk Cleanup.
- In Disk Cleanup‘s description section, select Clean up system files and select the drive that you want to clean up > click OK.
- On the Disk Cleanup tab, select the check boxes for the file types that you want to delete > click OK > select Delete files.
4) Use the previous drive letter/ change the drive letter
If the Data error Cyclic redundancy check code occurred after you changed the letter of your drive, try restoring the previous letter.
1. Go to Search > type disk management > select the first result > launch the tool
2. Select the problematic drive > right-click it > select Change driver letters and paths

3. Click on the Change button > restore the previous driver letter > click OK.
5) Install PartedMagic or Recuva
Users also reported that PartedMagic can fix the Data error (cyclic redundancy check) error code. PartedMagic is a disk partitioning and data recovery tool that supports many drive formats, including FAT16, FAT 32, HFS, etc.
It can format internal and external hard drives, create, move and delete hard drive partitions, clone your drive etc.
You can download PartedMagic from the tool’s official website.
Recuva is a powerful file recovery tool that you can use to recover files from damaged disks. Thanks to its deep scan feature for buried files, Recuva is able to retrieve virtually any lost files. Many Windows users confirmed that Recuva helped them fix the Data error (cyclic redundancy check) error.
You can download Recuva and see if this works for you.
6) Use diskpart
You can also use the diskpart command to fix the Data error (cyclic redundancy check) error code. Diskpart is a powerful tool for hard drive management, and using it can cause damage to your system. Be extra caution when using this command and keep in mind that you’re using it at your own risk.
- Go to Start > type Diskpart > right-click diskpart in the search results > Run as administrator.
- Type the list disk command to identify all the available devices

- Type select volume X (replace X with the volume number assigned to the device) to select the problematic drive
- Type the clean command to clean the drive
- Now, you’re going to create a new partition using the create partition primary command
- Type the command select partition 1 to select the recently added partition
- Then type the command activate to activate the new partition and the command format FS=NTFS label=[add the letter your new drive] quick. Type the command without the brackets.
- Type assign letter=Y (replace Y with the letter that you want to assign to the device).
Fix Data error Cyclic redundancy check on Outlook
As we mentioned at the beginning of this article, the cyclic redundancy check error may also occur on Outlook. Here’s how to fix it:
1. First check your drive for errors (see Solution 1 above for more details).
2. Repair your personal folder file with the Inbox Repair Tool. For a step-by-step guide on how to do this, check out Microsoft’s support page.
We hope that the solutions listed above helped you fix the Cyclic redundancy check error. As always, if you’ve come across other workarounds to fix this problem, you can help the Windows community by listing the troubleshooting steps in the comments below.
Read our disclosure page to find out how can you help Windows Report sustain the editorial team. Read more


Improve this guide

User forum
0 messages