Disable Windows Key: 5 Easy Ways to Lock it
Top tips to stop the Windows key from interrupting your activities
![]() 6 min. read
6 min. read
![]() Updated on
Updated on
Share this article
This article is translated in

Improve this guide
Read our disclosure page to find out how can you help Windows Report sustain the editorial team. Read more
Key notes
- Have you wondered how to disable the Windows key? Modifying the registry is one solution.
- Instead of modifying the registry, you can download a .reg file and use it to disable the Windows key.
- Usually, gaming keyboards have dedicated software so that you can check the key settings there.
The Windows key is somewhat helpful and is a part of many shortcuts on Windows 10. However, many users use it frequently, and some want to disable it.
The key can sometimes be a problem, especially during intense gaming sessions. By default, pressing the Windows key will open the Start Menu, which can make you lose focus while gaming.
This guide will show you the easy ways to disable the Windows key and prevent any distractions.
Can you disable the Windows key while gaming?
There are limited ways to disable the Windows key in game mode. This is because Microsoft views and has placed much importance on the key.
However, some gaming keyboards have a unique feature to lock and unlock the Windows key. Another option is to disable the Windows key from opening the Start Menu in-game.
This will require you to alter the keyboard configuration and controls in the game.
How can I disable the Windows key?
1. Modify your registry
- Press the Windows key + R, type regedit, and click OK.

- To be on the safe side, click File > Export… to create a backup.

- Select All as Export range, choose a safe location, enter the desired file name and click on Save.

- In the left panel, navigate to:
Computer\HKEY_LOCAL_MACHINE\SYSTEM\CurrentControlSet\Control\Keyboard Layout - In the right pane, right-click the space and choose New >Binary Value from the menu.
- Enter Scancode Map as the name of the new value.

- Double-click the Scancode Map value and enter 00000000000000000300000000005BE000005CE000000000 in the Data field.
- Be extra cautious and double-check if the entered value is correct. Now click OK.

- After doing that, close Registry Editor and restart your PC.


Keep in mind that your registry has sensitive information in it. So, if you want to edit it, use extra caution. If you encounter problems with your PC after modifying the registry, restore the backup created.
After your PC restarts, the Scancode Map you created in the registry should disable the Windows key altogether. Therefore, you need to delete the Map from the Registry Editor to enable it later.
Finally, if you are uncomfortable editing your registry manually, download Disable Windows key.reg and run it. This will perform the task for you quickly. To enable the key later, you must download and run Enable Caps Lock and Windows keys.reg.
2. Use Registry Editor to block Windows Key hotkeys
- Open Registry Editor.
- When Registry Editor opens, from the left panel, go to:
HKEY_CURRENT_USER\Software\Microsoft\Windows\CurrentVersion\Policies\Explorer - Right-click any space in the right panel and choose New > DWORD (32-bit value).
- Enter NoWinKeys as the name of the new DWORD.

- Double-click NoWinKeys DWORD to open its properties.
- Set Value data to 1 and click OK to save changes.

- After you’re done, close Registry Editor and restart your PC to apply the changes.


This solution is ideal for you if you want to disable the Windows key because of a shortcut affecting games like Razer Huntsman and Apex Legends. It disables all shortcuts related to the Windows key entirely.
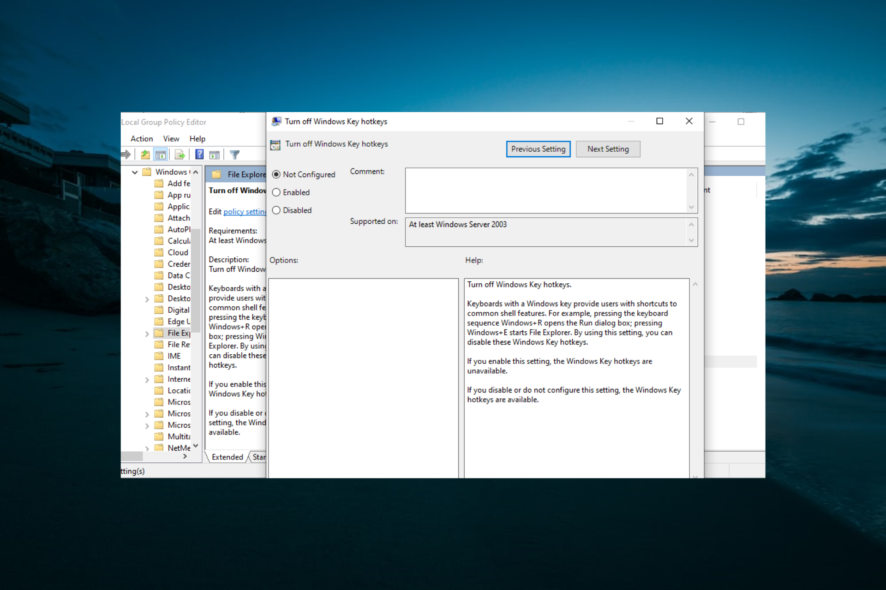
3. Use Group Policy Editor
- Press the Windows key+ R, enter gpedit.msc, and click OK.
- Now navigate to the User Configuration > Administrative Templates > Windows Components > File Explorer in the left pane.
- Locate and double-click the Turn off Windows key hotkeys option in the right pane.

- Select the Enabled option and click on Apply and OK to save changes.

- After that, restart your PC and check if that solves the problem.


This is a simple solution, but like before, it should disable only the Windows key shortcuts. If you need to disable the Windows key entirely, you might want to try a different solution.
4. Use a third-party software
- Download and start SharpKeys.
- Once the application starts, click on Add.

- Now you’ll see two columns. Click on the Type Key in the left pane and press the Windows key.

- Now click on OK to select the pressed key.

- Select Turn Key Off in the right pane and click OK to save changes.

- Now, click on the Write to Registry button.

- From here, restart your PC or log out and log back in to apply the changes.
- Start Sharpkeys, select the desired key from the menu to enable the Windows key again and click on Delete.

- After deleting the key, click on the Write to Registry button.

- Now restart your PC or log off and back on to apply the changes.
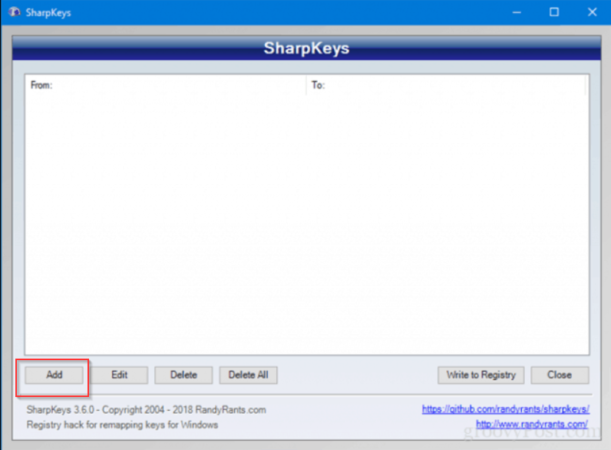


This free and portable tool allows you to remap your keys but can also disable keys or assign them to certain functions. Remember that this is a powerful application, so you’re using it at your own risk.
Other third-party options include the simple-to-use Winkill and creating a script with Autohotkey to disable the Windows key.
5. Use Gaming mode on your keyboard
Many gaming keyboards have a Gaming mode feature that allows you to block the Windows key with ease. However, you usually have to press a particular keyboard shortcut to activate Gaming mode.
Some keyboards even have a controller icon on one of its keys so you can easily find the shortcut key for Gaming mode. However, if you can’t find the shortcut, we advise you to check your keyboard manual for detailed instructions on activating Gaming mode.
Remember that not all keyboards support this feature, so check if your keyboard supports it.
The Windows key is beneficial but can get in your way sometimes. While there are many ways to disable it, the best and safest option is to use a gaming keyboard and set it to Gaming mode.
After reading this article, you may have a better understanding of why the Windows key is not working on Windows 11.
If you need a list of the best Logitech gaming keyboards, you can buy them today; check our detailed guide for the top picks you can select from.
If you have suggestions or questions, leave them in the comments section below, and we’ll take a look.


User forum
2 messages