Please Do Not Power Off or Unplug Your Machine [SOLVED]

Are you getting stuck during Windows Update? Did you get the Please do not power off or unplug your machine prompt after Windows Update? This post will show you how to fix this issue.
Many Windows users reported getting stuck after Windows Update due to this prompt. Their PCs simply get stuck at the prompt for hours without rebooting.
This could be due to several reasons such as outdated system drivers, missing Windows Registry keys, outdated BIOS, and even errors due to incomplete Windows OS installation.
Windows Report has compiled the best solutions applicable in solving this problem on your Windows PC.
Fix: Please do not power off or unplug your machine
- Perform a Clean Boot
- Repair PC registry
- Reset BIOS Settings
- Run System Restore in safe mode
- Run Windows Update troubleshooter
- Run Automatic Repair (Windows 10)
- Reset Windows Updates components
1- Perform a Clean Boot
One of the quick fixes to this issue is to clean boot your Windows PC. This involves pressing the “power off” button until your PC shuts down. Afterward, you can boot up your PC and log in to Windows.
Meanwhile, in order to successfully perform a clean boot on Windows 10, you have to be logged on as the administrator, and then follow these steps:
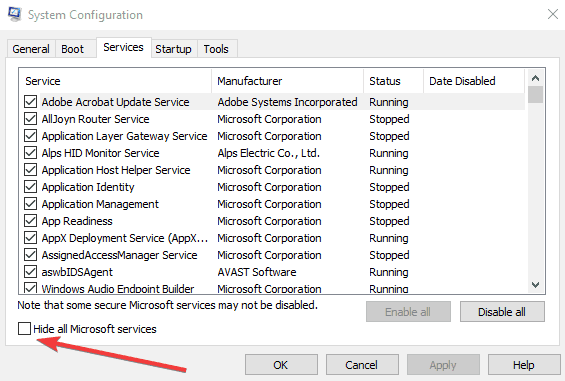
- Go to the search box, and then type “msconfig”
- Select System Configuration to open the dialog box as below:
- Find Services tab, and then select Hide all Microsoft services box
- Click Disable all
- Go to Startup tab > Open Task Manager
- Disable startup programs
- Finally, reboot your PC
However, if this solution did not fix the error problem, you may proceed to the next solution.
2. Repair PC registry
Another way of fixing the “please do not power off” error problem is to repair your Windows registry. You can use Windows built-in SFC to check for system file corruption.
SFC utility program verifies system files integrity and repairs files with problems when possible. Here’s how to run an SFC scan on all Windows versions:
- Go to Start > type cmd > right-click Command Prompt > select Run as Administrator.

- Now, type the sfc /scannow command.

- Wait for the scanning process to complete and then restart your computer. All corrupted files will be replaced on reboot.
Isn’t it a little counterproductive to manually solve Windows bugs and errors? It allows for a lot of human error and oversight.
That’s why we recommend utilizing a third-party registry cleaning tool to search your device for corrupted or damaged files and then fix them so that everything runs properly again.
This is just one of the many reasons why you should make sure your registry is clean and healthy, with no obsolete, corrupted, or unnecessary entries stored in it.
3. Reset BIOS Settings
Another way of fixing the error is by resetting your BIOS to its default settings. BIOS consists of system settings that determine the order and how your PC boots up.
Before you proceed with these steps, ensure you disconnect connected external drives on your PC. Here’s how to reset BIOS:
- Restart PC.
- Hit the “F2” key repeatedly until a System Setup screen window appears.(The BIOS function key varies; you may have to check during boot which Function key to use so as to access the BIOS settings).
- Now, Hit on the “Right Arrow” on your keyboard and wait until “Exit” menu is highlighted.
- Next, hit on the “Down Arrow” on your keyboard and select “Load Optimized Defaults” option.
- Finally, hit the “Enter” button.
Alternatively, you can flash your PC’s BIOS if resetting it does not work. For more information about flashing your PC’s BIOS, check out our guide.
4. Run System Restore in safe mode
Safe mode is a diagnostics mode in Windows that starts your PC in a limited state. Hence, running system restores in safe mode can revert your system back to a certain restore point before you carried out Windows Update that generated the “please do not power off” error problem. Here’s how to do this:
- Forcefully shut down your PC and turn it on again.
- Navigate to the “Run in Safe Mode” option and hit “Enter”.
- Go to Start > Type “system restore” and then hit “Enter”.
- Follow the prompts to revert back to a certain restore point.
- Wait for the process to complete, and then reboot.
Note: Ensure you are able to identify the restore point dated before the “please do not power off” error problems waxed. System restore does not affect any of your files, documents, and personal data.
5. Run Windows Update troubleshooter
Windows Update troubleshooter is Windows 10’ built-in program that automatically detects and fixes most incorrect settings on your PC resulting in Windows Update failure. Here’s how to run the troubleshooter:
- Click Start
- In the search field box, type Troubleshooting
- Click Troubleshooting
- Click View all in the left pane
- Select Windows Update
- Click Next to run Windows Update Troubleshooter, then follow the instructions on the screen
If you still cannot fix the “please do not power off” error after running the Windows Update troubleshooter, try the next solution.
6. Run Automatic Repair (Windows 10)
You may consider running Startup repair so as to fix the “Please do not power off or unplug your machine” prompt. The system may be corrupted due to irregularities caused during Windows installation. You need to create a Windows bootable USB or DVD drive before you proceed with automatic repair. Here’s how to do this:
- Download the Windows 10 ISO file, to create a bootable device for Windows 10.
- Insert the bootable USB or DVD and boot Windows from it.
- In the “Windows Setup” window, select the “language to install”, “Time and Currency format”, and the “keyboard or input method”.
- Hence, click on “Repair your computer” and select “Troubleshoot”.

- Click on “Advanced options”, select “Automatic Repair”, and then select the Operating System.

- After the repair process, follow the prompts notification to boot up your Windows PC.
7. Reset Windows Updates components
Disclaimer: This solution contains steps that are part of modifying the registry. Please note that serious problems may occur if you do this incorrectly. Ensure you follow these steps correctly, and carefully.
This method involves modifying your Windows registry; hence, it is very necessary that you back up the registry before you modify it. Also, you can restore the registry in case a problem occurs.
Here’s how to manually reset the Windows Updates Components:
- Right click Start
- Select Command Prompt (Admin)
- Click Yes when asked for permissions
- Stop the BITS, Cryptographic, MSI Installer, and Windows Update Services by typing the following commands at a command prompt:
- net stop wuauserv
- net stop cryptSvc
- net stop bits
- net stop msiserver
(Press Enter after each command you type)
- Rename the SoftwareDistribution and Catroot2 folder by typing the commands below in the Command Prompt then press Enter after each command you type:
- Ren C:WindowssoftwareDistribution SoftwareDistribution.old
- Ren C:WindowsSystem32catroot2 Catroot2.old
- Restart the BITS, Cryptographic, MSI Installer, and Windows Update Services by typing the following commands in Command prompt:
- net stop wuauserv
- net stop cryptSvc
- net stop bits
- net stop msiserver
- Type Exit in the Command Prompt to close it
After trying out the steps above run Windows Updates again and follow the prompts to complete Windows Update process.
However, some Windows users reported getting “Access Denied” prompts when trying the step above. Here’s what to do if your access is denied:
- Log in first as administrator or use administrator user account
- Stop the windows Update service and try to rename SoftwareDistribution folder
- Right click Start
- Select Run
- Type services.msc and press OK or enter
- Scroll down and locate Windows Update service
- Right click and select Properties
- Stop the service
- Follow the steps again to reset Windows Update Components
After you complete the process, go to the “Services” window again, now start the Windows Update service, and then restart the computer.
Note: We highly recommend that you check the “Give me updates” menu for other Microsoft products when using the Windows update option. Windows Updates downloads and installs updates required to run Windows efficiently.
If you have any comments on any of the steps or success using another method not listed above please leave a comment below.
Read our disclosure page to find out how can you help Windows Report sustain the editorial team. Read more


Improve this guide


User forum
0 messages