How to Turn On / Off Fast User Switching on Windows 10?
Enable/Disable the feature using any of these methods

Fast User Switching is a great feature to seamlessly switch between accounts on your Windows computer without quitting the apps or logging out from the former account. To use this function, a user must click on Switch user instead of Log off from the Start menu options.
This guide will discuss how to turn on/ off the functionality using three simple methods. Let’s get started!
How can I enable/disable Fast User Switching on Windows 10?
1. Use the Group Policy Editor
- Press Windows + R to open the Run window.

- Type gpedit.msc and press Enter to open Group Policy Editor.
- Follow this path:
Local Computer Policy\Computer Configuration\ Administrative Templates\ System - Locate the Logon folder from the left pane, and on the right pane, double-click Hide entry points for Fast User Switching.

- On the Hide entry points for the Fast User Switching window, select Disabled to turn it on.
- If you want to disable it, then click on the radio button for Enabled.

- Once you have selected the option, click Apply and then OK.
- Restart your computer to let the changes take effect.
2. Use the Registry Editor
- Press Windows + R to open the Run window.
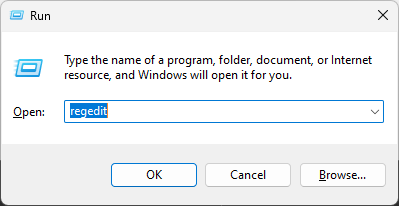
- Type regedit and press Enter to open Registry Editor.
- Follow this path:
HKEY_LOCAL_MACHINE\SOFTWARE\Microsoft \Windows\CurrentVersion\Policies - Now locate System, right-click it, and select New.

- Select D-WORD(32-bit) Value and name it HideFastUserSwitching.
- Double-click HideFastUserSwitching and change the Value data to 1 to disable it.
- If you want to enable Fast User Switching, change the Value data to 0.

- Click OK.
- Restart your PC.
3. Use the PowerShell
- Press Windows + X key and select PowerShell Admin.

- Copy and paste the following command and press Enter to disable Fast User Switching:
powershell -windowstyle hidden -command "Start-Process cmd -ArgumentList '/s,/c,REG ADD HKLM\SOFTWARE\Microsoft\Windows\CurrentVersion\Policies\System /V HideFastUserSwitching /T REG_DWORD /D 00000001 /F & REG Delete HKCU\Software\Microsoft\Windows\CurrentVersion\Policies\System /V HideFastUserSwitching /F & taskkill /f /im explorer.exe & start explorer.exe' -Verb runAs" - To enable, copy and paste the following command and press Enter:
powershell -windowstyle hidden -command "Start-Process cmd -ArgumentList '/s,/c,REG Delete HKLM\SOFTWARE\Microsoft\Windows\CurrentVersion\Policies\System /V HideFastUserSwitching /F & REG Delete HKCU\Software\Microsoft\Windows\CurrentVersion\Policies\System /V HideFastUserSwitching /F & taskkill /f /im explorer.exe & start explorer.exe' -Verb runAs" - Once done, close the PowerShell window and restart your computer.
So, these three methods you can use to enable/disable the Fast User Switching feature on your Windows 10 computer. Once you enable this feature, you should be able to easily switch users on Windows 10.
Try them and let us know which worked for you in the comments below.
Read our disclosure page to find out how can you help Windows Report sustain the editorial team. Read more


Improve this guide


User forum
0 messages