How to Enable & Disable Fingertip Writing in Windows 11
You need to enable the feature to use it on Windows 11
3 min. read
Updated on
Read our disclosure page to find out how can you help Windows Report sustain the editorial team Read more
Key notes
- Fingertip writing makes writing more straightforward and intuitive.
- Ensure you make a system backup before making changes to the Windows Registry.
- With the Fingertip writing feature enabled, you can operate your PC’s screen using your fingers or a stylus.
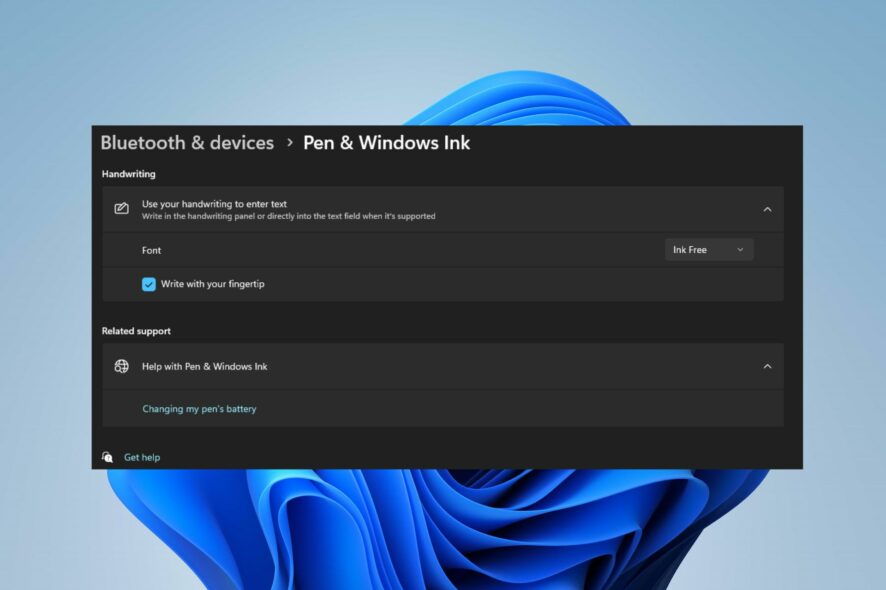
Using the Fingertip Writing in Handwriting Panel in Windows 11 requires enabling the feature. Enabling the fingertip writing feature is a simple process that can be achieved in a few steps.
In this article, we’ll walk you through two of the best steps you can apply to enable and disable fingerprint writing in Windows 11.
What is Fingertip Writing in Windows?
Fingertip Writing is a feature that enables users to operate their PC’s screen using their fingers or a stylus pen.
Further, the feature is one of Windows’ latest releases that enables users to write on the screen with their fingers without using a stylus or pen.
With the feature enabled, you can scribble a character or an alphabet on the screen, and the fingertip writing feature will recognize and convert it to its correct form.
Also, this feature makes writing more straightforward and pretty intuitive.
How can I enable and disable Fingertip Writing in Windows 11?
1. Using the Settings app
- Press the Windows key + I to open the Settings app.
- Click on Bluetooth & devices on the left pane. Then, locate the Pen and Windows Ink tab and click on it to expand the option.
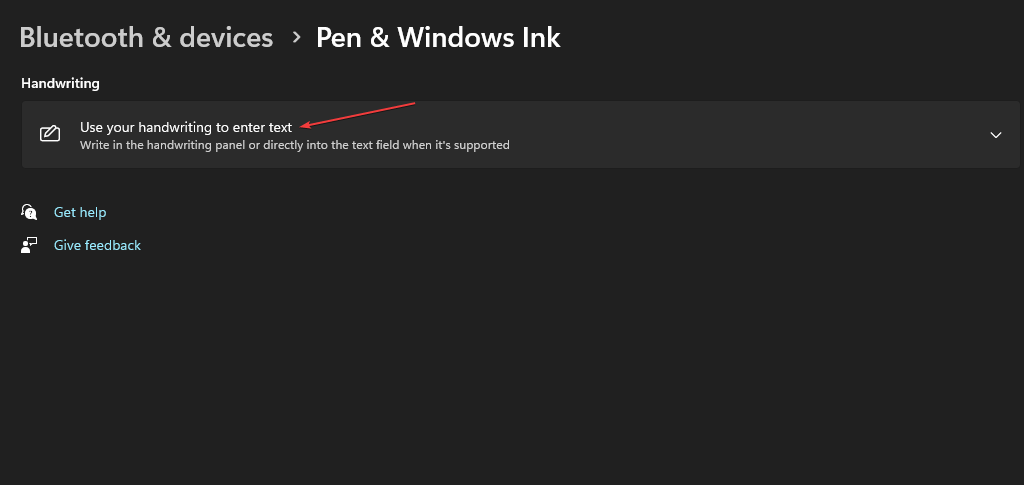
- In the next window, click the Use your handwriting to enter text option under the Handwriting section.
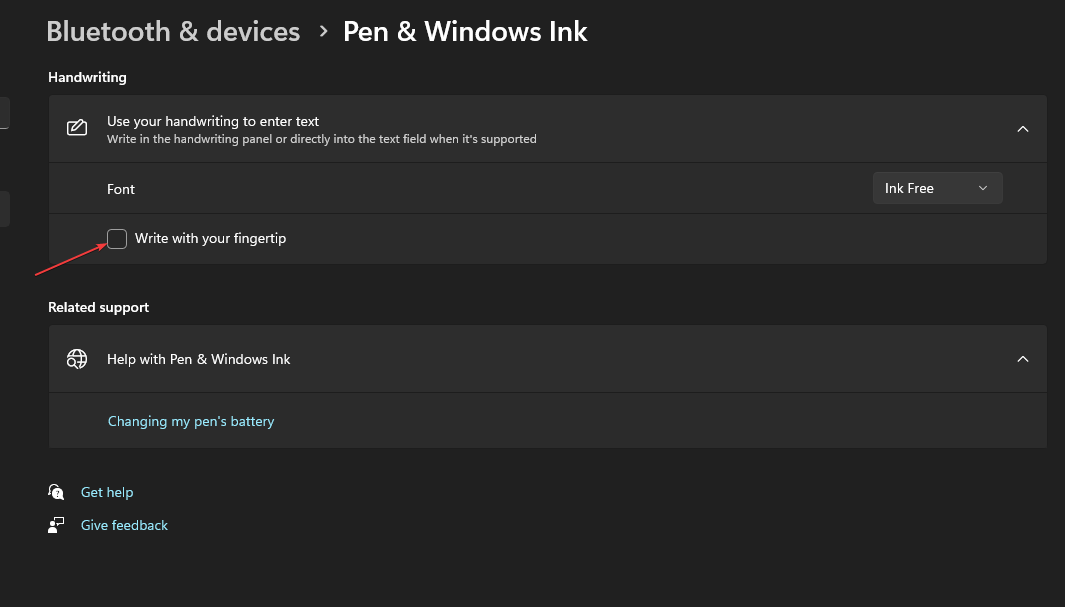
- To enable the Fingertip writing option, check the box next to the option of Write with your fingertip.
- To disable the feature, uncheck the Write with your fingertip option.
2. Using the Registry Editor
- Press the Windows key + R, type in regedit in the Run box, and hit Enter to open the Registry Editor.
- In the Registry Editor window, browse and navigate to the following path:
Computer\HKEY_CURRENT_USER\Software\Microsoft\TabletTip - While in the TableTib folder, right-click on the folder and select New, then click the Key option.
- Name the newly created folder EmbeddedInkControl.
- After renaming the folder, right-click on the EmbeddedInkControl, select New, and choose DWORD (32-bit) Value.
- Rename the new REG_DWORD EnableInkingWithTouch.
- Now, double-click on the EnableInkingWithTouch REG_DWORD and set its Value data to the following:
- 1 = To enable writing with your fingertip.
- 0 = To disable writing with your fingertip.
- 1 = To enable writing with your fingertip.
- Click OK to save the changes.
- Close the Registry Editor, Restart your PC, and check if the error persists.
Enabling or Disabling Fingertip writing using the Registry editor is a pretty complicated task. Editing the registry on its own can prove difficult; if done incorrectly, it could lead to many system errors.
Ensure you backup your system and create a restore point on your local disk. With a backup and a restore point in place, you don’t have to worry about crashing your PC and losing all your files.
Enabling or disabling the fingertip writing feature in Windows can be achieved using varying steps. Whatever method you choose to apply, you’ll get the same results.
However, it’s important to note that making changes to the Registry is pretty complicated and can cause many errors if not correctly done.
In case you’re having issues with this feature, be sure to properly enable the Touch Keyboard and Handwriting Panel service beforehand.
Nevertheless, following the steps outlined in the above guide, you can enable and disable the Fingertip Writing in Handwriting Panel in Windows 11.


