How to fix corrupt AutoCAD files in Windows 10/11
5 min. read
Updated on

Having trouble nursing a corrupt AutoCAD file back to health? An AutoCAD file is one that has the .DWG extension, also known as an AutoCAD Drawing Database file. Such files store metadata, 2D or 3D vector image drawings you can use with the computer aided design (CAD) program(s).
These files can be transferred between programs because they’re compatible with several 3D drawing and CAD programs, though not all viewers can open each type of DWG file.
It can be miserable when a file appears to be lifeless, or when you have to kill it after it has brought your system down to its knees, literally.
Some of the symptoms of a corrupt AutoCAD file include:
- A drawing that seems funny
- The file works slowly
- File doesn’t open
- File hangs or crashes the AutoCAD program
- A few commands won’t work
- It appears to have some missing parts
- Unexplained increase in size of the file
- Display or regen issues
- The corrupt AutoCAD file just won’t reveal itself when you try to open it
Eventually, all these elements cause the AutoCAD program to send you unexpected or unwanted messages.
These and other issues are caused by third-party apps within AutoCAD, DWG files created or saved by products that aren’t Autodesk or RealDWG, the program terminates while saving, or old drawings getting used all the time, over a few years.
Other causes include network faults such as file locking, latent data writing, transmission errors, storage media degradation by bad hard drive sectors, failing/defective RAM, OS problems, power surges, and outdated software.
— RELATED: 8 best laptops for architects to unleash your imagination
For each of the above symptoms, and a few others, there are several causes you need to consider, each of which have solutions to help you clean, repair, fix, and recover your drawing.
Fix corrupt AutoCAD files
1. Use Recover Command
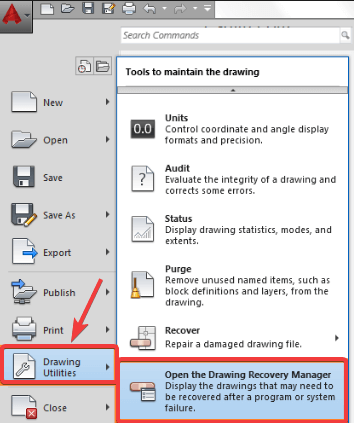
Recover Command lets you restore the corrupt AutoCAD files directly if you either deleted or lost them. To do this:
- Open a new AutoCAD drawing
- Select file
- Select Drawing Utilities
- Select Recover or Recovery Manager, depending on your software version

- Select the drawing
- Click OK
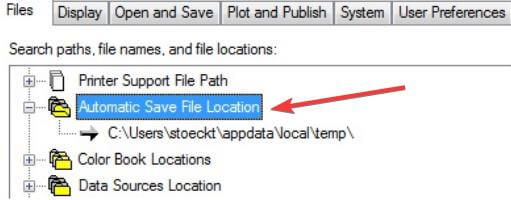
2. Use Auto save feature
- Open AutoCAD
- Select Tools
- Click Options
- Click Files
- Click Automatic Save File Location

- Check the location of the autosave files saved under: C:Documents and SettingsUsernameLocal SettingsTemp
- Locate your CAD file by name
- Check the date of modification of the files
- Select the right version – the one that was deleted or lost
- Change the file’s extension from .bak or .sv$ to .dwg
- Try and see if you can use your AutoCAD file/files again. You can use a dwg file opening software, then convert the drawing to an older DWG version and try to open again
- Go to your backup system. Restore the file from a previous time before it was corrupted
If the file opens, do the following:
- Open the file
- Purge Registered Applications by typing PURGE in a command line. Type R for Regapps and press enter. Type N when asked to verify each of the names to be purged, and press enter
- Type PURGE gain at the command line
- Check all the boxes and click Purge All
- Type AUDIT at the command line. Type Y for Yes to fix errors and press enter
- Save your drawing
— RELATED: Fix: AutoCad not Working in Windows 10
3. Other steps to take
Method 1
If the corrupt AutoCAD file persists, try the steps below:
- Open the corrupt AutoCAD file or drawing and a new drawing
- Press CTRL+A to select everything on the corrupt AutoCAD file, and press CTRL+SHIFT+C
- The base point will be 0,0,0
- In the new drawing, press CTRL+V
- The insert point is 0,0,0
- Save the new drawing
If it still persists, do the following:
- Check that all the layers are ON, thawed, and unlocked
- Detach all XREFs (external references) and that they have no circular attachments
- Write Block all necessary information in the corrupt AutoCAD file to a new drawing using the command line.
- Type WBLOCK in the command line
- Go to Source > select Objects
- Click Select Objects
- Use a selection window to pick only necessary objects from the file (don’t type ALL)
- Set the file path and name > click OK
- Open a new blank file (drawing file)
- Insert the file you created from the command line
- Type INSERT in the command line and select the file
- Uncheck the box “Specify On-screen”
- Check Explode box and click OK
- Type PURGE in the command line > click Purge ALL
- Audit and fix the errors
- Type SAVE AS and create a new file name
Method 2
- Open a new blank AutoCAD file
- In a command line, type RECOVER
- Go to the corrupt AutoCAD file to let the program restore it
- Type OVERKILL at the command line
- Select all objects
- Check or uncheck the properties to include/ignore
- Click OK
- Type DELCON at the command line
- Select all objects
- Type BREP
- Select all objects
- Type –SCALELISTEDIT
- Type R for reset and Y for yes
- Type FILTERS
- Click Delete filters
If the file is unexpectedly large in size, use the DGNPURGE tool.
Were you able to find a solution among these listed here? Let us know which one worked for you by leaving a comment in the section below.
RELATED STORIES TO CHECK OUT:


User forum
0 messages