How to fix GWXUX.exe application error in Windows 10
![]() 3 min. read
3 min. read
![]() Updated on
Updated on
Share this article

Improve this guide
Read our disclosure page to find out how can you help Windows Report sustain the editorial team Read more
Key notes
- Many users bumped into the GWXUX.exe application error when trying to upgrade their OS.
- If you get this error too, check out our solutions below.
- Since updating to Windows 10 isn’t always as smooth as expected, make sure to bookmark our Windows Update Guides.
- Explore our Windows 10 Errors Hub as well and leave nothing to chance when it comes to your OS.
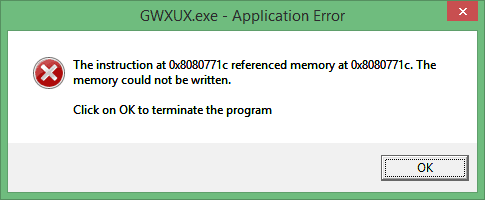
Updating to Windows 10 isn’t always smooth as expected. Users have reported that file GWXUX.exe gives them an annoying Application Error alert while trying to update to Windows 10.
So, let’s see what we can do to resolve this issue.
What is gwxux.exe?
First off, let’s explain what GWXUX.exe does. This application is in charge of updating your Windows 7, Windows 8 or Windows 8.1 to Windows 10.
If you’re using an older version of Windows, you’ve probably noticed the little icon in your Taskbar that asks you to update to Windows 10.
That is GWXUX.exe, it scans your computer in order to see if your system is compatible with Windows 10, and it informs you when the update is ready to be downloaded.
However, after clicking the icon and trying to update to Windows 10 many users have received an Application Error. If you’re having this problem, don’t worry, there is a way that you can fix this.
How can I fix gwxux.exe application errors?
As far as we know, this error is caused by corrupted system files. The best solution is to reinstall Windows or to perform a repair installation.
However, for some users, this isn’t the best solution, especially if you don’t want to deal with backing up of your files and reinstalling your software all over again.
But don’t worry, you can repair corrupted system files without installing a fresh copy of Windows.
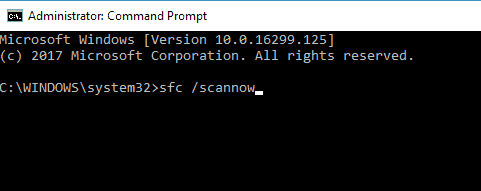
1. Perform an SFC scan
SFC stands for System File Checker, and it will scan your system for corrupted files and it will repair them. To perform an SFC scan, you need to do the following:
- If you’re on Windows 8 or Windows 8.1, go to the bottom right of your screen and open Search. Then type Command Prompt in the search box and find the Command Prompt application from the list. Right-click it, and select Run as administrator. You might have to enter your administrator password to proceed or allow the application to run.
- On Windows 7 it’s almost the same. Open the Start menu, in the search box type Command Prompt, right-click the application and select Run as administrator from the context menu. Again, you might need to enter your administrator password or to allow the Command Prompt to run.
- The next step is the same for both Windows 8 and 7. Command Prompt will open up and you’ll need to type sfc /scannow in it. Just press Enter and SFC scan will perform, replacing any corrupted files it finds.

- Before starting SFC scan please close all other applications, and do close Command Prompt until verification is 100% complete.
- After the scan is complete, you’ll be notified if SFC has managed to find and repair the corrupt files. If the corrupted files have been repaired the GWXUX.exe Application Error should be fixed.
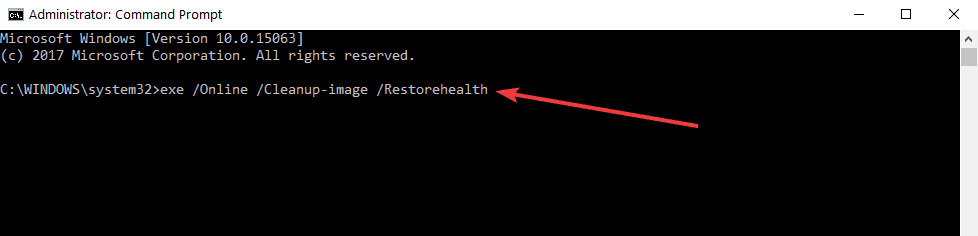
2. Run DISM
- Open Command Prompt as an administrator
- Enter the following commands one by one and hit Enter:
- DISM.exe /Online /Cleanup-image /Scanhealth
- DISM.exe /Online /Cleanup-image /Restorehealth

- Reboot your computer and check if the error persists.
3. Reinstall your Windows
If the issue cannot be fixed with SFC scan, and you’re still getting GWXUX.exe Application Error you might need to reinstall your current version of Windows.
Keep in mind that other files can experience these kinds of issues, and to learn more, we suggest reading out nvwmi64.exe errors guide.
That should do it, feel free to try any of the solutions detailed above and let us know what worked for you in the comments section below.
[wl_navigator]