FIX: Surface Pro 4 screen dimming problem
Key notes
- The Surface Pro 4 screen dimming can be produced by the adaptive brightness settings so turn them off.
- Tweak the Registry to change some Intel graphics features and fix the problem.
- Checking for Windows and driver updates can also lead to a favorable outcome.
- You can also try to change the refresh rate for the screen to a recommended value.

We continue our series of articles about problems in the Surface Pro 4. After solving (or at least trying to solve) waking up problems in our previous article, we move on to another common Surface Pro 4 issue.
This time, we’re going to talk about the annoying screen dimming problem on Surface Pro 4, and how to (try to) solve it.
A few things can cause the screen dimming problem with Surface Pro 4, so we’ll cover all of them. If you’re also facing this annoying problem, check our solutions below.
Also, here are a few more problems you can solve with the same solutions:
- Surface Pro 4 screen brightness keeps changing – It’s possible for the Surface Pro 4’s screen to keep changing brightness without your permission. In fact, it’s actually a common issue.
- DPST Surface Pro 4 – Intel’s DPST (Display Power Saving Technology) is actually a known culprit for the screen dimming problem on Surface Pro 4 devices.
- Surface Pro 4 brightness not changing – This is actually the reverse problem, where users can’t change the screen brightness
How do I fix the screen dimming issue on the Surface Pro 4?
- Turn off adaptive brightness
- Disable Intel graphics features
- Check for updates, and make sure your drivers are up to date
- Rollback to an older driver
- Set the DPI size
- Update Windows
- Remove the latest Windows update
- Change the refresh rate
1. Turn off adaptive brightness
- Go to Search, type power, and open Power & sleep settings.

- Now click on Advanced power settings.

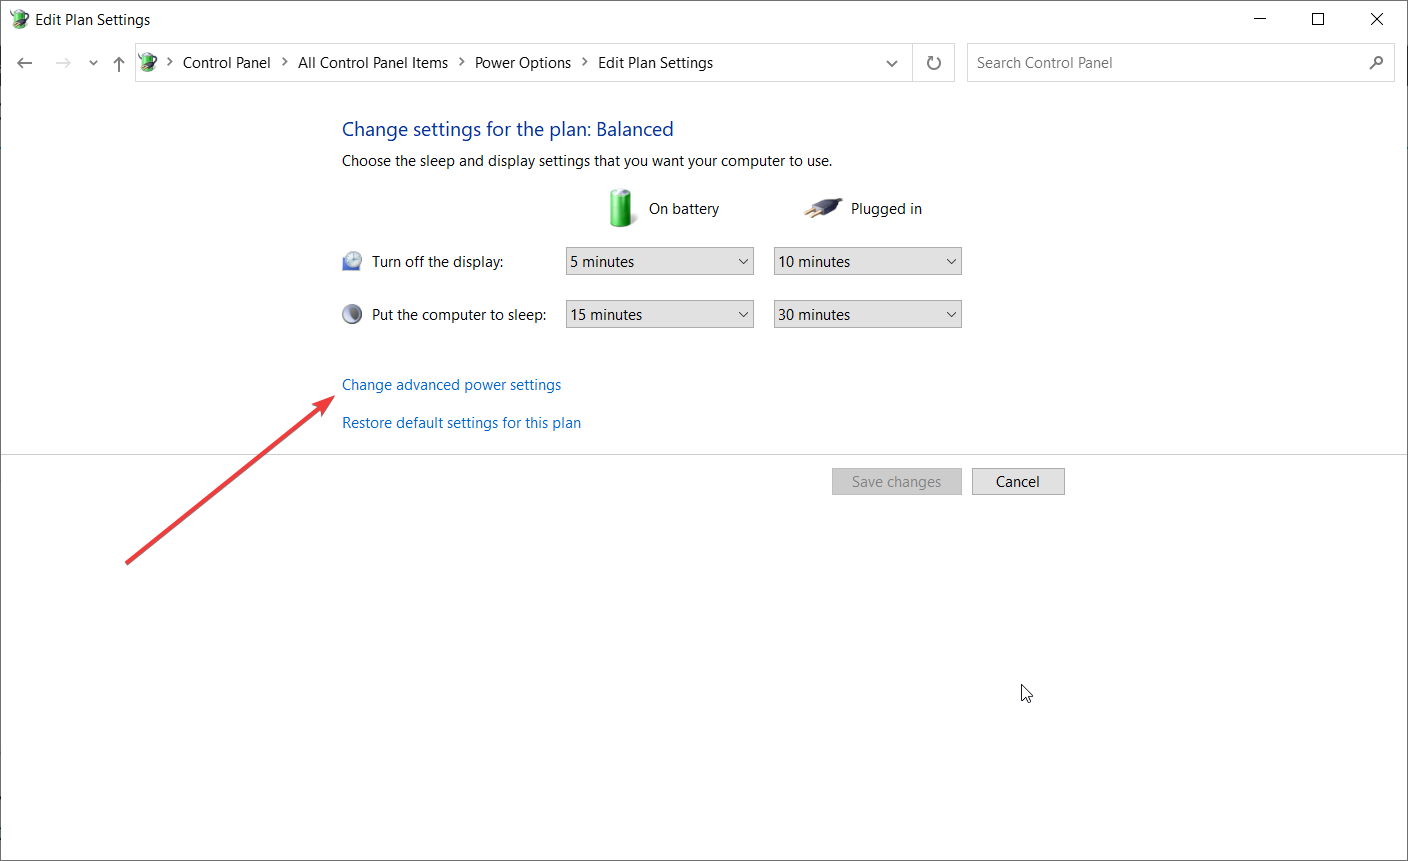
- Next to your selected power plan, tap or click on Change plan settings.

- Now, go to Change advanced power settings.
- Expand Display and expand Enable adaptive brightness.
- Now set both On battery and Plugged in to off.

- Click OK.
Adaptive brightness is a tricky thing. This feature can be extremely useful, in terms of saving power, but sometimes, it can also be troublesome.
In case you don’t know how this feature works, adaptive brightness scans your surroundings and automatically sets your screen brightness based on a level of lightness around you.
As we said, adaptive brightness can go wild sometimes, causing various issues on a device, including the screen dimming problem.
So, if you’re facing the screen problem, you should try disabling the adaptive brightness feature, and see if the issue is resolved.
Once you disable the adaptive brightness feature, the problem with screen dimming on your Surface Pro 4 device will hopefully be solved.
However, if the issue is still present after disabling adaptive brightness, try the solution from below.
2. Disable the Intel graphics features
- Go to Search, type regedit, and open Registry Editor.
- Go to the following path:
[HKEY_LOCAL_MACHINESYSTEMControlSet001ControlClass{4d36e968-e325-11ce-bfc1-08002be10318}000]
- Now, open the DWORD called FeatureTestControl, and change its value from 9a40 to 9a50.
- Restart your computer.
Another feature that’s similar to adaptive brightness can cause your Surface Pro 4’s screen to dim.
That feature is Intel’s Display Power Saving Technology or DPST, which adjusts your screen brightness based on how dark or light the content on the screen is.
So, adaptive brightness scans your surroundings to adjust brightness, and DPST scans what’s actually on the screen.
Of course, the solution is to turn DPST off, as well, but that won’t be as easy as disabling adaptive brightness.
Some older PCs have the option to disable DPST via Intel’s driver configuration software, but unfortunately, that software is not available on the Surface line of tablets.
So, it’s impossible to legitimately disable this feature on your Surface Pro 4. However, there’s an alternative way of doing that, by using one registry tweak.
So, if you want to disable Intel Display Power Saving Technology on your Surface Pro 4, perform the steps above.
Once you perform this action, Intel’s DPST will be disabled, and potential screen dimming issues will be solved.
3. Check for updates, and make sure your drivers are up to date
Microsoft releases new updates for devices from its Surface line quite often. So, there’s a chance that Microsoft or Intel pushed a new update for the Surface Pro 4 before you found this article.
Just in case, head over to Settings, select Updates & Security, and check for updates.
The same thing applies to your Surface Pro 4’s graphics card. Go to the Device manager, and check if a new version of a graphics driver for your device is available.
Update drivers automatically
It is very important to choose the right driver versions from the manufacturer’s website. In case you choose and install the wrong one, this will not only be an issue for the GPU but may harm all your system.
The tool recommended below is safe, quick, and it will update all your drivers automatically in a single action with no effort from your part.
4. Rollback to an older driver
- Go to Search, type devicemngr, and go to Device Manager.
- Under Display adapters, right-click your graphics card, and go to Properties.
- Head over to the Driver tab.
- Click Roll back driver, and follow further on-screen instructions.
- Restart your computer.
Contrary to the previous solution, the newest driver may actually do more harm than good. If it doesn’t compliment the other drivers, there could be problems.
In that case, the best decision is to just roll back to an older, working version of the driver.
 NOTE
NOTE
5. Set the DPI size
- Go to Settings.
- Head over to System and select Display.
- Now, go to Custom scaling, and you’ll see a screen like this:

- Now, choose one of these three options and save the changes:
- Smaller – 100% = 96 DPI (Pixels/Dots Per Inch)
- Medium – 125% = 120 DPI (Pixels/Dots Per Inch)
- Larger – 150% = 144 DPI (Pixels/Dots Per Inch)
Adjusting DPI (dots per inch) can also play a role in resolving screen problems on Windows laptops or PCs. This option should be set to the best settings. However, there could be some interference.
6. Update Windows
As it’s the case with all Windows-related products, Microsoft delivers updates for the Surface Pro 4 through Windows Update.
So, make sure to always keep your device up to date, because there could be some important updates you can’t afford to miss. And by important updates, we think patches and hotfixes for problems like this one.
To check for new updates, simply go to Settings, select Updates & Security, and check for updates.
7. Remove the latest Windows update
- Go to Settings.
- Head over to Updates & Security and click on Windows Update.
- Go to Update history and Uninstall updates.

- Now, find the latest update installed on your computer (you can sort updates by date), right-click it, and go to Uninstall.
- Restart your computer.
Contrary to the previous solution, it’s also possible that the very update you just installed caused the screen dimming problem on your Surface Pro 4.
Because, well, Microsoft’s updates aren’t always that perfect. To uninstall the previously installed Windows 10 update, follow the instructions above.
8. Change the refresh rate
- Go to Settings.
- Now, head over to System, select Display, and then Display Adapter Properties.
- Go to the Monitor tab.
- Make sure the Screen refresh rate is set to 60 Hz.
And finally, the last thing we’re going to try is changing the display refresh rate. Although this shouldn’t directly affect the screen, you can try it if none of the previous solutions worked.
You have nothing to lose. Follow the steps above on how to change the refresh rate of your Surface Pro 4’s display.
Screen dimming and other display issues can be very annoying, especially on portable devices like the Surface Pro 4.
We hope this article helped you to solve the screen dimming problem on your Surface Pro 4.
And if you have some other screen-related problem on your device, check out this helpful article for a potential solution.
Should you happen to know any other solutions, write it down under the comments section below so that other users can benefit from it.
Read our disclosure page to find out how can you help Windows Report sustain the editorial team. Read more


Improve this guide


User forum
7 messages