FIX: Unallocated hard drive with no data loss [Windows 10/11]
Key notes
- Due to several reasons, your hard drive may become unallocated, and you won't be able to make use of it.
- If you're not careful, you may lose the data in the drive while fixing this issue. You have to follow the steps here to the letter.
- For more troubleshooting guides for whatever error you see on your PC, visit our Troubleshooting Hub.
- You can also find DIY guides and detailed step-by-step instructions in our How-To section.
Have you ever noticed your external hard drive not appearing in the Devices and Drives section of This PC (My Computer in earlier Windows editions)?
The first thing you should do here is to reconnect the drive. If it’s still missing from the page, then troubleshooting begins.
The Device Manager can say that the connected device is working properly and healthy. However, you see that the drive is also unallocated.
Data can’t be written to unallocated space on your hard drive.
Several things can cause the unallocated hard drive issue, but before figuring out the cause, you need to learn how to fix an unallocated hard drive without losing data.
How do I fix unallocated hard drive without losing data in Windows 10?
1. Use Command Prompt
Create a new volume using commands
- Press the Windows key and search for cmd.
- Click on Command Prompt from the search results.
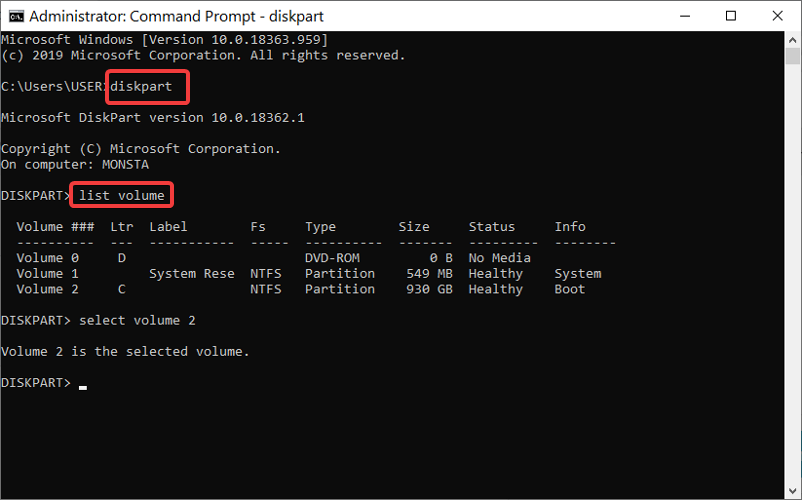
- In the Command Prompt window, enter diskpart and hit Enter.
- Type in list volume and press Enter.
- Choose your drive letter using the following command: select volume z.
NOTE: Replace z in the above command with your drive letter. - Type the following commands and hit ENTER after every line:
- delete volume
- list volume
At this point, DiskPart should create a new volume.
Note: In case the above-mentioned steps fail, follow the steps described below to create the volume manually.
Create a new volume manually
- Enter the following commands in Command Prompt and press Enter after every line to run it:
- select volume z (change the z in this command to your drive letter).
- delete volume
- delete volume override
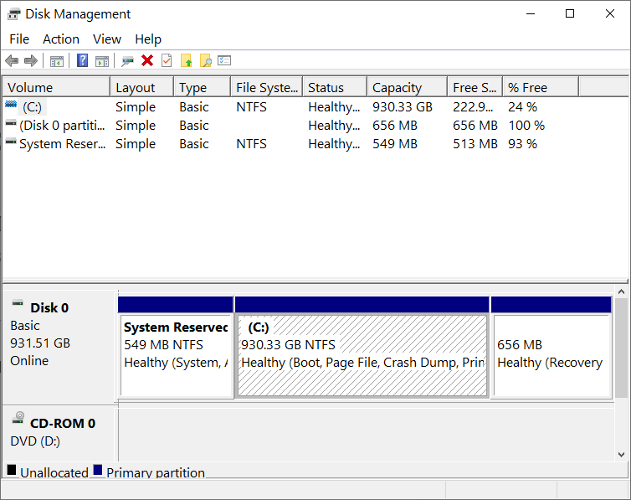
- Press the Windows key and search for disk management.
- Select Create and format hard disk partitions from the search results.
- Right-click on the unallocated hard drive.
- Select New Simple Volume and click Next.
- Set the Simple volume size in MB and hit the Next
- Select Format this volume with the following settings.
- Set the File system to NTFS, Allocation unit size to Default, and name the Volume label.
- Mark the Perform a quick format checkbox and hit Next.
- Click on the Finish button.
2. Use CHKDSK
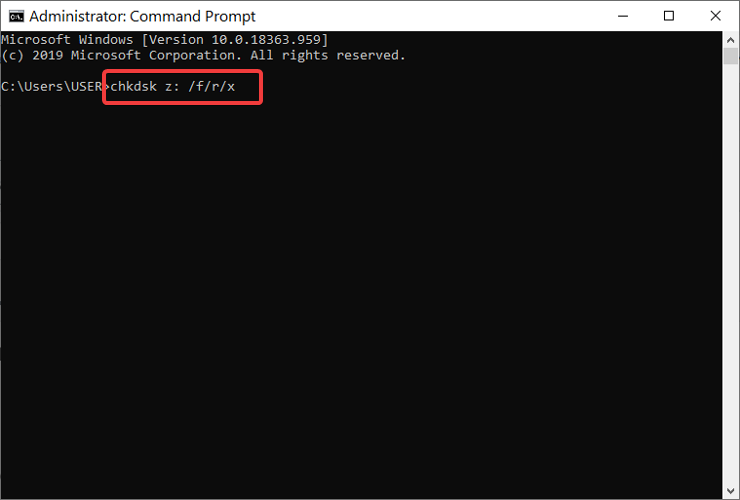
- Click on the Start Menu button and search for cmd.
- Right-click on Command Prompt and choose to Run as an administrator.
- In the Command Prompt window, input chkdsk z: /f/r/x and hit ENTER.
Note: In the command above, remember to change z to the correct drive letter of the unallocated hard drive. /f repairs drive errors, /r recovers data in bad sectors, and /x unmounts the drive to begin the process.
3. Update your hard-drive driver
- Press the Windows key + R
- Type diskmgmt.msc and hit OK.
- Expand Disk drives.
- Right-click on the unallocated hard drive and select Update Driver Software.
- Click on Search automatically for updated driver software and follow the on-screen instructions.
- Restart your machine.
If you still don’t see your drive after the reboot, return to these steps and start all over. In Step 4, select Uninstall instead of Update Driver Software.
After restarting this time around, your driver will be re-installed. This is another useful tip when learning how to fix an unallocated hard drive without losing data in Windows 10.
[wl_navigator]
Read our disclosure page to find out how can you help Windows Report sustain the editorial team. Read more


Improve this guide


User forum
1 messages