Set up Hyper-V USB Passthrough on Windows 11
Using an offline disk is the easiest option
Key notes
- Hyper-V, Microsoft’s native virtualization software, can’t access data on USB devices connected to the host system.
- This guide highlights the steps to attach a USB storage to Hyper-V.
It’s the era of Virtual Machines, and Hyper-V is often the preferred option amongst users, given its wide array of customizations and user-friendly setup. But accessing data on USB storage, or passthrough, remains a problem in Hyper-V on Windows 11.
This is all the more important considering how common VMs are, be it for performance, testing software and applications, reducing cost, and isolation from host processes.
Does Hyper-V support USB passthrough?
Hyper-V doesn’t, by default, support USB passthrough since it runs independently from the host. But you can set up passthrough on a Hyper-V VM using the native methods and with a reliable tool.
Here are a few benefits of Hyper-V USB passthrough:
- Direct access to the USB storage doesn’t affect the performance, as is the case with emulation.
- Better testing of applications and software or sharing data.
- Hyper-V USB passthrough is easy to set up.
- Most USB devices are compatible with Hyper-V passthrough.
How do I enable Hyper-V USB Passthrough on Windows 11?
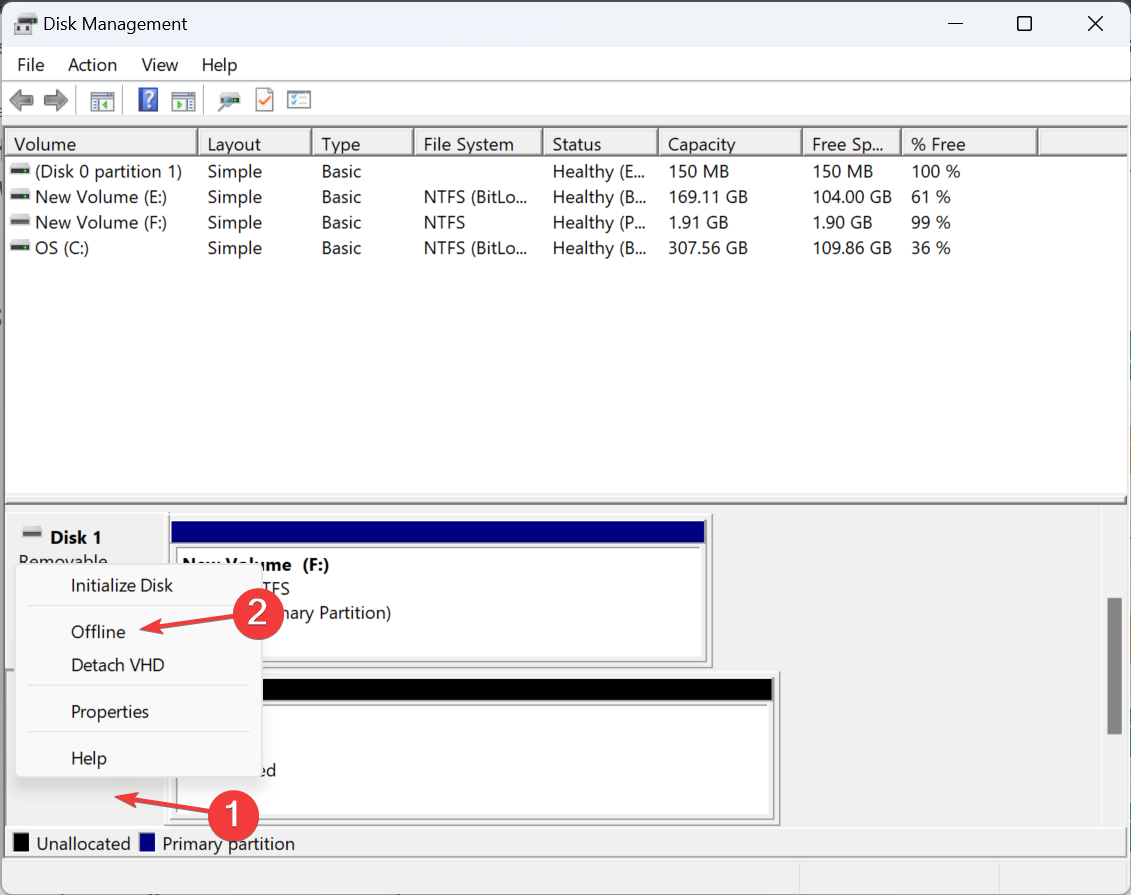
1. Set the USB disk as offline
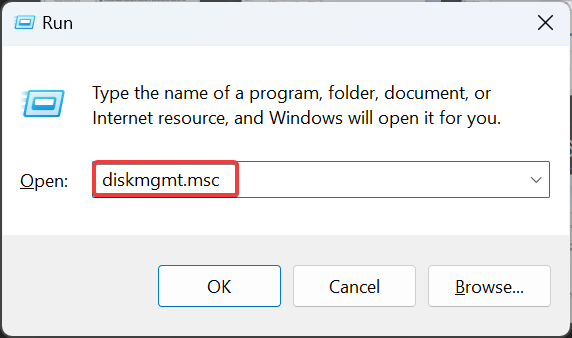
- Press Windows + R to open Run, type diskmgmt.msc, and hit Ctrl + Shift + Enter.
- Locate the USB storage, right-click on it, and select Offline from the context menu.
- Open the Hyper-V Manager, locate the list of VMs, right-click the one that needs to access data on the USB device, and select Settings.
- Go to SCSI Controller from the navigation pane, select Hard Drive from the right, and click Add.
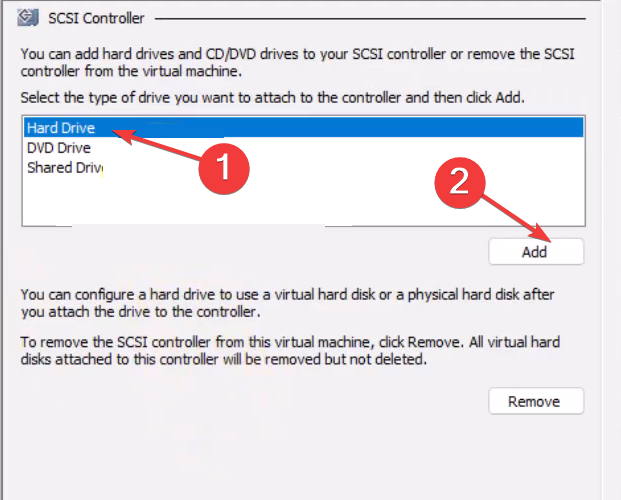
- Now, select Physical hard disk, choose your USB device from the dropdown menu, and click OK to save the changes.
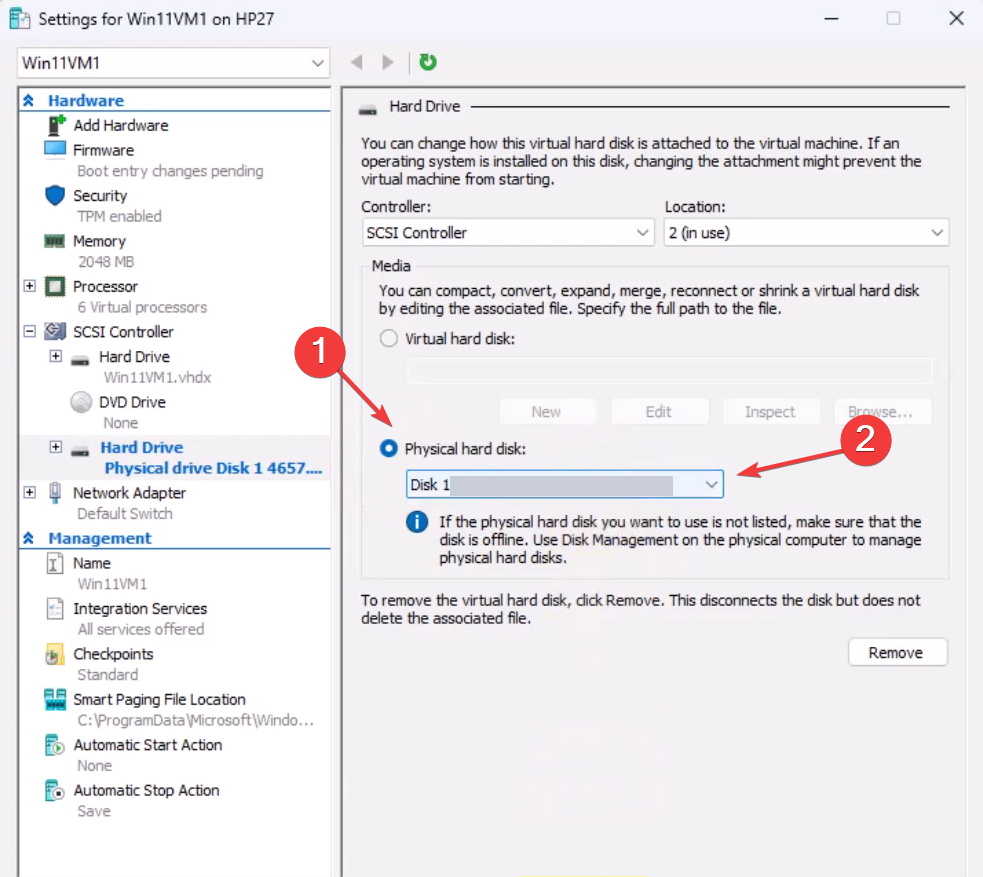
To set up passthrough with a Hyper-V USB device in Windows 11, you will need to set it offline on the host system. That’s because a disk can’t be accessed from two systems simultaneously.
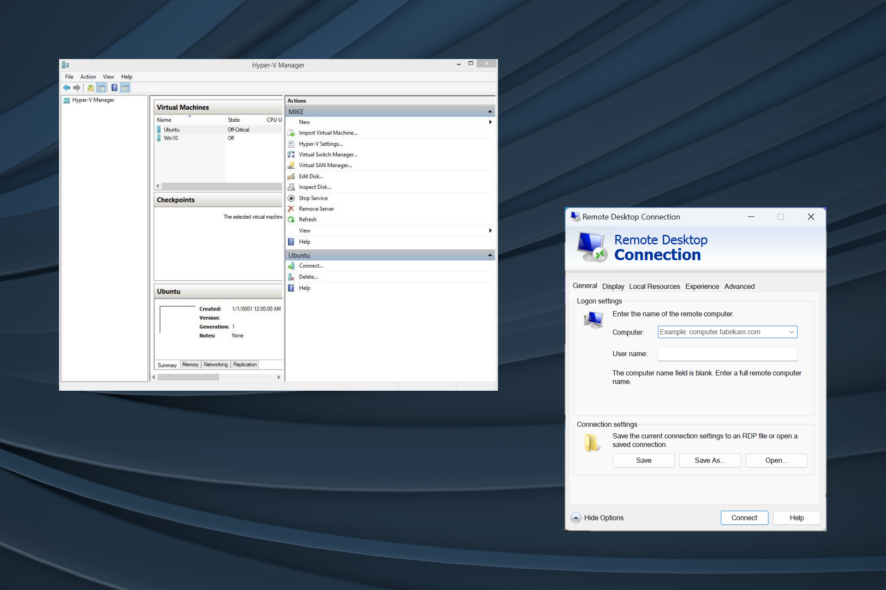
2. Enable Remote Desktop Protocol
- Press Windows + S to open Search, type Control Panel, and click on the relevant search result.
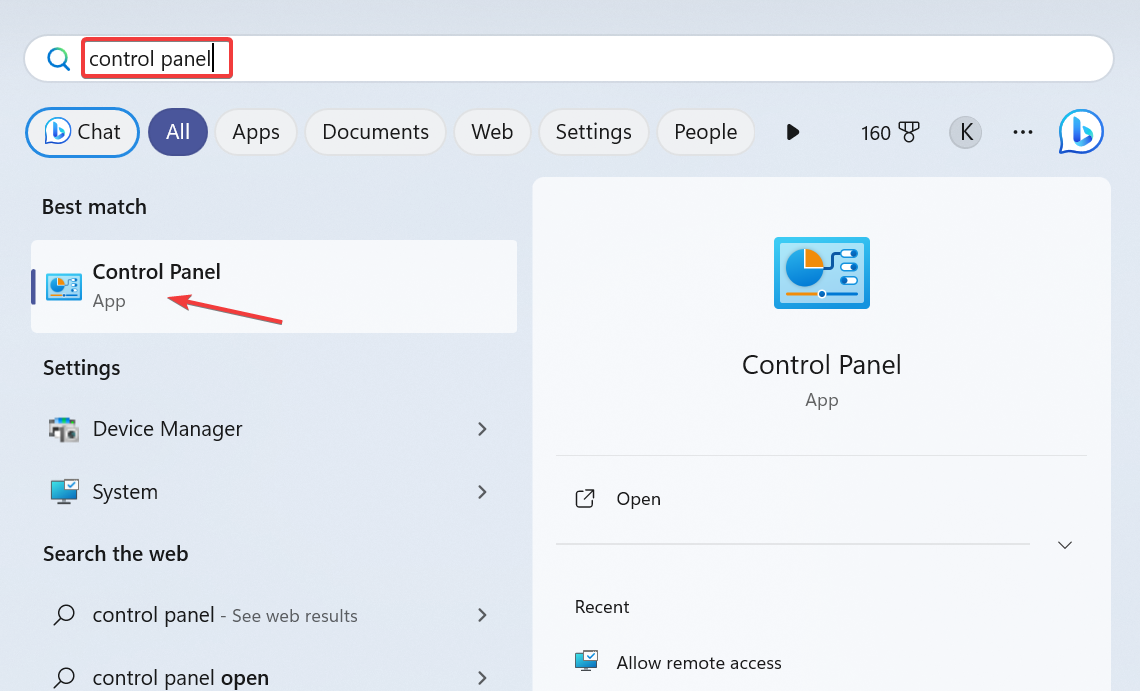
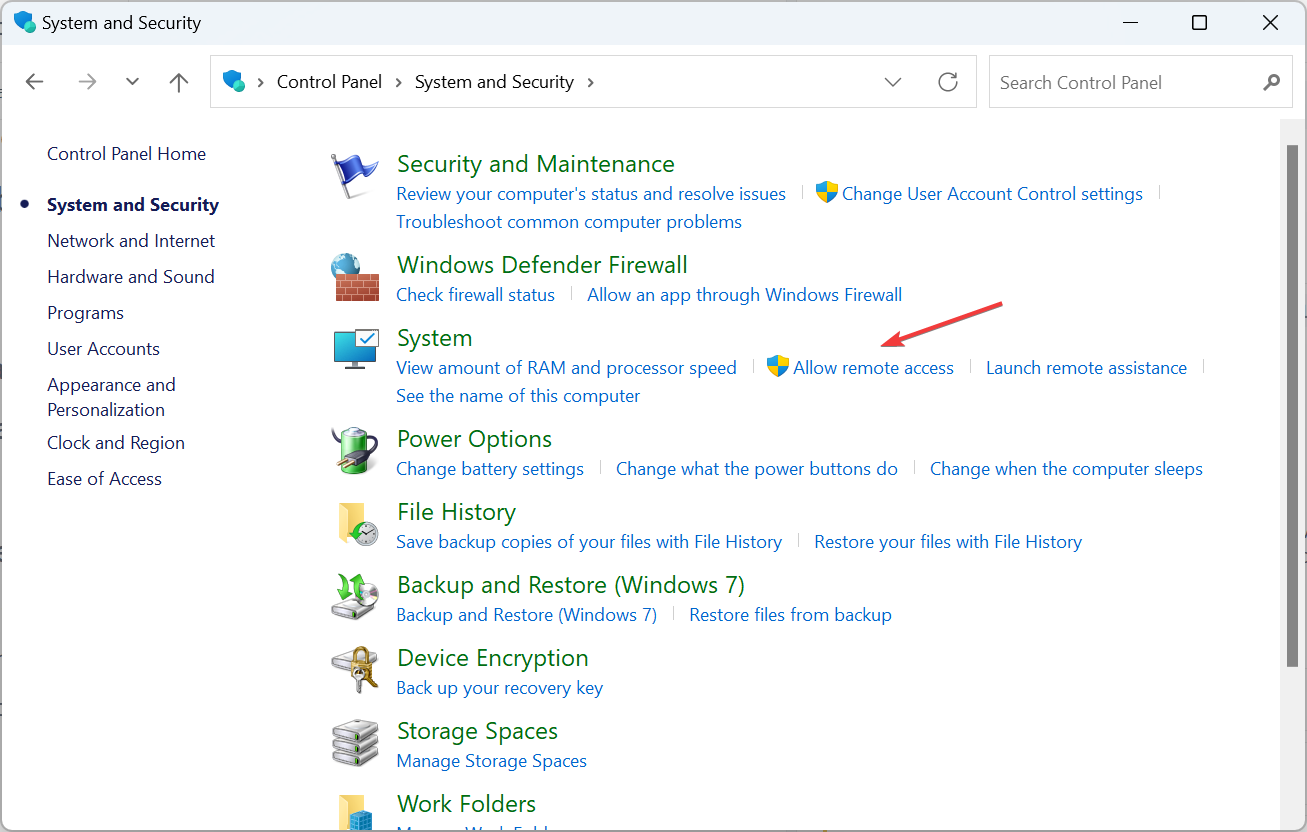
- Click System and Security.
- Choose Allow remote access under System.
- Tick the checkboxes for Allow Remote Assistance connections to this computer and Allow remote connections to this computer, then click Apply and OK to save the changes.
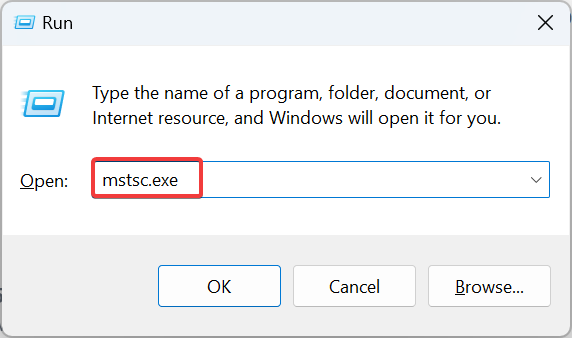
- Press Windows + R to open Run, type mstsc.exe in the text field, and hit Enter.
- Click on Show options.
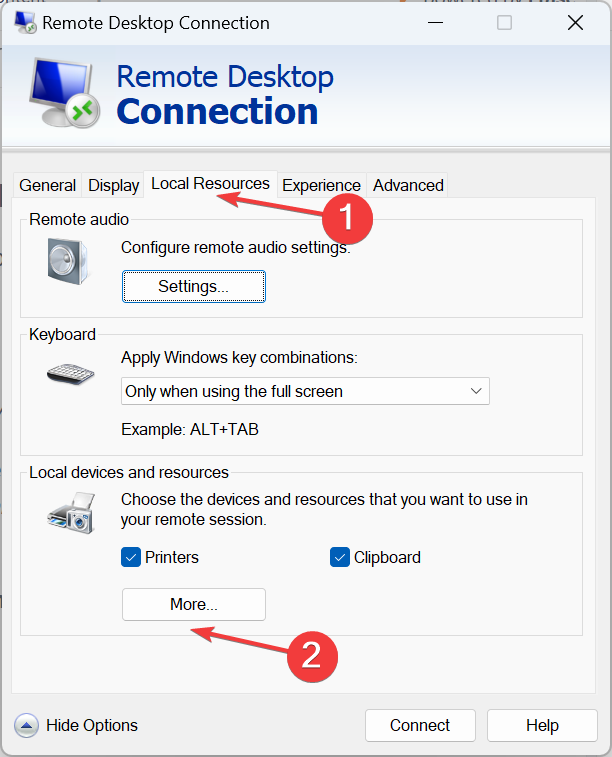
- Go to the Local Resources tab, and click the More button under Local devices and resources.

- Now, expand Drives, and select the USB storage for which you want to set up passthrough on the Hyper-V machine.
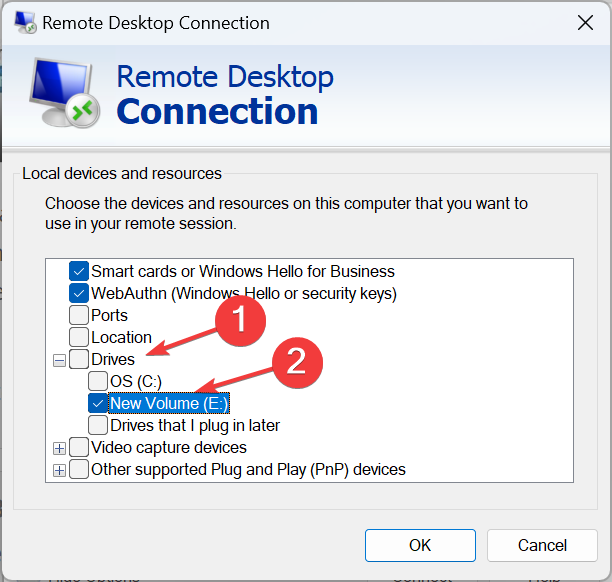
- Similarly, tick the checkbox for Other supported Plug and Play (PnP) devices, and click OK to save the changes.
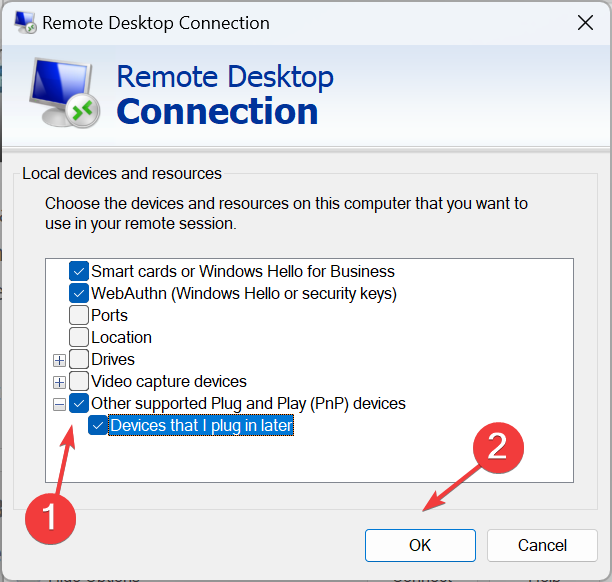
- Go to the General tab, enter the VM’s details, and click Connect at the bottom.
Remember, you can similarly set up Hyper-V USB passthrough in Windows 10. All you need is to enable the Remote Desktop.
3. Use Enhanced Session Mode
- Press Windows + S to open Search, type Hyper-V Manager in the text field, and click the relevant result.
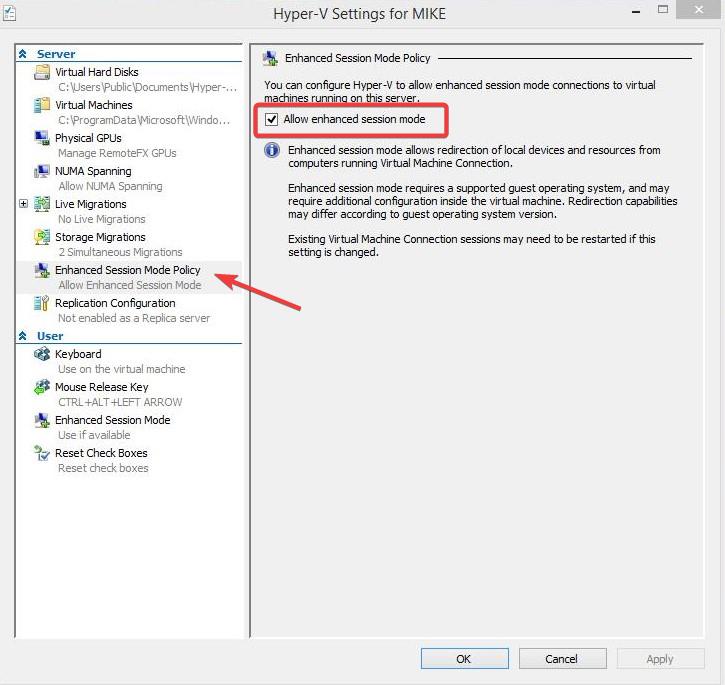
- Identify the concerned hostname, right-click on it, and select Hyper-V Settings.
- Go to Enhanced Session Mode Policy under Server from the left pane, and tick the checkbox for Allow enhanced session mode.
- Now, go to Enhanced Session Mode under User, and tick the checkbox for Use enhanced session mode.

- Turn on the VM, and click Show options in the configuration window that appears.
- Go to the Local Resources tab, and click on More under Local devices and resources.
- Select the USB drive from the list, then click OK to save the changes, and finally click Connect.
- Once the Hyper-V Virtual Machine powers on, the USB device will be accessible.
4. With a third-party software
When the built-in options don’t work or seem too much of a hassle, you can always rely on third-party software.
To just transfer data between the two or create a backup, you can use AOMEI Centralized Backupper, an easy-to-use program that allows P2V data transfer.
Or you could choose from a plethora of other options. Just make sure to scan the program files before running the software.
Limitations of Hyper-V USB passthrough
- It poses a security risk to all three, the Hyper-V Virtual Machine, the Hyper-V host, and the USB storage.
- The host device may witness a reduced performance.
- Not all USB devices support Hyper-V passthrough, so compatibility can be an issue.
- Often, you need additional drivers to set up USB passthrough.
You now know how to enable USB passthrough in Hyper-V on Windows 11 and the previous iterations. For seamless connectivity, it’s recommended that you add a network adapter in Hyper-V, though the task is usually handled by administrators.
As a matter of fact, you can also boot VMware from a USB drive, something most users don’t know.
You can set up Hyper-V on Windows Home using a quick script and then enable USB passthrough in several ways. Learn how to install Hyper-V on Windows Home by following this step by step guide how to install Hyper-V on Windows Home.
If you have any queries, drop a comment below, and we will get back to you as soon as possible.
Read our disclosure page to find out how can you help Windows Report sustain the editorial team. Read more


Improve this guide


User forum
0 messages