FIX: IPVanish Not Working with Netflix [6 Tested Methods]
The streaming service has restricted the IP address of your VPN server
4 min. read
Updated on
Read our disclosure page to find out how can you help Windows Report sustain the editorial team. Read more
Key notes
- If IPVanish is suddenly not working with Netflix anymore, there are some things you can try to fix it.
- Netflix constantly tries to block VPN users from accessing its service due to geo-restrictions.
- Often times, you can solve the issue by simply connecting to a different VPN server or try another protocol.
- However, it's also possible that IPVanish stopped working with Netflix due to changes on your system.
IPVanish not working with Netflix might seem like a minor inconvenience. However, it’s a known fact that Netflix users turned to VPN services precisely for their Netflix-unblocking capabilities.
Therefore, noticing that IPVanish stopped working on Netflix can be sort of a deal-breaker.
Fortunately, we might be able to teach you a trick or two to fix this issue without breaking a sweat.
How can I fix IPVanish not working with Netflix?
Try another server
One of the most common misconceptions about VPNs is that all of their servers work the same way.
This usually leads to customer disappointment when they discover that in reality, things are wildly different.
For instance, connecting to a VPN server in Germany wouldn’t be able to unblock US Netflix libraries, or might even render Netflix entirely inaccessible.
To avoid situations like that, make sure you connect to appropriate servers (e.g. US servers for US Netflix).
If you notice that the server you’re on doesn’t work as it should, simply disconnect from it and pick another one.
It doesn’t take too long and might save you a lot of headaches.
Clear cached data
Having cached data build-ups on your web browser may trigger some connectivity/functionality issues with some websites, including Netflix.
This might lead you to believe that IPVanish might not be working with Netflix, when in fact your web browser triggers this issue.
To avoid this situation clearing your web browser is usually more than sufficient. Here’s how to do this on Chrome:
- Click the More button (three dots stacked vertically)
- Select Settings
- Scroll down until you see the Privacy and security section
- In this section click the Clear browsing data button
- Select Cookies and Cached images and files
- Click Clear data
- Close and reopen Chrome
- Connect to IPVanish
- Head to Netflix
- Check if you’re still experiencing connection issues
If you’re using the Netflix Windows 10 app, simply uninstall the app from your computer and reinstall it.
Uninstalling the app should also remove any conflicting cached data as well.
After you reinstall it, reconnect to IPVanish and try using the app once more.
Log into Netflix without VPN
- Log out of your Netflix account
- Disconnect from IPVanish
- Restart your web browser
- Optional: clear your browser data (check method #2 above)
- Access Netflix once more
- Log into your account (without being connected to a VPN)
- Reconnect to the IPVanish VPN server
- Check if you can use Netflix as intended
For some reason, Netflix can have a hard time processing VPN-based log-in requests from time to time.
If that’s the case, disconnecting from IPVanish before you log in to your Netflix account should do the trick.
After you manage to log in, you should be able to use Netflix with IPVanish as usual.
Change and flush DNS
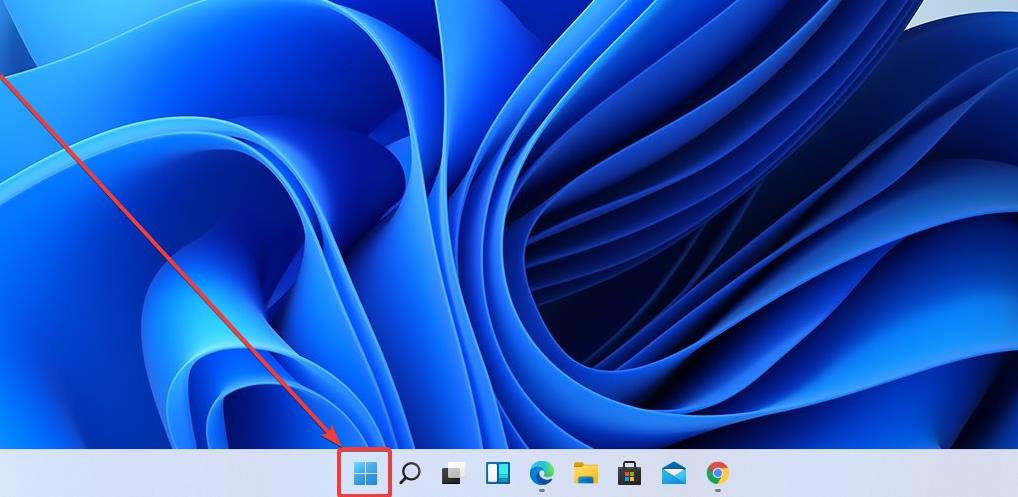
1. Right-click your Start Menu.
2. Select Network Connections.
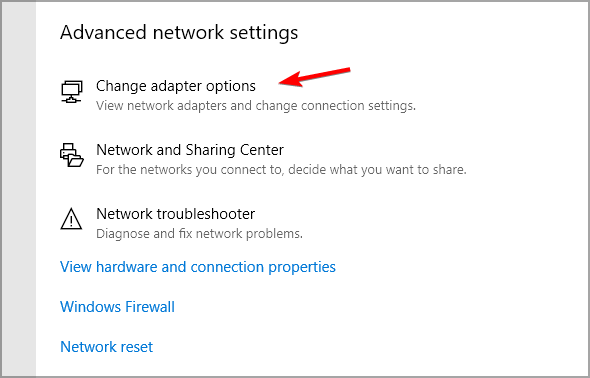
3. Click the Change adapter options button.
4. Right-click your default Internet connection.
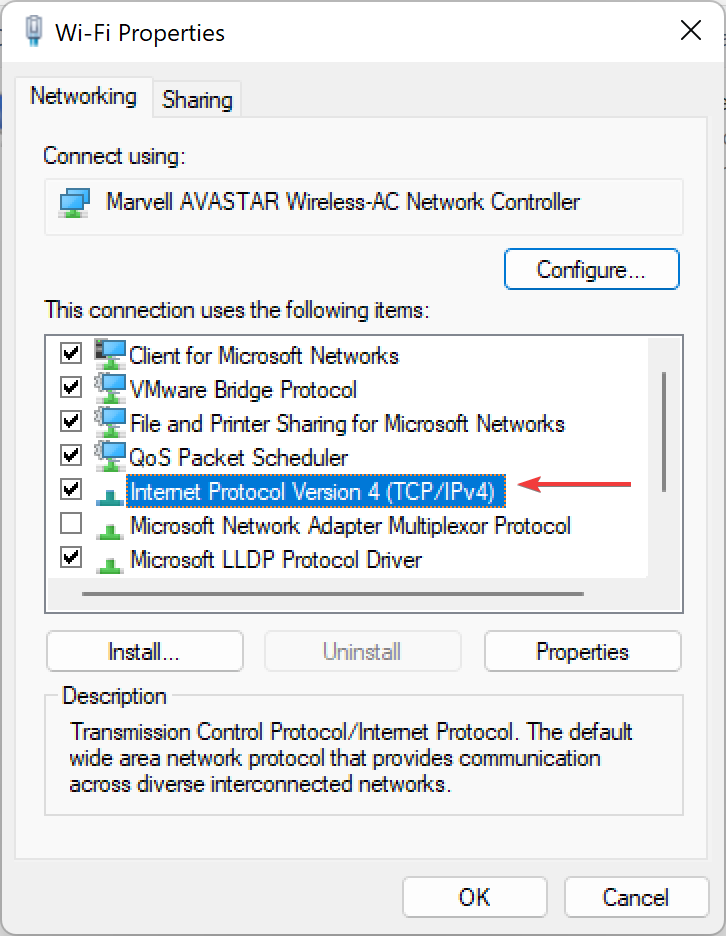
5. Select Properties.
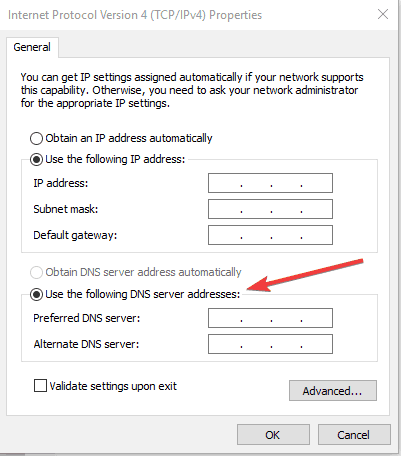
6. Highlight Internet Protocol Version 4 (TCP/IPv4).
7. Click the Properties button.
8. Select the Use the following DNS server addresses radio button.
9. Use 8.8.8.8 and 8.8.4.4 in the Preferred, respectively Alternate DNS server fields.
10. Click the OK button to confirm your settings.
-
11. Now you need to flush the DNS records. To start off, press the Start button on your taskbar to open Windows Search.
12. Type cmd in the search box and right-click on the first result, then select Run as Administrator.
13. Once Command Prompt opens, type the commands below, each followed by the Enter key on your keyboard:
ipconfig /flushdnsipconfig /registerdnsipconfig /releaseipconfig /renewnetsh winsock reset14. Restart your PC.
If your Internet Service appears unreliable, switching your DNS service might be a way to see what is the problem. If your ISP is bad at maintaining its DNS servers up and operating with no hitches, you may encounter slow uploads and service while the DNS request gets stuck.
Unfortunately, you still have to flush any lingering old DNS data from your PC, but we’ve got you covered.
This technique helps you change your DNS from your ISP-assigned one. Oftentimes, ISP-assigned DNS addresses are restricted.
Turning to a public one such as Google Public DNS (the one we used above) usually circumvents these limitations.
After your PC finishes its boot sequence, make sure to connect to IPVanish and check if it works with Netflix.
If the issue was caused by cached DNS data, everything should be taken care of now, and Netflix should now work with IPVanish.
Switch protocols
Another misconception is that VPN protocols are all the same, when in fact they’re wildly different.
Even OpenVPN TCP is different from OpenVPN UDP. Not a coincidence is the fact that these two are the most used VPN protocols.
However, UDP is better when it comes to streaming video content.
Therefore, if you notice that IPVanish is not working with Netflix, you might want to change the protocol.
By default, IPVanish uses IKEv2, so you might want to go through all protocols until you reach one that works for you.
Use a different VPN

- Buy a new VPN subscription (we recommend Private Internet Access)
- Download and install the new VPN on your PC
- Launch the VPN client
- Log in to your account
- Connect to an appropriate server (e.g. US server for US Netflix)
- Enjoy streaming your favorite content on Netflix
Private Internet Access is a great VPN when it comes to streaming video content.
Besides its ability to gracefully dodge geo-restrictions, PIA also offers more than 22,000 fast servers all around the world.
Check out PIA’s main features:
- More than 22,000 high-speed servers worldwide
- Strict no-logging policy
- Built-in kill switch
- Military-grade encryption
- Can unblock various websites (e.g. Netflix, Amazon Prime)
- Private DNS on all its servers
All things considered, if IPVanish seems to be not working with Netflix any longer, know that there are some things you could do about it.
We recommend that you run through all our suggested fixes and try them one by one.
Try not to skip any of them, as each method targets specific causes for your IPVanish-Netflix incompatibility.



User forum
0 messages