Fix: Last USB Device you Connected to Computer Malfunctioned
Get your USB device working again in no time

Many of our readers received the message USB device not recognized with the description The last USB device you connected to this computer malfunctioned. In other variants of this error, you may receive a recommendation: Try reconnecting the device. If Windows still does not recognize it, your device may not be working properly.
The error is pretty vague because this could mean many things, and it doesn’t pinpoint the cause of the problem. Before going into any of these fixes, reconnect your USB device, as a bad connection could trigger the problem. You may also want to restart your computer, as a reboot will force many conflicting processes to end.
What can I do when getting The last USB device you connected to this computer malfunctioned?
1. Update the USB driver
- Click the Search icon from the taskbar, type device manager, and click on the app from the results.

- Select the Universal Serial Bus controllers section to expand it, right-click the first controller, and select Update driver.

- Now choose the first option, Search automatically for drivers.

- If the system finds a new driver, it will install it. If you already have the latest one, you can click on the Search for updated drivers on Windows Update.

- That will bring you to the Windows Update menu. Click on Advanced options.

- Now select Optional updates. If you find any updates related to drivers, select and install them.

Unfortunately, you will have to perform this procedure for all the USB drivers you can find in the Universal Serial Bus controllers section.
Of course, the last part with the Windows Update will be required only once. After you install the latest drivers, the USB device should start working again.
If the above procedure seems too complicated for you, do not hesitate to use a dedicated driver updating tool.
2. Change the USB power settings
- Click the Seach icon on the taskbar, type control panel, and select the app from the results.

- Choose Power Options.

- Click on Change plan settings for your power plan.
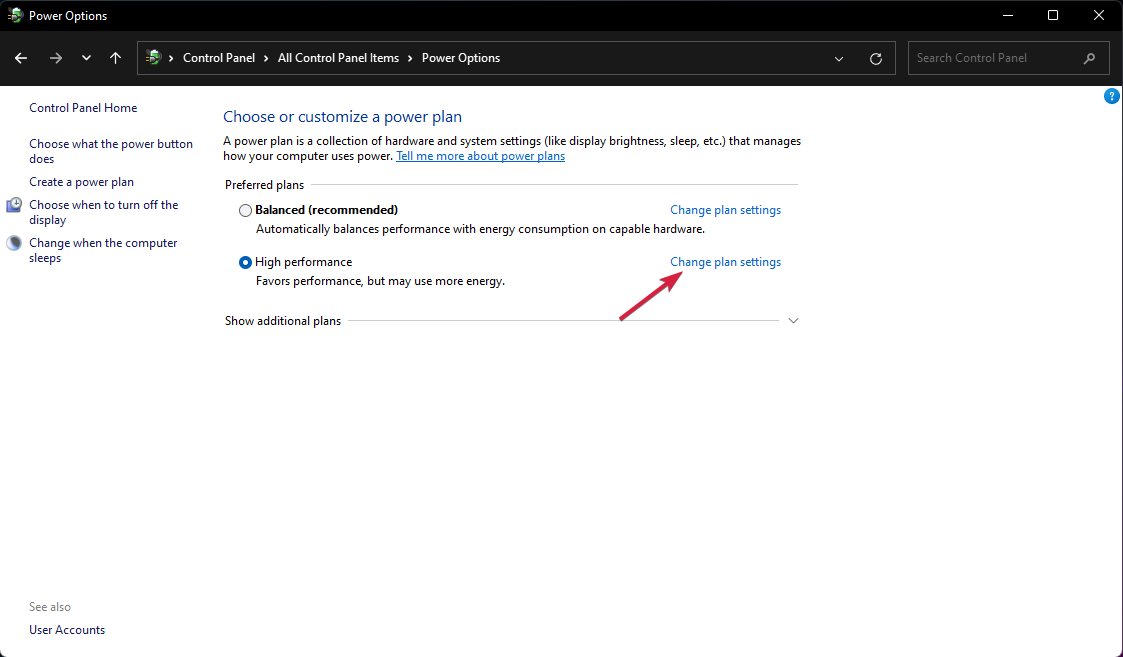
- Now select Change advanced power settings.
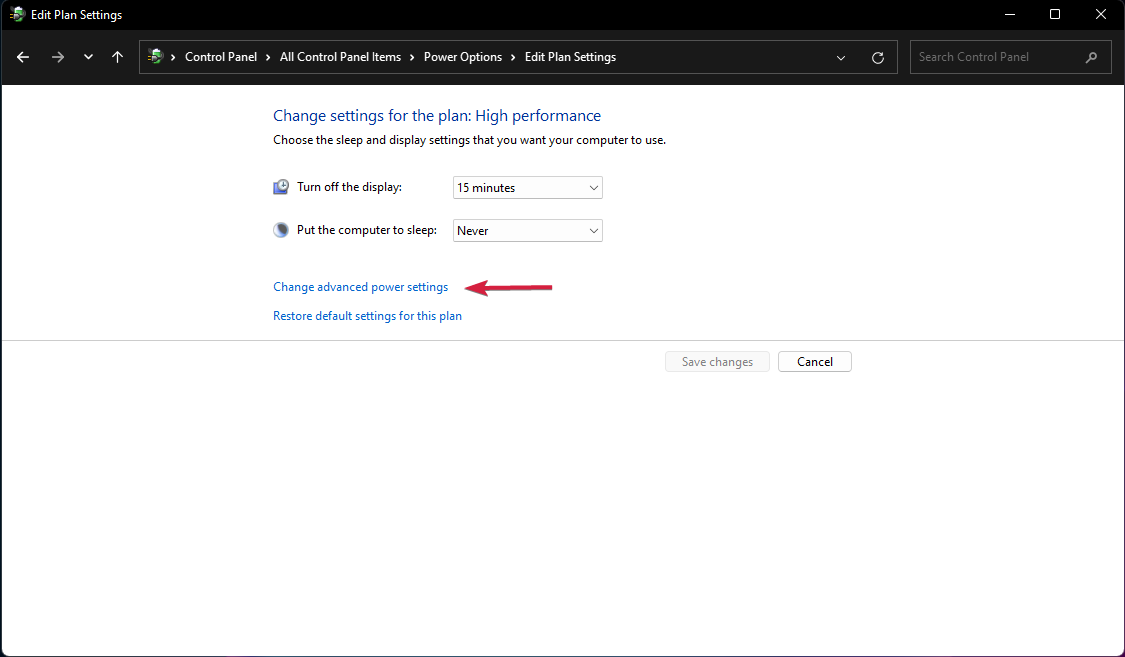
- Next, click on the USB settings, extend the USB selective suspend settings, and change its value to Disabled.

3. Uninstall the USB drivers
- Click on the Search icon on the taskbar, type device manager, and click on the app from the results.

- Expand the Universal Serial Bus controllers section, then look if any of the drivers have a yellow question mark symbol, right-click on it, and select Uninstall device.

- Restart your PC, and the system will automatically install the driver.
4. Use the USB troubleshooter
- Right-click the Start button and select Terminal (Admin).

- Type or paste the following command and press Enter to run it:
msdt.exe -id devicediagnostic
- This will start the Hardware and Devices troubleshooter, so hit Next.

- The system will find any possible problems with your hardware and if it does, click on Apply this fix.

- You will be prompted to restart your device.
This should solve the problem of the last USB device you connected to this computer malfunctioned.
6. Add the printer manually
- Select the Search icon from the taskbar, type control panel, and open the app from the results.

- Now choose Devices and Printers.

- Click on Add a printer.

- Now select The printer I want isn’t listed.

- Check the Add a local printer box, then click Next.

- Select the right USB port for your printer and hit Next but make sure that the printer is connected to the PC first.

- Now choose the brand and model of the printer. If you can’t find it, click on the Windows Update button. The system will update the list.

- After the list gets populated, select your printer and mode, then click on Next.

- Enter a name for the printer, or leave the default one, and hit Next.

- The printer will be installed, and you will need to restart your PC.
If the problematic USB device is a printer, you can try installing it manually. That will set the correct driver for the product and solve the problem of the last USB device you connected to this computer malfunctioned.
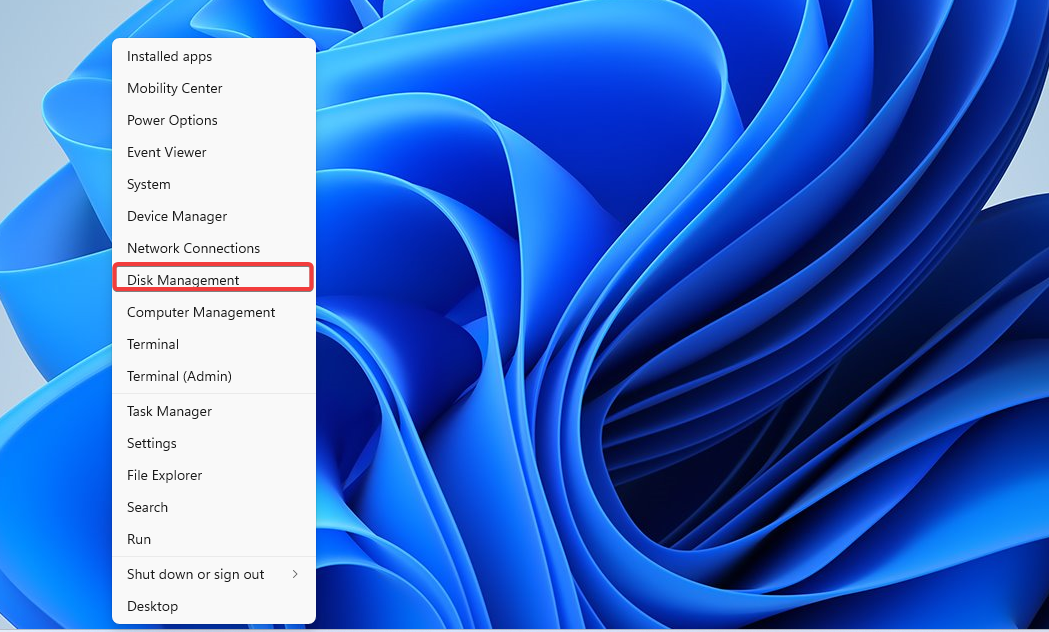
7. Provide a drive letter to the USB device
- Right-click Start and select Disk Management from the list.
- If the drive has unallocated space, right-click on it and select New Simple Volume.

- Click Next in the new window to start the wizard.

- Set the volume capacity or leave it to maximum and choose Next again.

- Now assign a drive letter and hit Next.

- If the drive is empty, choose to format it and select Next. If you have data on that drive, select the first option, Do not format this volume.

- Lastly, click Finish when the process is over.

- If the drive has already allocated space, right-click on it and select Change Drive Letter and Paths.

- Click the Add button.

- Press the OK button.

Now that the drive has an allocated space and a drive letter, you can see it in Windows without problems.
What does The last USB device you connected to this computer malfunctioned mean?
Speaking of possible causes, let’s outline some of the most common issues that produce this error message.
- Malfunctioning or wrong drivers – As you might know, driver issues are the most common culprits for many errors in Windows. If the system identifies your USB device incorrectly, it will also install the wrong driver, which will not help.
- The USB drive is not partitioned – Regarding an external hard drive, if it’s not partitioned and doesn’t have a drive letter, you won’t be able to see it in Windows. You can also have issues with the USB not working in Windows 10.
- Malfunctioning USB ports – Like any other component, USB ports can fail. That is a common occurrence, but you can fix that by switching to another one.
However, unfortunately, many other possible software problems may prevent the system from recognizing a USB device, but our solutions should come in handy.
They will help you if you encounter the issue of the last USB device you connected to this computer malfunctioned, for a mouse, keyboard, Xbox controller, Quest 2, Samsung devices, and other manufacturers.
This concludes our guide on what to do if the USB device was not recognized or malfunctioned in Windows 11, and we hope now it’s all working fine.
If you still have problems with your device, check out our piece on what to do if Windows 11 is not recognizing your USB device.
Use the comments area below to let us know which solution worked for you too.
Read our disclosure page to find out how can you help Windows Report sustain the editorial team. Read more


Improve this guide


User forum
0 messages